Consistent Dropped Frames Only During Playback
Symptom #1: Dropped Frames with One Particular Clip"I am getting dropped frames warnings when trying to capture one particular clip in a logging bin filled with offline clips. All other clips capture fine. There is no timecode break on the tape." BackgroundOne other cause of consistent dropped frames during is the long frame, which causes dropped frames warnings even though no frames are actually dropped. Unlike with a clip that has true dropped frames, there is nothing technically wrong with a clip containing a long frame. A long frame is simply a video frame that lasts longer than a frame is supposed to, according to the format of video you are using. For instance, say you were using the DV NTSC codec, which should have exactly 29.97 frames per second, but FCP captured a frame with the frame length of 3 normal frames. Such a frame length may sound odd, but keep in mind that there is no limit to the configuration of digital video. There could be a frame rate of 15, 24, 29.97, or any other rate the system requires. Thus, if you end up with a long frame, FCP will use it. However, you will see that some of the frames appear to be missing, giving the appearance of a lag or still image on some of the frames. Obviously, long frames aren't something you want when you capture video, but they do occur in rare instances. If you've enabled the option on the General tab called Abort Capture On Dropped Frames, long frames (or other dropped frame incidents) that do occur will be aborted with a dropped frames warning message. Otherwise, FCP will capture long frames when they occurand the clips in which they are captured will generate the same long frames each time you try to capture them with the same In and Out points. SolutionSince legitimate long frame problems caused by a QuickTime fluke are almost always the first frame of the capture, you can avoid such problems by using these techniques:
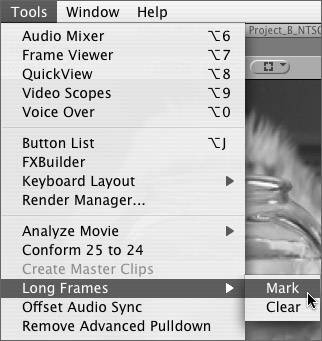
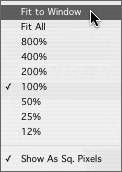
If you aren't sure whether a clip has a long frame, you can manually test the clip with a command in the Tools menu.
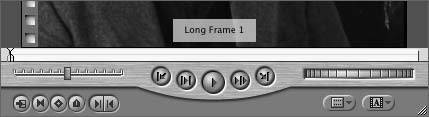
If there are long frames in a clip, FCP will identify the long frame with a marker labeled Long Frame, followed by the number in order of occurrence. You can remove the marker by using the normal marker-removing method or by choosing Tools > Long Frames > Clear. If there is more than one long frame in the clip, or if the long frame occurs anywhere other than the very beginning of the clip, adjust the In and Out points and attempt a recapture. Symptom #2: Picture Is Stuck on a Single Frame"My hardware and settings are all appropriate, and I'm getting a signal out to my FireWire DV deck, but when I attempt playback, the picture is stuck on a single frame." BackgroundFCP is extremely flexible and allows you to design and save the layout of your onscreen workspace according to your own private whims. But certain window choices make it difficult for FCP to deliver video and audio reliably and at the highest qualityand it's very easy to make mistakes in this area. So, if you encounter odd playback issues, check that window position/scale or incompatible windows aren't causing the interference. One of the most important rules to know about FCP is that it can't output video or audio at the appropriate frame rate when there are scroll bars in the Viewer or Canvas. Scroll bars will appear any time the Viewer or Canvas is zoomed in, making it impossible to fit the entire video frame in the window. If your Viewer or Canvas tabs have scroll bars in the frame, FCP will drop frames on playback. Video output to FireWire DV or capture cards will freeze on a frame as the playhead happily moves along the Timeline. The Viewer or Canvas will play back at a severely reduced frame rate, depending on how far the window is zoomed into the frame. Worse still, this sort of frame-dropping doesn't register as a dropped frame in playback, so you just end up with weird choppy output. 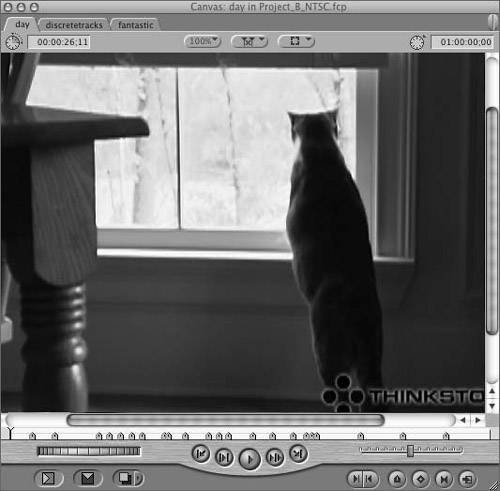 SolutionTo avoid this situation, always look out for scroll bars in the Canvas or the Video tab of the Viewer. If you see them, press Shift-Z, the keyboard shortcut to Fit to Window. Fit to Window, a command found in the Viewer Video tab and the Canvas scale pop-up menu, always scales the contents of any FCP window such that the entire contents are visible and scroll bars aren't present. If you are zooming in and out for effects work, get used to using Zoom In (Cmd-+) and Shift-Z, rather than Zoom Out (Cmd-), since Fit to Window will always return the window's content to its optimal size in the window frame. Note You can inadvertently end up with scroll bars by loading a Window Layout preset, either from the FCP native set or one that you have created and saved in your custom settings. Although these presets rearrange the windows to the layout you choose, they don't perform a Fit to Window. If your windows weren't already set for Fit to Window before recalling the window layout, chances are you will immediately end up with scroll bars. Symptom #3: Dropped Frames at a Specific Clip or Location in a Sequence"I know that all my settings are correct for what I'm trying to do, but I consistently get dropped frames warnings during certain sections of my sequences." "If I play back my sequence with the playhead in the Timeline window, it plays back fine, but Edit to Tape and Print to Video always drops frames." BackgroundYou can probably think of a dozen ways to make a particular clip more interesting. Using all of those ideas may require more than your computer can handle in real time. You can easily step back in time by first loading clips into the Viewer and then deselecting effects in the Filters tab. Move back to the Timeline and play back your sequence again. Forcing a Render All (Option-R) is also a good way to render material that your computer would otherwise try to play back in real time. It is also possible for clips, media files, and even render files to become corrupted for unknown reasons. It happens rarely, but when it does, your sequence will not function properly when the offending file is being processed. In theory, any workstation that runs FCP can deliver at least eight tracks of audio in a sequence without extra hardware support, as long as there are no audio filters applied to the tracks. No matter what you have in those tracks, FCP should be able to mix them all down into the number of tracks your current audio output device can handle. Unfortunately, that theory doesn't always hold true in the real world. If you have a less-than-optimal situation (such as a lack of RAM or slow processors), in which FCP can't deliver as many tracks as it should, you can end up dropping frames. Several factors can contribute to this type of less-than-optimal situation. A storage drive that is filled beyond 85 percent of capacity could be a risk factor. Another might be an overfilled and fragmented drive that prevents FCP from simultaneously accessing several different media files to mix down several audio tracks. Likewise, if the audio clips in your audio tracks are very short, and the sequence is composed of very fast cuts, your drives may not be able to jump back and forth quickly enough. FCP believes that it can mix the tracks so it doesn't give you a red render line, but you get a dropped frames report during playback. SolutionTo rule out a corrupted render file, you can use the Render Manager to delete render files you think may be corrupt and then re-render the sequence. If you suspect a corrupt clip or media file, open the clip into the Viewer from the Timeline and play back the clip. If your findings are inconclusive, with your Viewer active, choose Export As QuickTime Movie. Then re-import your clip into your sequence. You can also go back to the original source media if all other troubleshooting fails. In order to check whether your dropped frames are related to audio mixdown troubles, look at the number of clips and the number of audio tracks in the part of the sequence where the dropped frames warning occurredand consider what you're asking FCP and your scratch disk drives to deliver. A lot of short, fast cuts spread over several different tracks might explain the dropped frames report. Fortunately, this situation is easy to fix. All you have to do is force an audio mixdown of the affected area of the sequence, as follows:
When you perform an audio mixdown, FCP generates an audio render file for the range of frames you specify. When the sequence is played back, FCP doesn't have to access and mix five different audio files together simultaneously in real time; it just reads the single, mixed-down render file, and your dropped frames report disappears. Note It's usually a good idea to perform an audio mixdown for a sequence prior to performing an Edit to Tape or Print to Video operation, especially on sequences over an hour long, where the interruption of output due to a dropped frames warning at minute 90 means you have to output the whole thing to tape again! |
EAN: N/A
Pages: 205