Flylib.com

Books Software


Section 80. Setting Margins and Columns


#80. Setting Margins and Columns

When you create a new document, you can specify the number of columns, the gutter width between columns, and a margin for each page edge. Column and margin settings are used to display guidelines that help you position text frames, graphic frames , and other elements on pages. The settings you specify in the New Document dialog box are used for all document pages unless you change the column and margin settings for the document's master page, or you change the settings for individual document pages.

Showing and Hiding Margin and Column Guides

To turn off the display of margin and column guides, choose View > Grids & Guides > Hide Guides. You can also hide all guidelines by clicking the Preview button in the toolbox.


Before you can change column and margin settings for a master page or specific document pages, you must first selector target the pages you want to change in the Pages palette. To target both pages of a facing -page master page, click the name of the master page. To target only the verso or recto page of a facing-page master page, click the left or right master page thumbnail. To target a document page, click its thumbnail. To target a range of documents or master pages, click the thumbnail of the first page, and then Shift-click the thumbnail of the last page. Command-click (Mac OS) or Ctrl-click (Windows) to select multiple, nonsequential master or document pages.

Margins, Bleeds, and Printing

It's easy to confuse the margin guides with the outside edge of a page or spread. Margin guides are displayed in color , whereas page edges are black. You'll probably place most elements within the margin guides, but there's no restriction on placing objects between the margin guides and the edge of the page. Objects that extend beyond the edge of the page are referred to as bleed objects . Most desktop printers cannot print to the edge of the page, which means that bleed objects get clipped.


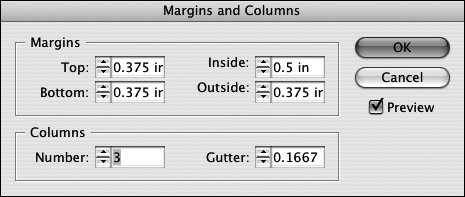
After you've targeted the pages whose column and margin settings you want to change, choose Layout > Margins and Columns. In the Margins and Columns dialog box ( Figure 80 ), change the margin and column settings.

Figure 80. The settings you apply in the Margins and Columns dialog box are applied to the pages targeted in the Pages palette.


If you change the settings in the Margins and Columns dialog box when no documents are open , the modified settings become the default settings used in the New Document dialog box.


#81. Using Guides and Grids

If you like to use guidelines when you lay out pages, you may need more than margin and column guides. If that's the case, you can use ruler guides, a document-wide grid, or a combination of both. For example, you can quickly divide a page into quadrants by adding a vertical ruler guide and a horizontal ruler guide that intersect at the center of the page. Or you can use a document-wide baseline grid for aligning text and objects across columns . While it's nice to have so many options when it comes to adding guidelines, you probably won't use them all.

Snapping Objects to Guides and Grids

If the Snap to Guides and Snap to Document Grid commands (View > Grids & Guides) are checked, object edges and centerpoints will snap to ruler guides and gridlines, respectively, when you drag objects near them. The Snap to Zone value in the Guides & Pasteboard panel in the Preferences dialog box determines the distance at which an object will snap to a ruler guide or gridline.


Ruler guides and grids are similar in that they don't print (unless you want to print them), and they help you align objects. They're also different in some ways:

  • Ruler guides are much like objects. You can select them with the Selection tools, move, and delete them, and they're layer specific. Ruler guides can be vertical or horizontal only.

  • Gridlines are document-wide and cannot be selected or modified.

You can create ruler guides in two ways: manually by clicking and dragging a ruler or automatically using the Create Guides command (Layout menu).

  • To create a ruler guide manually, click the ruler along the left or top edge of the document window and drag the pointer onto a page or the pasteboard. (Choose View > Show Rulers if the rulers are not showing.) If you click the vertical ruler along the left edge of the document window, you create a vertical ruler guide. If you click the horizontal ruler at the top of the document window, you create a horizontal ruler guide. Release the mouse when the pointer is on a page to create a page guide that spans the page. Release the mouse when the pointer is on the pasteboard to create a spread guide that spans the page or spread and pasteboard.

  • To create ruler guides automatically, select the document or master pages to which you want to add guides in the Pages palette, and then choose Layout > Create Guides. The controls in the Create Guides dialog box ( Figure 81a ) let you create horizontal guides (Rows), vertical ruler guides (Columns), or both. If you don't specify a Gutter value, a single guide is placed for each row/column. If you specify a Gutter value, it's used as the space between a pair of ruler guides. Other options let you fit the guides within the margins or the page and remove existing ruler guides.

    Figure 81a. Use the controls in the Create Guides dialog box to divide a page into rows and columns using ruler guides.

Regardless of the method you use to create ruler guides, you can select, move, and delete them just like objects. You can also copy ruler guides into a Library and between pages.

Guides and Layers

When you create ruler guides, they're placed on the layer that's currently selected in the Layers palette. You can hide a layer's ruler guides by double-clicking the layer in the Layers palette and unchecking Show Guides in the Layer Options dialog box.


If you like to use a grid when you lay out pages, InDesign offers two options:

  • A baseline grid is a set of evenly spaced horizontal lines that help align text and objects across multiple columns.

  • A document grid is a set of evenly spaced horizontal and vertical lines that resembles graph paper.

The Baseline Grid controls in the Grids panel in the Preferences dialog box ( Figure 81b ) let you modify a document's baseline grid. You can specify the Color, Start point, Increment, and View Threshold. The Show/Hide Baseline Grid command (View > Grids & Guides) lets you control the display of the baseline grid. (Note: The Align to Baseline Grid button in the Paragraph palette let's you align the baselines of selected paragraphs to the baseline grid.)

Text Frame-specific Baseline Grids

A new feature in InDesign CS2 lets you add a baseline grid to individual text frames . A frame-based baseline grid makes it easy to align baselines of text across multiple columns within a frame. To add a baseline grid to a text frame, select the frame, and then choose Object > Text Frame Options. Use the controls in the Baseline Options panel in the Text Frame Options dialog box to control the placement of the gridlines. The Show/Hide Baseline Grid command (View > Grids & Guides) controls the display of frame-based baseline grids.


{% if main.adsdop %}{% include 'adsenceinline.tpl' %}{% endif %}

The Document Grid controls let you modify the document grid. You can specify Color as well as increments (Gridline Every) and subincrements (Subdivisions) for Horizontal and Vertical lines. The Show/Hide Document Grid command (View > Grids & Guides) lets you control the display of the document grid.

Figure 81b. Use the controls in the Grids panel in the Preferences dialog box to modify a document's baseline grid and document grid.