Section 46. Editing Tables
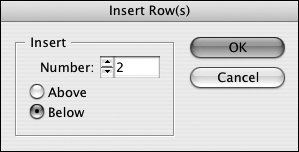
#46. Editing TablesWhen it comes to tables, change is inevitable. You will find yourself constantly adjusting column widths and row heights, adding rows and columns, deleting rows and columns, and so on. Both the Table menu and the Table palette menu provide many options for editing tables. Adding Rows and ColumnsYou can insert rows and columns within a table, or add rows to the bottom and add columns to the right. To add rows and columns, click in the table with the Type tool.
Deleting Rows, Columns, and TablesThe Delete key will eliminate just about any selection in InDesignselected text and objects, for example. It will not, however, delete selections within a table but will delete the contents instead. To delete parts of a table or a table, make a selection first. With the Type tool, click in a row, column, or table that you want to delete. Choose Table > Select, and then choose Row, Column, or Table. You can also click outside the table when the arrow pointer displays to select a row or column (Figure 46b). Drag the arrow pointer to select multiple rows or columns. Once you've made a selection, choose Table > Delete, and then choose Row, Column, or Table. Figure 46b. When you point outside a table with the Type tool, the arrow pointer lets you select entire rows and columns.
Note If you decrease the number of rows or columns in fields in the Table Setup panel or the Table palette, rows will be deleted from the bottom of the table and columns will be deleted from the right side of the table. Resizing Tables, Rows, and ColumnsIf the initial column widths and row heights are not quite rightand they rarely arethey are easy to adjust. Using the Type tool, you can drag the gridlines between rows and columns to adjust the sizes (Figure 46c). You can also drag any edge of the table to resize the table height or width in any given direction. Figure 46c. Using the Type tool, drag the gridlines to adjust column width and row heights.
To "clean up" a table so the columns are the same width and the rows are the same height, choose Table > Distribute Columns Evenly or Table > Distribute Rows Evenly. You can also specify a height for selected rows and a width for selected columns in the Table palette and in the Rows and Columns panel in the Cell Options dialog box (Table menu). |


EAN: 2147483647
Pages: 142