Chapter 9: Our First Game in MMF
Now that we have a foundation in MMF, we can move on to building our first game. This project will be the easiest in the book because we’ll try to cover a variety of topics that we can use again in later projects.
Let’s Get Started
The first step in our project is to open MMF. Once it is open, from the File menu choose New. This will open a window that allows us to create a new game. Choose Application from the window and click OK. You now see many of the editors that we spent time looking at in the last chapter.
Note A frame and a level are the same concept in MMF and are used interchangeably. Most often, a level refers to the gameplay aspect, whereas a frame refers to the game design.
The numbers along the left of the Storyboard Editor indicate the various levels that are available in our game. At this time, we have only a single level, which is created automatically. We can open this by clicking on the number 1. This will open the Frame Editor for our first level. You can see this in Figure 9.1.
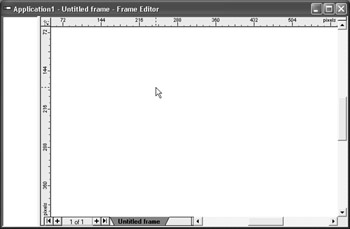
Figure 9.1: The Frame Editor is opened.
At this time, we have a blank level, so we need to begin adding the pieces that will make up the game. From the Insert menu, choose Object from Library (see Figure 9.2). This will display a window like that seen in Figure 9.3.
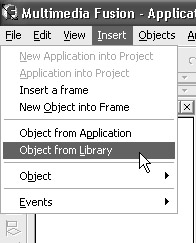
Figure 9.2: The Insert menu allows us to insert objects.
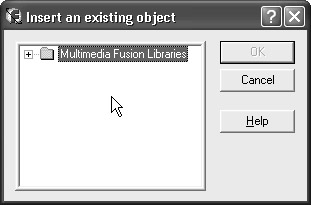
Figure 9.3: Insert an existing object is displayed
As you can see in Figure 9.3, there is a + symbol next to the Multimedia Fusion Library folder. You can click the + symbol to open the folder. This will display a new series of folders. Continue to click the symbols until you see the Game folder displayed. Open this folder in the same manner and find the item called bat1. Single-click this item and then click inside the frame, which has been empty up to this point. You should now see the item in the frame (see Figure 9.4 for an example).
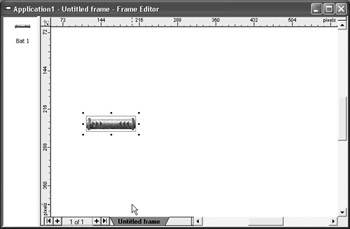
Figure 9.4: The bat is now visible in the frame.
You can now zoom out so that you can see the entire frame. Choose Zoom Out from the View menu. Continue to zoom out on the frame until you can see the entire frame within the Frame Editor, similar to Figure 9.5.
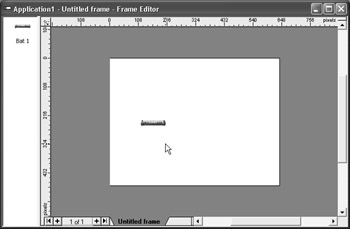
Figure 9.5: Your frame should now look like this.
The reason we wanted to see the entire frame was so that we could place items within the frame as needed. We can position the bat by clicking it and dragging it so that it is similar to Figure 9.6.

Figure 9.6: Position the bat using this figure as a reference.
Note The next two steps are to insert additional objects, repeating the same steps as before. You can use any of the game objects for the ball and the bricks. Figures 9.7 and 9.8 display the Ball 1 and Brick 1 objects in their respective positions.

Figure 9.7: The ball has been placed.

Figure 9.8: We also need a brick to destroy.
You can save your project at this time. It is called Chapter 9 and is located in the Project folder on the CD-ROM that accompanies this book, but feel free to save it with this or any name you would prefer by using the Save command from the File menu.
Although MMF is very stable, it is a good habit to save your work often when developing games. We have done this as a reminder, and you should continue doing so as you work through the examples in the book.
A single brick doesn’t really make for an exciting game. In fact, one collision between the brick and ball would most likely end the game. With that in mind, we’re going to duplicate the brick so that all the original brick’s properties will be given to the duplicates. We can then handle the collisions as if we had added a single item to our project. First, position the brick in the upper left, as in Figure 9.9.
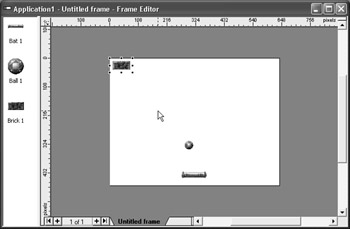
Figure 9.9: The brick in the upper left.
Our next step is to right-click the brick and choose Duplicate from the pop-up menu. This will display the Duplicate Object window, seen in Figure 9.10. This window gives us several things we can select, which are all self-explanatory. You can use the following settings for this project and then click OK when finished:
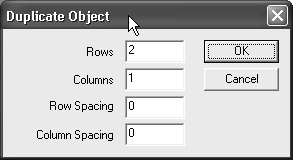
Figure 9.10: The Duplicate Object window.
Rows: 2
Col: 9
Space Row: 5
Space Col: 5
Movement
Our level now looks like Figure 9.11. If we were to run the game at this time, we would be left with a screen of stationary objects. For any type of game project, we’ll need to create movement of objects. Let’s begin with the ball. Right-click on this object and then choose Properties, New Movement from the pop-up menu (see Figure 9.12).
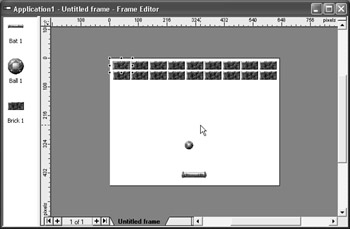
Figure 9.11: Your screen now looks like this.
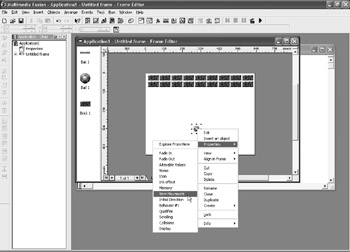
Figure 9.12: The first step in creating a new movement.
You should now have the Choose Move window on your screen (see Figure 9.13). As our luck would have it, there is a bouncing ball movement option. Select this option, and although there are a number of options seen in Figure 9.14 called Ball movement setup, you can simply leave these settings with their default values at this time and click the OK button to close it.
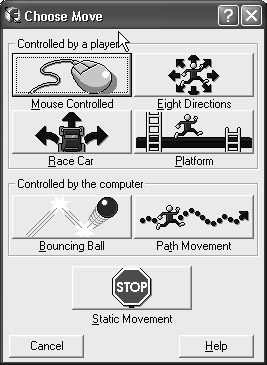
Figure 9.13: Choose Move allows us to set up the type of movement for our object.

Figure 9.14: The Ball movement setup window has specific options for ball movements.
The ball now has movement, but the bat in our object is left without any. Right-click the bat, choose New Movement, and then choose Eight Directions. The Eight directions movement setup screen is now displayed (see Figure 9.15).
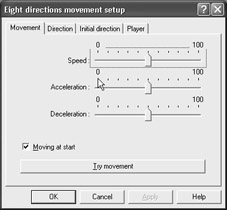
Figure 9.15: The Eight directions movement setup screen.
Unlike the ball movement, which was fine with its default settings, we are going to need to change some of the options for this movement. Click the Direction tab, which will change the window so that it looks like Figure 9.16. You can deselect all other movements by clicking on the black squares so that left and right are the only directions selected. Your window now looks like Figure 9.17.
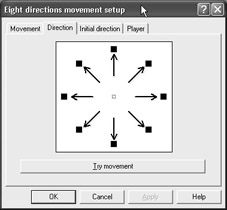
Figure 9.16: The Direction tab with default options.
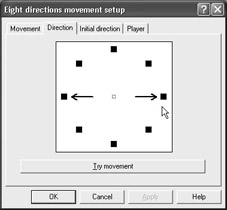
Figure 9.17: Left and right should be the only options selected.
The next step is to click the Initial direction tab, which looks very much like the Direction tab we were just looking at. We need to remove all directions and can do so by clicking each of them, or we can click the button at the lower right to deselect all of them simultaneously (see Figure 9.18). Click the OK button to close the settings.
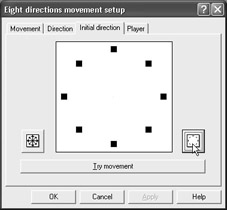
Figure 9.18: Deselect all directions.
Events
We now have a game that contains objects, and their movements have been set, but nothing will happen when the objects collide with one another. This would obviously limit any type of fun we would have with this game. To set this up, we are going to need to open the Event Editor. There are several ways to open the editor. First, you can click on its icon (see Figure 9.19). You can also open the Event Editor from the View menu. Lastly, you can use the shortcut combination of Ctrl+E to open it. Whichever method you prefer is fine.
Figure 9.19: The icon is one way to open the editor.
Once the window is open, double-click New Condition, which displays the New Condition window (see Figure 9.20).
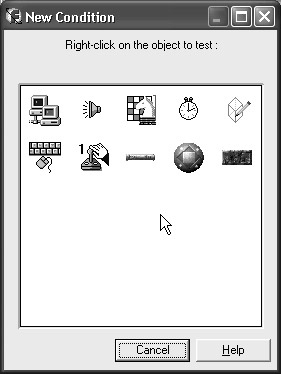
Figure 9.20: The New Condition window.
Double-click the ball icon in the window. This will display the pop-up menu displayed in Figure 9.21. We are setting up the collision that will occur between the brick and the ball, so we need to choose Collisions, Another Object. This will open the Test a collision window seen in Figure 9.22. Choose Brick from the available objects and then click OK. Your Event Editor is now updated with this collision (see Figure 9.23).
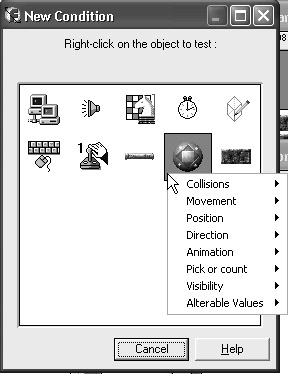
Figure 9.21: The pop-up menu as displayed.
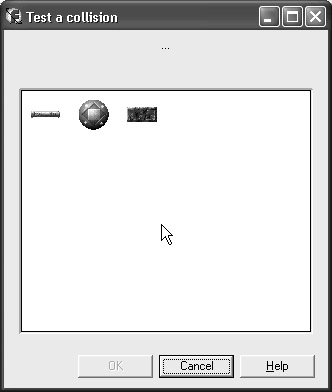
Figure 9.22: The test a collision window.
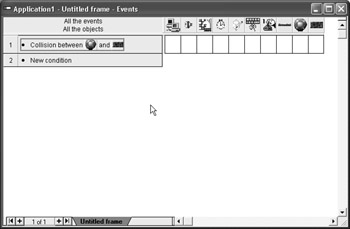
Figure 9.23: The event has been created.
Now we have a collision event that will be executed every time a ball and a brick collide. When the objects collide during the game, the Event Editor will cause an action to occur, but we have yet to create the exact action we would like to have. At this time, we are going to right-click on the square beneath the column in which the brick is displayed (see Figure 9.24). You can choose Destroy from the pop-up menu. A check mark is now visible in the Event Editor at the intersection point of the action and the brick column, like the one seen in Figure 9.25.
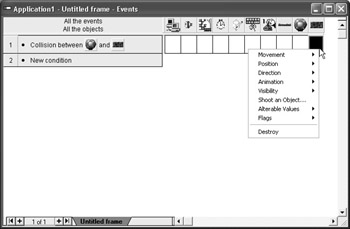
Figure 9.24: The brick column.
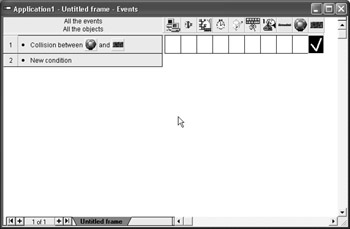
Figure 9.25: A check mark is now visible.
Now the brick is going to be destroyed when a ball collides with it, but if the ball collides with the bat, it will simply continue through it. We need to make it bounce during such a collision. We can create the event the same way we did for the brick and ball, but this time, we need to substitute the bat (see Figure 9.26).
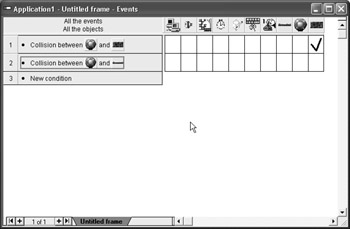
Figure 9.26: The brick is replaced by the bat in this event.
We have the event, and now need to create the action. As already mentioned, we would like the ball to bounce with this collision, so we don’t want either the ball or the bat to be destroyed with this collision. Right-click the square beneath the ball and then choose Movement, Bounce (see Figure 9.27).
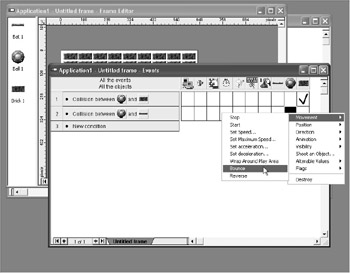
Figure 9.27: The ball will now bounce.
We now have the ball moving and colliding with the objects on the screen, but if the ball reaches any of the screen borders, it will continue to move into empty space. We will create an event to handle this as well. First, double-click New Condition and then double-click Ball. Choose Position, Test position of “Ball 1,” which can be seen in Figure 9.28. The Test position of “Ball 1” window is displayed (see Figure 9.29). Click on the arrows inside the square for left, right, and up but not down and click OK. The reason for this is simple. If the ball tries to leave in the left, right, or up direction, we need to have the ball bounce. If it leaves the bottom, we need an entirely different approach. The new entry in the Event Editor is seen as the ball leaves the play area on the top, left, or right (see Figure 9.30). Right-click the column beneath the ball and choose Movement, Bounce.
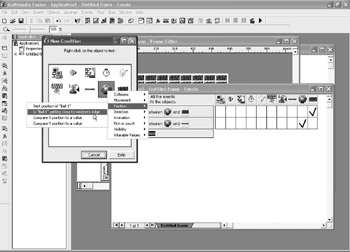
Figure 9.28: The pop-up menu has many options.
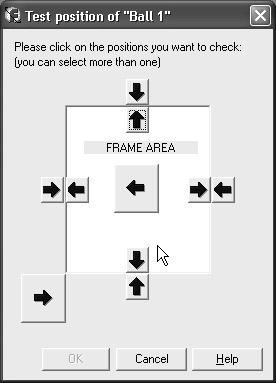
Figure 9.29: Test position of “Ball 1”window.
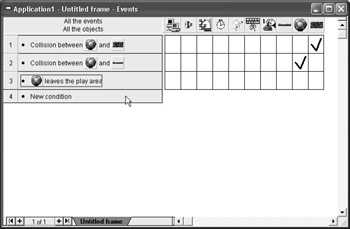
Figure 9.30: The new entry in the Event Editor.
The last event in this chapter again deals with the ball and testing its position, but this time, we need to create the event with the ball leaving the bottom position. After we create the event, right-click on the chessboard square and choose End the Application. Save the game and then choose Play to try out the application. Depending on your screen resolution, you may not see much of the action. Instead, choose Run, Application or hit F8 to see the running game (see Figure 9.31). Because this is a demo version, you may also see a notice such as that in Figure 9.32. If you get this window, click Continue to display the game.
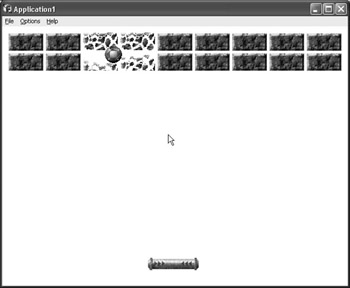
Figure 9.31: The game is running.
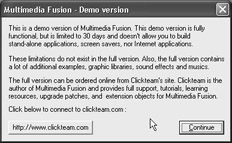
Figure 9.32: Because we are using a demo version, you may see this screen.
EAN: 2147483647
Pages: 168