Obtaining the Tablet PC SDK
In the preceding chapters, we have looked at the basics of VB .NET development, but up to this point in time, we have yet to get into the specifics of the Tablet PC. In this chapter, we change that as we install the Windows XP Tablet PC Edition Platform Software Development Kit (SDK). In the remaining chapters, we actually look at the various aspects of the development tool as we create a Tablet PC-specific application in each of them.
The SDK
The Tablet PC Platform SDK has undergone a series of betas since its initial release in 2001. Currently at version 1.5, the Tablet PC Platform SDK is available from the Microsoft Developer Network (MSDN) Web site. At this time, the SDK is specifically available at http://msdn.microsoft.com/library/default.asp?url=/downloads/list/windevtpc.asp. You should download it before continuing on with this chapter. The Tablet PC Platform SDK is relatively small and is freely available. The SDK includes several key concepts:
Managed application programming interfaces (APIs): If you remember way back to Chapter 1, The Tablet PC, we talked about the pen and ink capabilities of the Tablet PC. The SDK provides a set of managed APIs for .NET applications that expose these pen and ink features.
Ink controls: Another way to incorporate ink into an application is the ActiveX and .NET controls. The controls include InkPicture and InkEdit. The controls are very quick and easy to use, but unlike the managed APIs, the Ink controls expose a subset of the available underlying functionality. The InkEdit control is the more restricted of the two.
Component Object Model (COM) APIs: If you are interested in developing outside of .NET, COM APIs are available for C++ and Visual Basic 6.
Runtime libraries: To make the development of Tablet PC applications possible on non-Tablet PC editions of Windows, the SDK installs the necessary runtime libraries.
We look at these areas in more detail later in the chapter.
Installing the Tablet PC Platform SDK
In this section, we provide an overview of how to install the Tablet PC Platform SDK. If you have already installed the SDK and have verified its installation by compiling a few of the samples that are included with it, you can skip this section entirely. If you take this approach and later realize you have problems, you can always refer back to this section of the chapter.
System Requirements
The Tablet PC SDK does not have a great deal of specific hardware or software requirements. Of the requirements, there are some variations that may make your development easier (more on this later). The following operating systems and development environments are required, whereas the digitizer hardware is optional:
Operating system: Your development machine should be running a minimum of Windows 2000 or Windows XP; it is preferable to have the Tablet PC Edition of Windows XP. If you are using an actual Tablet PC, you have the correct OS. Windows 2000 will also work if you do not have Windows XP or Windows XP Tablet PC Edition.
Development environment: You can use either Visual Studio 6 for unmanaged development or Visual Studio .NET for either unmanaged or managed development.
Pointing device: Although a digitizer pad is not required for development, it is recommended. Trying to test input with a mouse is very difficult under the best of circumstances. Of course, if you are using a Tablet PC, you already have a Human Interface Device (HID) to use.
Hard drive: You will need at least 50MB of free hard drive space to install the SDK.
Although the SDK was created to develop applications for Tablet PCs, it can be installed and used on any PC running Windows 2000 and Windows XP Professional or Home versions. This is a nice feature for those without a Tablet PC because it allows for development and testing of Tablet PC software on any machine to which you have access. Unfortunately, development outside of an actual Tablet PC comes with a price. There are a few limitations you should keep in mind for developing without a Tablet PC:
- If you develop an application that relies on Ink Recognition, it will work only on computers running Windows XP Tablet PC Edition.
- Ink controls are limited outside of a Tablet PC, where new ink cannot be captured and existing ink cannot be recognized.
- You will probably want to have access to a digitizing pad if you are using a desktop PC to test pen entry.
With the previously listed problems in mind, Tablet PC application development is best done on a Tablet PC. Even this is not a perfect option because developing on a Tablet PC is a bit cumbersome when you are accustomed to a desktop PC. You could also use the Tablet PC only for remote debugging, in which you create your code on a desktop PC and then test it on a Tablet PC. None of the options are perfect, but any one or combination of these options can be used.
Installing the SDK
We'll assume that you have already downloaded the Tablet PC SDK. The downloaded file is probably titled 'Tablet PC Platform SDK v1.5.setup.exe.' Browse to the directory where you downloaded the file and run the setup file. There is nothing special about the SDK installation, but there are some steps to getting your development environment set up correctly.
When you start the installation, you are presented with an option to pick the items to install. You will probably want to install the samples of the SDK because they provide quick examples to many of the SDK features. In fact, if you have the space, it is advisable to install all of the optional components, as shown in Figure 12.1. These optional components also include the distributable merge module (Mstpcrt.msm) that can be redistributed with your applications. You only need this if you are building an application that needs to run on something besides a Tablet PC, such as a standard PC running Windows 2000 or Windows XP.
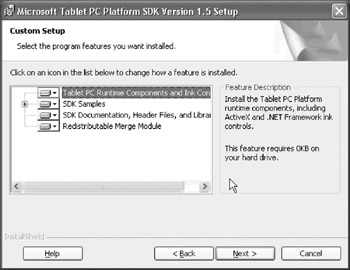
Figure 12.1: The optional components.
The rest of the setup is self-explanatory so we'll move on to setting up your development environment to utilize the SDK.
| Note |
We'll assume that you install the SDK at the default path of C:Program FilesMicrosoft Tablet PC Platform SDK. You can choose any path you want, but we assume you are installing it to this path for the purposes of this text. Please remember the location of your path if you install it elsewhere. |
Setting up Visual Studio NET
To build Tablet PC applications using either Visual C# or Microsoft Visual Basic .NET, you must add a reference to Microsoft Tablet PC API to your project in Visual Studio .NET (or use the InkEdit and InkPicture controls). This provides access to the Tablet PC managed object model. To add a reference to the SDK in Visual Studio .NET, perform the following steps:
- On the Project menu, click Add Reference (see Figure 12.2).
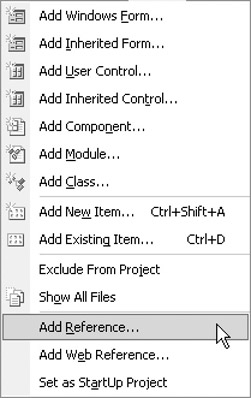
Figure 12.2: Choose Add Reference from the Project menu. - On the .NET tab in the Add Reference dialog box, in the Component Name list, select Microsoft Ink Resources, version 1.0.2201.2. If you want to use the Divider or PenInputPanel objects in your application (you'll use these extensively later in the book but if you want, you can browse the SDK documention for additional information), you should also select Microsoft Ink Resources version 1.5.3023.0 (see Figure 12.3). These are commonly shortened to only the component names Microsoft Ink Resources and Microsoft Ink Resources 1.5.
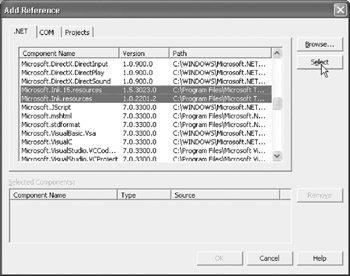
Figure 12.3: You need to select the Tablet PC Components. - Click Select, and then click OK.
ActiveX and Managed Controls
Microsoft was kind enough to include ActiveX counterparts for the managed InkEdit and InkPicture controls. These are perfect for users of the ever popular VB6. To build Tablet PC applications in Microsoft Visual Basic 6, you need to reference the Microsoft Tablet PC Type Library, version 1.0 (InkObj.dll), which is installed to the C:Program FilesCommon FilesMicrosoft SharedInk folder by default. We look at the InkPicture and InkEdit managed components in Chapter 13, Introduction to Ink-Enabled Applications, as we use them to build applications.
There are a few additional things you need to do in order to use the control. First, you need to add the InkConstants.bas file, found in the same folder as the InkObj.dll file to your project. Now, to use the InkEdit ActiveX control in your application, you should right-click the Toolbox and select Components. Add a reference to the Microsoft InkEdit control version 1.0 (InkEd.dll), which should be located in the C:WindowsSystem32 folder. Lastly, to use the InkDivider object, you need to create a reference in your project to the InkDiv.dll found in C:Program FilesCommon FilesMicrosoft SharedInk folder by default.
Microsoft Visual C++
To build Tablet PC applications in Microsoft Visual C++®, you will need to update the system environment variables, set up directory options for Visual Studio, and access the Tablet PC interfaces in your project. Follow these steps to build Tablet PC programs:
- Choose the Advanced tab and then click the Environment Variables button. This displays an Environment Variables dialog box (see Figure 12.6).
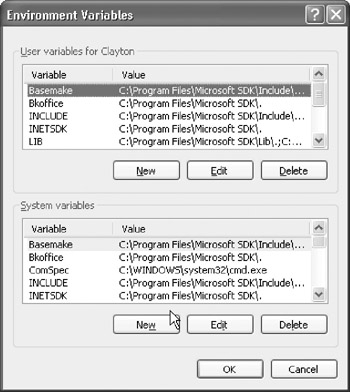
Figure 12.6: The Environment Variables dialog box. - Under System variables in the Environment Variables dialog box, select Path, and then click Edit.
- In the Edit System Variable dialog box, add ';%CommonProgramFiles%Microsoft SharedInk' to the Variable value, and then click OK. This can go at the end of anything already existing and should be entered without the quotes.
- Under System variables in the Environment Variables dialog box, select INCLUDE, and then click Edit.
- In the Edit System Variable dialog box, add '; %ProgramFiles%Microsoft Tablet PC Platform SDKInclude' to the Variable value, and then click OK. If you installed the SDK to another folder, you may need to alter the paths in the previous steps.
- Click OK in the Environment Variables dialog box.
- Click OK in the System Properties dialog box.
- In Visual Studio, select the Tools menu and then click Options. In Visual Studio .NET, the Visual C++ Directories options are located under the Projects node.
- On the Directories tab, in the Show directories for list, select Include files.
- Under Directories (the Include Directories list in Visual Studio .NET), add '%ProgramFiles%Microsoft Tablet PC Platform SDKInclude,' and then press Enter.
- In the Show directories for list, select Library files.
- Under Directories (the Library Directories list in Visual Studio .NET), add '%CommonProgramFiles%Microsoft SharedInk,' and then press Enter.
- Click OK.
To access the Tablet PC interfaces, you must include the Msinkaut.h and Msinkaut_i.c files and to access the InkEdit control interfaces, you need to include Inked.h and Inked_i.c. in your project like the following:
#include
#include
#include
#include
| Note |
You could use the following import directive instead of the first two #include statements: '#import "InkObj.dll" no_namespace exclude("tagXFORM")'. |
The files we have been using are only a few of the many that are installed with the Tablet PC SDK. According to Microsoft documentation, there are over 160 files included with the SDK. We are not reviewing each of the files, but the following list details some of the more important ones:
Microsoft.Ink: Most of the managed API is implemented within this assembly.
InkObj.dll: This includes most of the core ink services used internally by the platform and includes the COM automation APIs and type libraries.
Tpcsdk10.chm: The help documentation for the SDK is available here.
MSInkAut.h: The main COM automation API header is available here to include in your C++ projects.
InkEd.dll: The InkEdit control is implemented in this dynamic-link library (DLL).
Wisptis.exe: This runs as a system service that provides pen-data collection for other components of the SDK. When a component needs to interact with the pen, this executable is spawned as a service to communicate directly with the input device. This interacts with the digitizer on a Tablet PC or a mouse on a desktop PC.
Using the SDK
Most of the applications developed in this book utilize VB .NET, although we also use C# and C++. We look at some of the most important aspects of the SDK before we begin writing our first Tablet PC application.
Managed APIs
If you remember back to Chapter 4, Basics of the .NET Framework, a significant portion of the Microsoft .NET Framework is the common language runtime (CLR), which controls and supports the execution of .NET applications written in various languages. With this in mind, the Tablet PC Platform SDK APIs are 'managed' as they were created to run in the .NET Framework's common language runtime. As such, you can call the APIs from any .NET language, such as C#, C++, Jscript, or VB .NET.
The managed APIs are divided into three distinct areas that encompass the functions required for a Tablet PC:
The Tablet Input API (Pen API): As the name suggests, the Pen API is targeted at pen-specific features, such as the various buttons on a pen. It also collects digital ink and gestures from the movement of the pen.
The Ink Data Management API (Ink API): Once ink has been collected, the Ink API takes over for its manipulation and storage.
The Ink Recognition API (Recognition API): The Recognition API is used to recognize the ink.
Ink Controls
There are two Ink controls that are included in the Tablet PC Platform SDK. They allow us to quickly integrate pen and ink functions into a new or existing application. The controls can be easily dragged onto forms in a language that supports forms-based software development, such as VB. If you remember the section earlier in this chapter, there are ActiveX Ink controls and managed Ink controls. We use these in Chapter 13, Introduction to Ink-Enabled Applications.
The following controls are available for us to use:
InkEdit: This control is an extension of the common RichEdit control and captures and can also convert ink into text. This is the quickest way to add conversion to an application.
InkPicture: This control is used to display or capture ink over existing images.
Tablet PC Speech
When dealing with Tablet PC development, it is quite obvious that we need to take advantage of ink for data entry. But, it is definitely not the only one. As the Tablet PC was created with portability in mind in which a keyboard is not always readily available, speech also plays an important role in software development. We are going to delve into the basics of the Microsoft Speech API (SAPI) SDK beginning in Chapter 21, Speech Input with SAPI. Along the same lines, we are also going to take advantage of Microsoft Agent (Chapters 19 and 20, Getting Started with Microsoft Agent and Advanced Microsoft Agent, respectively) technologies for a couple of example projects. We go over more of each of them as we encounter them.
Summary
In this chapter, we have installed the Tablet PC SDK and taken a quick glance at some of its features. In the remaining chapters, we actually look at the more involved aspects of the development tool as we create a Tablet PC-specific application in each of them.
- The Tablet PC
- Introduction to Visual Basic .NET
- Working with VB .NET
- Basics of the .NET Framework
- Introduction to the VB .NET Language
- Object-Oriented Programming with VB .NET
- Strings, GDI+, and Error Handling in VB .NET
- Math and Random Number Functions in VB .NET
- Your First Program
- Console Application Input/Output
- Your First Windows Forms Application
- Obtaining the Tablet PC SDK
- Introduction to Ink-Enabled Applications
- Tablet PC Full Screen Utility
- Tablet PC Screen Rotation and Special Buttons
- Creating an MP3 Player
- Form Effects
- Using Gestures to Control Tablet Media Player
- Getting Started with Microsoft Agent
- Advanced Microsoft Agent
- Speech Input with SAPI
- Custom Grammars for Speech Recognition
- WMI and Hardware
- Power Management for the Tablet PC
- Virtual Joystick
- Pong Game
- Not Quite a Magic Ball
- Storing Ink in a Database
- 3D Rendering with OpenGL and DirectX 9
- Using Third-Party Engines
- Tablet Fax
EAN: 2147483647
Pages: 191
- Integration Strategies and Tactics for Information Technology Governance
- Linking the IT Balanced Scorecard to the Business Objectives at a Major Canadian Financial Group
- Measuring ROI in E-Commerce Applications: Analysis to Action
- Governance in IT Outsourcing Partnerships
- Governance Structures for IT in the Health Care Industry
