FLOPPY DISK DRIVES (DISKETTE) OVERVIEW
Floppy drives were the original storage drive type in PCs. The IBM PC, circa 1981, had two 5.25-inch floppy drives, each with a capacity of 360KB. There were no other storage devices. 1.2MB versions of these came out years later, and the 3.5-inch version that we use today came out after that. There was an attempt to circulate 2.88MB floppies, but they really didn’t catch on.
These days, floppy drives are on their way out, although the vast majority of new computers still come with them, with the exception being notebooks. While many of the most common uses for floppies have been taken over by CD-RWs, removable hard drives, Zip drives, and network connections, at the moment, floppies are still essential for tasks such as starting computers that won’t boot otherwise, or running programs such as disk utilities that can’t run in Windows. This is because the drivers to run floppy disks are included on all BIOS chips, meaning that floppy disks can run as soon as the BIOS gets to them. More recently, however, this has become true for optical drives as well.
Selecting a Floppy Drive
New floppy drives available today are nearly all good quality. If the case has an opening that shows the entire floppy faceplate, as shown in Figure 6.12, the only consideration is that the color of the faceplate matches the computer case, if that is important to the user. Many cases, however, have openings for proprietary floppy drives, an example of which is shown in Figure 6.13. In this case, if you have a selection of used drives, you can try to match up a faceless drive, such as the one shown in Figure 6.13, or try to order a new drive from the case or computer manufacturer.
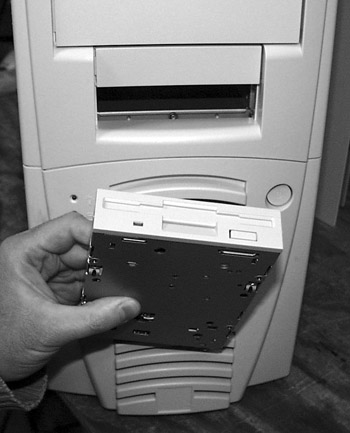
Figure 6.12: Standard opening, standard drive.
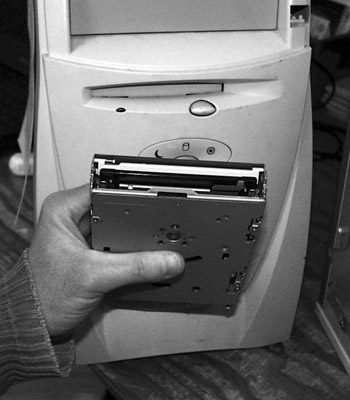
Figure 6.13: Proprietary opening, proprietary drive.
Floppy Drive Installation
Motherboards have one floppy connector, and many newer motherboards support only one floppy drive. A computer can have no more than two floppy drives. About the only need these days for two floppy drives is if the user has 5.25-inch disks to access. In this case, the 3.5-inch drive should be A and the 5.25-inch should be B. A small power connector (see Figure 6.14) is used for 3.5-inch floppy drives. A standard floppy drive ribbon cable has three connectors: one for A, one for B, and one for the motherboard connector (see Figure 6.15). You’ll see that a floppy cable has a twist. The twist should be nearest the A drive. If there is some compelling reason to switch drive letters, such as having to use the B drive as a boot drive (only A can be a boot drive), this should be possible in the BIOS. The other option is to change jumpers, but they differ from drive to drive and tend to be confusing.
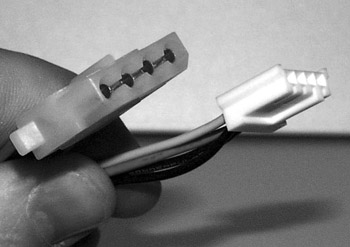
Figure 6.14: The large connector is for hard drives, optical drives, and 5.25-inch floppy drives. The small connector is only for 3.5-inch floppy drives.
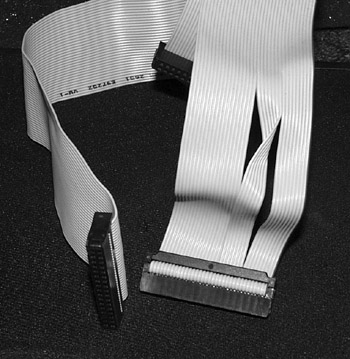
Figure 6.15: One floppy cable with a twist.
| Note | The data connectors for 5.25-inch floppy drives are not the same as those for 3.5-inch drives. If you need to install a 5.25-inch floppy drive, you’ll need a floppy cable with a choice of two connectors to use for the B drive. That type of cable allows connection of either a 3.5-inch or a 5.25-inch device as the B drive. Remember, the A drive is always the one nearest the twist in the cable. |
Just about every case has a space dedicated to a floppy drive. Look for a 3.5-inch bay that corresponds to an opening in the front of the case (shown in Figure 6.16). Just as in hard drives, you’ll have to match up pins 1. Pin 1 on the cable has a stripe, and there will be some type of marking on the drive as shown in Figure 6.17, and on the motherboard, as shown in Figure 6.18. The drive markings can be cryptic, but know that if pins 0 and 34 are marked, pin 1 will be next to pin 0, and on the opposite end from pin 34. Other drives have only a red mark. Once you ascertain which side pin 1 is on, it is a good idea to mark it on the drive with a fine-tipped permanent marker. However, damage won’t occur if you make a mistake with the data cable; if the floppy drive light stays on continuously, it means that one end of the data cable is in backward.
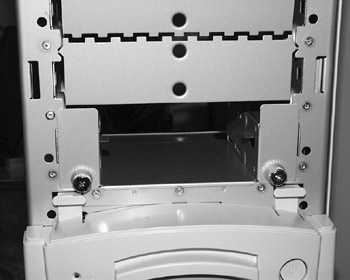
Figure 6.16: A bay usable for a floppy drive.
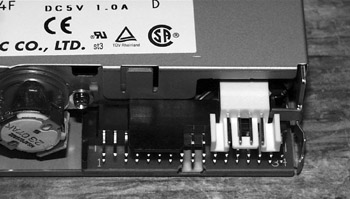
Figure 6.17: Pin 1 markings can be vague.
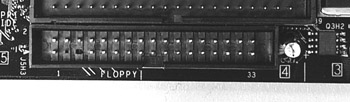
Figure 6.18: Pin 1 marking on the motherboard.
Finally, make sure that the BIOS is set correctly for the floppy drive(s) in the system.
Diagnosing Floppy Problems
There aren’t many different types of problems with floppy drives. The one mentioned previously is that of the light staying on continuously, indicating that one of the data connectors is in backward. If the drive doesn’t seem to work at all, either the data or power cable might not be in all the way. The only other problem is trouble reading from or writing to the disk. First, try a new disk—floppy disks are prone to damage. If that doesn’t work, try using a cleaning kit. Search the Web for “floppy drive cleaning kit.” These should be very inexpensive.
| Tip | Don’t use an important floppy to test a drive; a bad drive can damage a floppy disk and/or its data. |
Formatting Floppies
Floppy disks come from the factory already formatted for PCs or Macs. The easiest way to erase all the data on a floppy is to format it again. In Windows, right-click the drive in My Computer and click the Format command. If the disk has been working and you are in a hurry, select the Quick Format check box. Quick Format skips the step of checking the disk for bad sectors. If the data has been corrupted, or you have the time, leave this box clear. You can also do this at a command prompt, which is important if you are in DOS. The command is as follows:
FORMAT A: /Q
The Q switch instructs the system to do a quick format.
| Note | All floppies will be formatted as FAT16. |
Making a Windows 9x Startup Disk
To make a Windows 9x startup disk, insert a floppy in the drive of a Windows 9x computer. Then, go to Add/Remove Programs in Control Panel, and click the Startup Disk tab.
For more information on floppy drives, go to pcmech.com/floppy.htm.
EAN: 2147483647
Pages: 390