MEMORY INSTALLATION
Memory isn’t hard to install. First, make sure to take the usual static-avoidance measures, including wearing an anti-static wrist strap. Touch a piece of bare metal on the case before proceeding. With DIMMs, insert the module straight in the slot, taking care to match up the indentation in the module with the notch in the slot (see Figure 5.4). Then, make sure the plastic clips are closed as shown in Figure 5.5.
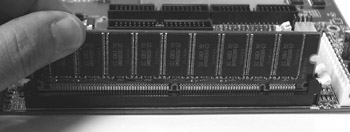
Figure 5.4: Match the indentation with the notch.
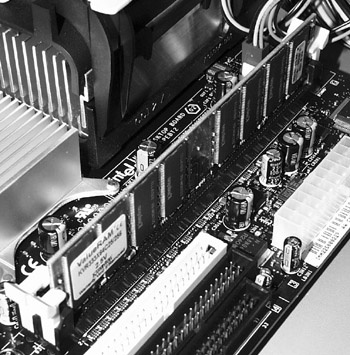
Figure 5.5: An installed module.
In old computers that take SIMMs, insert at an angle, and then straighten out. Do this very carefully, as old-style memory modules are exceptionally delicate.
Notebook Computer Memory Installation
Check the documentation for the notebook to find the memory slot—they are usually on the bottom. With the power off, remove the screw(s) to access the slot. Insert the modules at an angle and then straighten out, as shown in Figure 5.6.
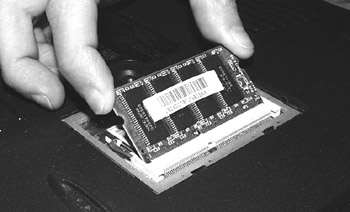
Figure 5.6: Inserting a SODIMM in a notebook computer.
General Rules for Memory Installation
-
Use the correct memory for the motherboard.
-
Follow all instructions from the computer/motherboard and memory manufacturers.
-
Make sure all the memory modules match as described earlier in the chapter.
-
Start at the lowest number memory slot, either 0 or 1.
-
Insert the memory in capacity order starting with the highest-capacity module in the lowest number slot.
-
After you have installed the memory, boot the computer and check the memory. If you don’t have a diagnostic program, run some memory-intensive programs such as office programs, photo or video, or games with a lot of graphics.
For more help with memory installation, go to kingston.com and select Install Guides from the Support menu.
| Tip | Some motherboards with the Intel 865 and 875 chipsets take DDR SDRAM in a dual-channel configuration. There are two channels of memory, A and B, and two slots for each channel, 0 and 1. For best performance, make sure to follow the motherboard manufacturer’s instructions. This means that chips in channel A, slot 0, and channel B, slot 0, should match exactly. The same goes for the DIMMs in the two slots 1. The best advice is to follow the instructions in the motherboard manual. |
On the CD See the video “Installing Memory” on the accompanying CD-ROM.
EAN: 2147483647
Pages: 390