WINDOWS ME TOOLS AND UTILITIES
The tools utilized in Windows Me remain largely unchanged from the tools offered in the earlier versions of Windows 9x. Windows Me does add some notable exceptions, though, such as PCHealth tools (including the very helpful System Restore utility). Let’s take a look at some of the new tools as well as some of the best tools to help you troubleshoot errors.
Display Settings
Display settings are accessed the same way across all of the Windows 9x family of operating systems by either right-clicking on the Desktop and choosing Properties or by going through Start > Settings > Control Panel, and clicking the display icon. From either of these avenues, you are taken to the Display Properties applet (see Figure 27.1). Click on the Settings tab to change Desktop resolution (which may be featured on the exam) and color depth. If you click the Advanced button, and then the Monitor tab, you can adjust your monitor’s refresh rate, which by default is typically set to 60Hz. Did you note the checkbox toggle on/of for “Hide modes that this monitor cannot display” option on the Monitor tab? It should stay checked (toggled on), because running your monitor at unsupported refresh rates can seriously affect the life span of a monitor. When changing the Desktop resolution, Windows Me will automatically set the refresh rate for the lowest possible setting (equal to or greater than 60Hz) that the monitor can handle at that particular resolution (i.e., it may be possible to run your monitor at 75Hz at 1024 768, but Windows Me will typically default to 65Hz at this resolution). Make sure that you are running the highest possible refresh rate for your monitor in order to avoid headaches, strained eyes, and other physical ailments that can be caused by prolonged use of a monitor with a low refresh rate.
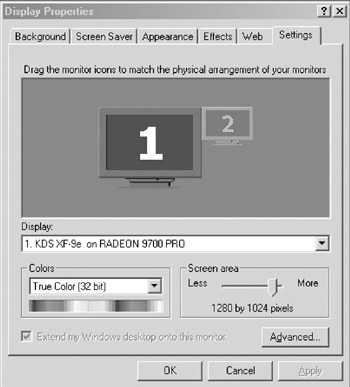
Figure 27.1: Windows Me Display Properties applet.
DXDIAG
DXDIAG is another useful command line that is run from the Run prompt in the Start menu to utilize the DirectX Diagnostic tool. The DirectX Diagnostic tool is another display applet relating specifically to DirectX, a 3D API that is directly supported by Microsoft. Most computers have some form of 3D processing unit in the video card, either on-board or as AGP/PCI, and Windows Me comes with a version of DirectX automatically installed. Direct Draw and DirectX capabilities can be tested from the DirectX Diagnostics applet, and general information can be found by clicking the General tab.
MSCONFIG
Windows Me, being a member of the Windows 9x family, shares many of the qualities found in Windows 95 and Windows 98 SE. Unfortunately, it contains many of the same issues that plague its older siblings, as well. Boot times have been improved from those found in Windows 95 and 98, but booting can still be slowed by having too many services running at start-up. To check exactly what you have starting within the boot-up process, go to Start > Run, and type in “MSCONFIG” (not case sensitive) on the Open line. This will bring up the System Configuration Utility (see Figure 27.2), which contains several system tabs, including System.ini, Win.ini, and Startup. The one we’re interested in is Startup. From here, you can choose what applications will start with Windows, with checkboxes to the left indicating if you wish them to be toggled on or off. For optimal performance, only leave enabled what is absolutely necessary at start-up. Most programs, Microsoft Office included, have a tendency to leave start-up files as a part of the boot sequence, which (when compounded with several other start-up enabled programs) can seriously slow down the amount of time it takes to boot into Windows.
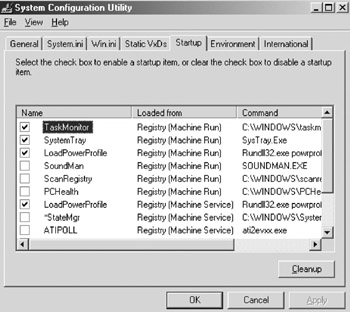
Figure 27.2: Windows Me System Configuration Utility.
Device Manager
While not specific to Windows Me, the Device Manager is one of the most useful tools you have at your disposal when trying to troubleshoot hardware difficulties. By right-clicking My Computer, which will bring up the System Properties applet, and choosing the Device Manager tab, you have access to your entire list of hardware. From here, you can uninstall, re-install, and update drivers for all of your hardware. When in doubt, in dealing with malfunctioning devices, turn to the Device Manager first.
PCHealth Tools
Windows Me has a variety of PCHealth features that are used to monitor and correct problems with your system. All of the resources used by the 9x family are carried over and can be found in the same locations. Some of the more useful tools that can be utilized are:
Viewing System Information: This can be accessed through Start > Programs > Accessories > System Tools > System Information. From here, you will be given a folder tree on the left, with +/– boxes that let you expand/contract any particular category. When in the System Information applet, pay special attention to the Tools menu, which gives you access to:
System Restore: We will discuss this in the next section.
Fault Log: Fault Log provides a comprehensive error log for troubleshooting issues.
Network Diagnostics: This is a helpful little utility that diagnoses problems with network connectivity.
DirectX Diagnostics: Discussed earlier in this section, The DirectX Diagnostics utility contains tools for testing 3D system drawing capabilities, as well as DirectX sound functions.
Update Wizard Uninstall: This utility aids in uninstalling downloaded updates using the Windows update feature.
Signature Verification Tool: This tool is useful in troubleshooting when you need to ensure that certain critical system files have not been modified since installation
Registry Checker: The Registry Checker scans your Registry for errors that could be causing issues.
Automatic Skip Driver Agent: This is a wonderful tool if you are trying to diagnose problems with Windows’ start-up. This utility identifies problems with drivers loaded at start-up that keep Windows Me from starting correctly, and it allows you to skip them.
Dr. Watson: Dr. Watson™ is a program error debugger tool used in Windows 9x, NT, and 2000 to detect and log critical error information pertaining to system halts. Dr. Watson also attempts to point you in the right direction by offering possible tips for problem and error resolution.
System Configuration Utility: This gives you the ability to change start-up services and programs that load at start up.
ScanDisk: Discussed in Chapter 23, ScanDisk is a Microsoft disk analysis and repair utility that is used to recover and repair lost or bad clusters on a disk. Windows 9x and Windows Me utilize a GUI version of ScanDisk that can be accessed and run by selecting Start > Programs > Accessories > System Tools > ScanDisk.
WMI Control: WMI (Windows Management Implementation) Control lets you take control of remote PCs on a network for security and maintenance.
Resource Meter: The Resource Meter is a great tool for monitoring your GDI (Graphical Device Interface), system resources, and user resources. This tool can be found by navigating Start > Programs > Accessories > System Tools > Resource Meter.
System Monitor: A more complex version of the Resource Meter, the System Monitor can be used to graph Kernel usage (by default), File System, Memory Manager, and Microsoft Network Client. To change the graph target, choose Edit > Add Item, then choose another statistic to graph.
You can also remove items from the graph using the Edit menu.
Windows Update: This utility automatically keeps your operating system up to date with current patches, fixes, security updates, service releases, and other information offered by Microsoft (see Chapter 24 on Windows 9x for an in-depth discussion).
Auto Update: This feature runs from the system tray. Auto Update uses downtime (time when you are using the Internet) and downloads what it deems to be appropriate updates, then prompts you to install them. To disable this feature, go to the Control Panel and double-click the Automatic Updates icon. From here you can choose to:
-
Automatically download updates and notify me when they are ready to be installed. (On by default).
-
Notify me before downloading any updates and notify me again when they are ready to be installed.
-
Turn off automatic updating. I will update my computer manually.
System Restore: System restoration is accomplished in Windows Me using the new System Restore tool. It can be found by navigating Start > Programs > Accessories > System Tools > System Restore. System Restore essentially takes a snapshot of your current system setup (e.g., current drivers, installed programs, etc.) which it can revert to previous settings at any point. System Restore compresses these files and saves them as .cab files in C:\Restore\Archive. It’s a good tool to use prior to a major driver update for your hardware, before installing new software (or major updates to current software), or any other action that might cause your system to function incorrectly as a result of an upgrade. Using the System Restore tool before doing any such action allows you to capture a working image of your current setup, so that if something does go wrong in the process of upgrading, you can always revert back to a working setup.
Note Windows automatically captures an image of your machine once a day and holds it for a period of about two weeks. You can always choose from one of Windows’ Restore Points, or choose to revert to one you’ve specifically made.
Note From the System Restore applet’s initial screen you are asked if you want to restore your computer to an earlier setup or create a new Restore Point. To create a Restore Point:
-
Go to Start > Programs > Accessories > System Tools > System Restore.
-
Choose “Create Restore Point.”
-
Click Next.
-
You are then prompted to enter a description of your Restore Point. You can enter anything you like (up to 64 characters). When you’ve entered your desired description, click Next to continue.
-
Windows will create the Restore Point and indicate that it is complete. A time/date display is listed with your personalized description (as entered in the previous step).
To revert to an earlier Restore Point:
-
Go to Start > Programs > Accessories > System Tools > System Restore.
-
Choose “Restore My Computer to an Earlier Time.”
-
Click Next.
-
The next screen has a calendar on the left and an option box on the right. Choose from the dates displayed in bold to open the available Restore Points made on those given days/dates. The Restore Points available appear in the option box to the right. Choose the appropriate Restore Point, and click Next to continue (see Figure 27.3). You will be prompted with a cautionary message that reads, “Before restoring your computer, save and close all open files, and close all open programs. Do not alter, open, or delete any files or programs until the restoration is complete.” Click Next to continue.
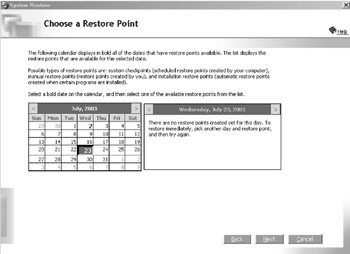
Figure 27.3: Windows Me System Restore—Restore Point Selection applet. -
The following screen will display the progress of the System Restore and restart the system.
-
The System Restore screen will appear when the system restarts. Click Close to continue.
Note The system restoration tool is completely reversible. If for any reason you are displeased with the image you chose, you can always go back to where you were before you restored.
It is also possible to start the System Restore tool from a command prompt. You would want to consider this when you cannot start Windows Me normally or in Safe Mode. To do this you must:
-
Boot your PC using a Windows Me start-up disk.
-
From the Startup menu, choose Minimum Boot
-
You will be given a command prompt, type “edit c:\windows\system.ini” (provided that this is your Windows directory), and press Enter.
-
Edit the “shell =” line so that it reads, “shell =program.exe.”
-
Press ALT+F, then “S” (to save changes made to the system.ini).
-
Press ALT+F again, then “X.”
-
Remove the Windows Me start-up disk and restart the computer.
-
The Program Task Manager should start. If it doesn’t, repeat the previous steps, making sure you follow the instructions exactly.
-
From the File menu, click Run, type “MSCONFIG” (is not case sensitive) in the command line, and press Enter.
-
Click Launch System Restore, to begin restoring you computer to a previous, functional Restore Point.
Note Once you configure your computer to start Program Manager (progman.exe), you can also start the System Restore tool with the command line C:\windows\system\restore\rstrui.exe.
EAN: 2147483647
Pages: 390