UTILITIES AND SETTINGS
Windows 9x has many useful utilities for managing and maintaining the integrity of the operating system. This section is dedicated to the many utilities, configuration options, and settings that are available in Windows 9x. Pay close attention to the details listed in this section—it is very likely that they will appear on the exam.
System Monitor and System Resource Meter
System Monitor is an excellent troubleshooting tool used to monitor the system’s performance in a real-time graphics snapshot. It can be used to view the system’s CPU, virtual memory, and network client/server resources used (only on the local system), just to name a few. If System Monitor is not installed on your system, you can install it by navigating to Start > Settings > Control Panel > Add/Remove Programs > Windows Setup > System Tools > System Monitor. Select the OK button and you will be prompted to insert the Windows installation CD-ROM. After System Monitor is installed, you can locate and run it from Start > Programs > Accessories > System Tools. Figure 24.2 displays a snapshot of System Monitor.
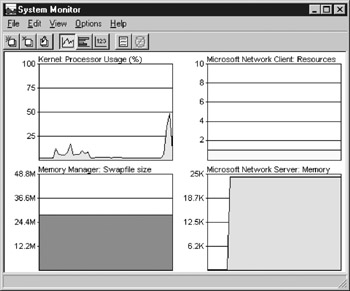
Figure 24.2: System Monitor.
| Note | Remember that System Monitor is not used to monitor the network utilization of other client and server computers. |
Many other useful tools, including the Windows 9x Resource Meter, which is used to monitor system, user, and GDI heap resources, are installed through the Add/Remove Program applet in the Control Panel.
Task Manager
The Task Manager is by far one of the most useful tools available in most Microsoft operating systems. Pressing Ctrl+Alt+Delete displays the Task Manager and programs that are currently running on the operating system. If a process or program is stalled or not responding, you can select the program and press the End Task radio button to remove it. Pressing Ctrl+Alt+Delete twice restarts the system. Figure 24.3 displays some of the many system processes in the Task Manager of Windows 2000.
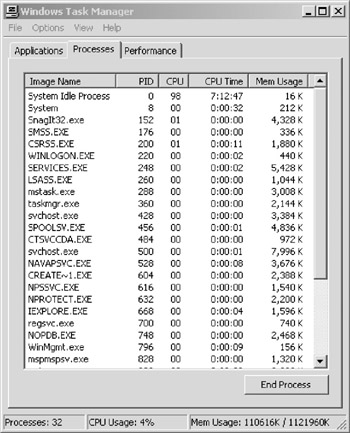
Figure 24.3: Windows Task Manager.
Dr. Watson
Dr. Watson™ is a program error debugger tool used in Windows 9x, NT, and 2000 to detect and log critical error information pertaining to system halts. Dr. Watson also attempts to point you in the right direction by offering possible tips for problem and error resolution. The question at hand does not seem to be “Dr. Watson, I presume?” Instead, the question seems to be, “Dr. Watson, where are you storing your log files?” The Dr. Watson tool stores its information in log files located in various places. In Windows 9x, the Dr. Watson log file is called WATSONXXX.WLG and is stored in C:\WINDOWS\DRWATSON. In Windows NT, Dr. Watson creates two log files named DRWTSN32.LOG and USER.DMP that are stored in C:\WINNT. When Dr. Watson intercepts a program fault in Windows 2000, the file DRWTSN32.LOG is produced and is stored in the C:\DOCUMENTS AND SETTINGS\ALL USERS\DOCUMENTS\DRWATSON. Dr. Watson offers a standard view and an advanced view for diagnostic reporting purposes.
Device Manager
The Device Manager is probably the most useful utility ever created for viewing, troubleshooting, and installing devices that are attached to a computer system. As mentioned earlier in this book, the Device Manager can be used to view or change system resources, such as IRQs, I/Os, and DMAs. The Device Manager is available in Windows 9x and Windows 2000. It is not available in Windows NT.
There are two easy ways to navigate to the Device Manager utility in Windows 9x. A quick way to access it is to right-click the Desktop icon My Computer, select Properties, and choose Device Manager. You can also access Device Manager by clicking Start > Settings > Control Panel, double-clicking the System icon, and choosing the Device Manager tab. The Device Manager opens, and you see a display similar to that shown in Figure 24.4.
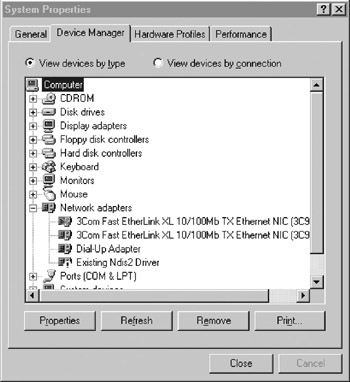
Figure 24.4: Windows 9x Device Manager.
The Properties button depicted in Figure 24.4 allows you to view more information about the device that you select. If you click Computer and select Properties, you can view information regarding the IRQs, DMAs, I/Os, and memory of your particular system. The Refresh button forces the system to refresh the device through a process called enumeration. This means the system will simply start the plug-and-play process for the device. The Remove button forces the device to be deleted from the operating system’s Registry. The Print button prints out a report based on the devices listed in Device Manager. You can expand and view more information for a particular device by clicking on the plus (+) sign that is located to the right of it.
The Device Manager places specific symbols on its list of devices to notify you if a particular device is having a problem or has been disabled. The most common Device Manager symbols and their meanings are as follows:
-
A black exclamation point (!) in a yellow circle represents a device in a problem state. The device in question may still be operational; the error may be related to the system’s ability to detect the device, or it may be a device driver issue.
-
A red “X” means that the device in question has been disabled by the system. A resource conflict or a damaged device usually causes this error.
-
A blue “I” on a white background is used to show that a device’s system resources have been manually configured. It is the least common symbol of the three and is used for informational purposes only.
What do you do if you are having trouble with devices in the Device Manager? Here are a few important tips:
-
It is important to understand that the Device Manager may not always be able to list a device’s properties. If you have a device that seems to be running properly but you cannot list its properties in the Device Manager, you are most likely using a CONFIG.SYS file to load older Real Mode drivers for the device. This often occurs when running older CD-ROM devices with Windows 9x.
-
If a device is displaying a black exclamation point (!) on a yellow circle, you should check the properties of the device and identify any resource conflicts. You may have to reassign an IRQ for the device in question before the system can utilize it. You can also troubleshoot this error by starting the Hardware Conflict Troubleshooter that is located in Windows Help. To practice using the Windows 98 troubleshooters, select Start > Help and select Troubleshooting.
Note The Device Manager should always be your first-choice utility to view and modify device resources.
The Windows 95 installation CD-ROM contains several useful hardware diagnostic tools, such as MSD.EXE and HWDIAG.EXE. MSD.EXE is based on the old DOS diagnostic reporting tool. HWDIAG.EXE is a more robust diagnostic tool that will provide detailed information about hardware devices. Neither of these tools loads by default; your best bet is to use the Device Manager.
Windows Update
All current versions of Windows operating systems include the Windows update feature known as Windows Update Manager. This utility is used to keep your operating system up to date with current patches, fixes, security updates, service releases, and other information offered by Microsoft. Simply select Start > Windows Update. You will be directed to http://windowsupdate.microsoft.com/. Follow the instructions on this site to bring your operating system up to date.
Here are some important notes regarding Windows Update:
-
It is recommended that you view the Web pages on the Windows Update site at an 800 x 600 or higher screen resolution.
-
When you enter the Microsoft Windows update site, ActiveX controls are downloaded to your system. These controls are used to check your system for specific updates that your system may require. After checking your system, Windows update provides you with a list of updates, software, and drivers that are suggested in order to keep your system up to date.
-
If you reinstall windows or upgrade you system, it is recommended that you reinstall any components you had previously installed using Windows Update.
Display Settings
When you experience display-related problems, start by navigating to the Windows 9x Display Properties Window. Select Start > Settings > Control Panel, and double-click on the Display icon. The Display Properties Settings Window should appear by default (Figure 24.5). You can also get to this window by right-clicking the Windows Desktop, selecting Properties, and clicking the Settings tab.
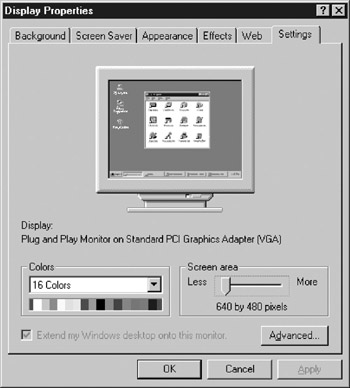
Figure 24.5: Windows 9x Display Properties Settings Window.
Figure 24.5 shows the Display Properties Settings window for the second time in this book—and for good reason. The current as well as past A+ Operating System exams focus on your ability to resolve display-related issues with this graphic. For example, If you are running a 640 4 80-pixel display, as shown in Figure 24.5, and you are unable to view entire Web pages through your Internet browser, or you want to fit more icons on your Desktop, simply use the mouse to move the “Screen area” bar to 800 600 pixels or more. If your video card supports a higher resolution, you will be able to fit more into the viewable screen area with this method. If you select the Advanced > Performance button, you will have the option of changing the Graphics Hardware acceleration settings.
| Note | The exam may try to confuse you here. Another way to navigate to the Graphics Hardware acceleration settings is Control Panel > System > Performance > Graphics. |
Changing these settings can be useful if you are having trouble with how fast your system is handling graphics. If you select Advanced > Adapter, the system’s video Adapter/Driver information will look like that shown in Figure 24.6. If you select the Change radio button on this screen, the Update Device Driver Wizard window will appear and lead you through the process of updating the video adapter driver. Remember, there are usually several ways to achieve a single goal in a Windows operating system. You can update your video adapter driver, as well as many other device drivers, through Device Manager.
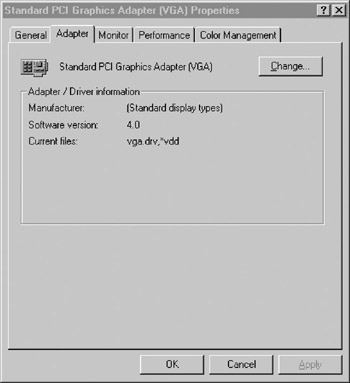
Figure 24.6: Graphics Adapter Properties Window.
Virtual Memory Settings
In Chapter 23, we discussed virtual memory and swap files. You should recall that Windows 9x has the ability to use a portion of free hard disk space as a temporary storage area or memory buffer area for programs that need more memory than is available in RAM. This temporary hard disk memory area is called virtual memory or swap file. The actual name for this memory in Windows 9x is called WIN386.SWP.
To view or change your virtual memory settings in Windows 9x, select Start > Settings > Control Panel > System > Performance > Virtual Memory. You will be presented with a window similar to that shown in Figure 24.7. As stated in the Virtual Memory window, you should be very cautious when changing your system’s virtual memory settings. If you are not sure of what these settings should be, you should obviously let Windows manage your settings for you. If Windows is managing your virtual memory settings for you, it allocates around 12MB above the amount of physical RAM installed in your system. For example, if you have 64MB of RAM installed in your system, Windows will create and manage a swap file of around 76MB of hard drive space.
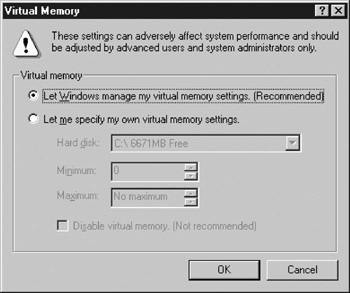
Figure 24.7: Windows 9x Virtual Memory Settings.
The Recycle Bin
The Windows 9x Recycle Bin is a Desktop icon that represents a directory in which files are stored on a temporary basis. When you delete a file from a computer system’s hard drive, it is moved to the Recycle Bin. To restore a file that has been deleted to its original location on the hard drive, right-click on the file in the Recycle Bin and select Restore, or select File from the menu bar and then select Restore. If you want to remove a file from the Recycle Bin to free up hard drive space, select File from the menu bar, and select Empty Recycle Bin. You can also delete entries in the Recycle Bin by selecting File from the menu bar and selecting Delete. When you delete a file from the Recycle Bin, its associated entry in the hard drive’s FAT is removed. It is still possible to recover the deleted file with many available third-party utility programs.
Disk Cleanup Utilities and More
Your hard drive can get bogged down after a while with unnecessary files. Applications and programs can leave temporary files scattered on your hard drive, temporary Internet files and cookies are left behind when you surf the Internet, and all those downloaded ‘shareware’ programs that you haven’t used in ages can take up precious hard drive space.
Windows 98 has an excellent tool known as Disk Cleanup. This built-in utility allows you to get rid of those unnecessary files and free up space. To access the Disk Cleanup in Windows 98, click Start > Programs > Accessories > System Tools > Disk Cleanup. A window appears that asks you to select the drive you want to clean up. The default is C:. Select the OK radio button, and the window shown in Figure 24.8 will be displayed. You can select the options you wish to have removed from your drive by inserting a check mark next to the appropriate selections. Always review your downloaded program files as well as files located in the Recycle Bin to verify that you no longer have a use for them before removing them. You can do this by selecting the View Files radio button on the Disk Cleanup window.
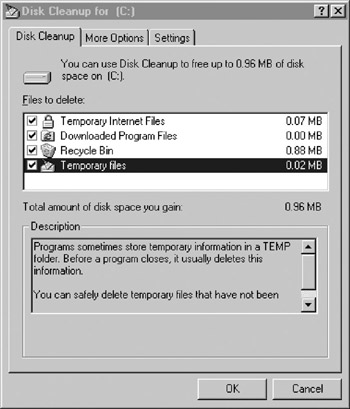
Figure 24.8: The Disk Cleanup Window.
If you select the More Options tab in the Disk Cleanup window, you will have the options of removing optional Windows components and other programs that you do not often use. If you choose to remove Windows components from within this window, you will automatically be directed to the Add/Remove Programs Properties/Windows Setup Window shown in Figure 24.9. This window lets you add or remove a Windows component. Notice the Install/Uninstall tab. The Install/Uninstall window lets you install applications and programs from a floppy or CD-ROM, or uninstall registered software that you do not use. The Add/Remove Programs Properties window can also be accessed by clicking Start > Settings > Control Panel > Add/Remove Programs.
You should also take note of the Startup Disk tab in Figure 24.9. With the Startup Disk window, you can create a Windows 9x bootable troubleshooting floppy disk that you can use later for diagnostic purposes.
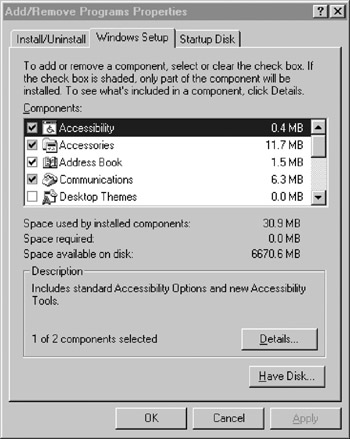
Figure 24.9: Add/Remove Programs Properties Window.
Windows 9x allows you to schedule routine maintenance jobs easily through the use of the Maintenance Wizard. This utility is a handy tool that can be used to automatically run utilities such as Defrag, ScanDisk, or Disk Cleanup at times that are convenient for the computer user. In Windows 9x, the Maintenance Wizard utility can be run by selecting Start > Programs > Accessories > System Tools > Maintenance Wizard.
Backup Utility
Windows operating systems come with a Backup utility program that is used to backup information to a tape storage device for future restoration. It is of utmost importance that you backup your critical information in the event of an operating system failure or accidental deletion of files.
A good backup program consists of a backup schedule that can be created using the Backup utility or a third-party backup utility program. In Windows 9x, the Backup utility can be accessed by selecting Start > Programs > Accessories > System Tools > Backup. If the Backup utility is not installed, you can install it through the Add/Remove programs applet located in the Control Panel.
There are several backup types and strategies that you can implement. The backup type and strategy that you use depends on the amount of storage capacity you have, the time it takes to back up files, and the time it takes to restore files. The following types of backups can be used to build your own personalized backup strategy.
-
Copy backs up only selected files. The Copy backup turns the Backup archive bit off or resets it.
-
Full backup backs up everything on your hard drive. If you have to restore an entire system, it is the best backup to have. During this backup, the backup archive bit is turned off. This simply means that every file will be backed up again whether or not its contents have changed. The disadvantages of this type of backup are that it takes longer to run and it is often redundant because most system files do not change.
-
Incremental backup backs up all the files that have changed or been created since the last backup job and have their archive bits set to on. This backup type uses less tape storage space and spreads the storage of files across several tapes. With an incremental backup, files are backed up much faster than with a differential backup, but they take much longer to restore. To do a proper incremental restore, you will need the last full backup tape and multiple incremental tapes.
-
Differential backup backs up all files that have been created or have changed since the last backup and does not reset the archive bit. The archive bit is left on. Differential backup takes much longer to do, but is much faster to restore. To do a proper restore, you will need the last full backup tape and the last differential backup tape.
A Zip drive is a popular information storage device. The average Zip drive can hold about 100MB of data, which can be very useful for the daily storage and backup of important files. Users of Windows can use a third-party utility, such as WinZip™, to store files in compressed form and then back them up. Windows stores compressed files in .ZIP format.
EAN: 2147483647
Pages: 390