Subclassing QWidget
Most custom widgets are simply a combination of existing widgets, whether they are built-in Qt widgets or other custom widgets such as HexSpinBox. Custom widgets that are built by composing existing widgets can usually be developed in Qt Designer:
- Create a new form using the "Widget" template.
- Add the necessary widgets to the form, then lay them out.
- Set up the signals and slots connections and add any necessary code (either in a .ui.h file or in a subclass) to provide the desired behavior.
Naturally, this can also be done entirely in code. Whichever approach is taken, the resulting class inherits directly from QWidget.
If the widget has no signals and slots of its own and doesn't reimplement any virtual functions, it is even possible to simply assemble the widget by aggregating existing widgets without a subclass. That's the approach we used in Chapter 1 to create the Age application, with a QHBox, a QSpinBox, and a QSlider. Even so, we could just as easily have subclassed QHBox and created the QSpinBox and QSlider in the subclass's constructor.
When none of Qt's widgets are suitable for the task at hand, and when there's no way to combine or adapt existing widgets to obtain the desired result, we can still create the widget we want. This is achieved by subclassing QWidget and reimplementing a few event handlers to paint the widget and to respond to mouse clicks. This approach gives us complete freedom to define and control both the appearance and the behavior of our widget. Qt's built-in widgets, like QLabel, QPushButton, and QTable, are implemented this way. If they didn't exist in Qt, it would still be possible to create them ourselves using the public functions provided by QWidget in a totally platform-independent manner.
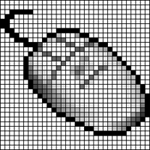
To demonstrate how to write a custom widget using this approach, we will create the IconEditor widget shown in Figure 5.2. The IconEditor is a widget that could be used in an icon editing program.
Figure 5.2. The IconEditor widget
Let's begin by reviewing the header file.
#ifndef ICONEDITOR_H
#define ICONEDITOR_H

#include
#include

class IconEditor : public QWidget
{
 Q_OBJECT
 Q_PROPERTY(QColor penColor READ penColor WRITE setPenColor)
 Q_PROPERTY(QImage iconImage READ iconImage WRITE setIconImage)
 Q_PROPERTY(int zoomFactor READ zoomFactor WRITE setZoomFactor)

public:
 IconEditor(QWidget *parent = 0, const char *name = 0);

 void setPenColor(const QColor &newColor);
 QColor penColor()const { return curColor; }
 void setZoomFactor(int newZoom);
 int zoomFactor() const { return zoom; }
 void setIconImage(const QImage &newImage);
 const QImage &iconImage() const { return image; }
 QSize sizeHint() const;
The IconEditor class uses the Q_PROPERTY() macro to declare three custom properties: penColor, iconImage, and zoomFactor. Each property has a type, a "read" function, and a "write" function. For example, the penColor property is of type QColor and can be read and written using the penColor() and setPenColor() functions.
When we make use of the widget in Qt Designer, custom properties appear in Qt Designer's property editor below the properties inherited from QWidget. Properties may be of any type supported by QVariant. The Q_OBJECT macro is necessary for classes that define properties.
protected:
 void mousePressEvent(QMouseEvent *event);
 void mouseMoveEvent(QMouseEvent *event);
 void paintEvent(QPaintEvent *event);
private:
 void drawImagePixel(QPainter *painter, int i, int j);
 void setImagePixel(const QPoint &pos, bool opaque);

 QColor curColor;
 QImage image;
 int zoom;
};

#endif
IconEditor reimplements three protected functions from QWidget and has a few private functions and variables. The three private variables hold the values of the three properties.
The implementation file begins with #include directives and the IconEditor's constructor:
#include

#include "iconeditor.h"

IconEditor::IconEditor(QWidget *parent, const char *name)
 : QWidget(parent, name, WStaticContents)
{
 setSizePolicy(QSizePolicy::Minimum, QSizePolicy::Minimum);
 curColor = black;
 zoom = 8;
 image.create(16, 16, 32);
 image.fill(qRgba(0, 0, 0, 0));
 image.setAlphaBuffer(true);
}
The constructor has some subtle aspects such as the setSizePolicy() call and the WStaticContents flag. We will discuss them shortly.
The zoom factor is set to 8, meaning that each pixel in the icon will be rendered as an 8 x 8 square. The pen color is set to black; the black symbol is a predefined value in the Qt class (QObject's base class).
The icon data is stored in the image member variable and can be accessed through the setIconImage() and iconImage() functions. An icon editor program would typically call setIconImage() when the user opens an icon file and iconImage() to retrieve the icon when the user wants to save it.
The image variable is of type QImage. We initialize it to 16 x 16 pixels and 32-bit depth, clear the image data, and enable the alpha buffer.
The QImage class stores an image in a hardware-independent fashion. It can be set to use a 1-bit, 8-bit, or 32-bit depth. An image with 32-bit depth uses 8 bits for each of the red, green, and blue components of a pixel. The remaining 8 bits store the pixel's alpha componentthat is, its opacity. For example, a pure red color's red, green, blue, and alpha components have the values 255, 0, 0, and 255. In Qt, this color can be specified as
QRgb red = qRgba(255, 0, 0, 255);
or as
QRgb red = qRgb(255, 0, 0);
QRgb is simply a typedef for unsigned int, and qRgb() and qRgba() are inline functions that combine their arguments into one 32-bit integer value. It is also possible to write
QRgb red = 0xFFFF0000;
where the first FF corresponds to the alpha component and the second FF to the red component. In the IconEditor constructor, we fill the QImage with a transparent color by using 0 as the alpha component.
Qt provides two types for storing colors: QRgb and QColor. While QRgb is only a typedef used in QImage to store 32-bit pixel data, QColor is a class with many useful functions and is widely used in Qt to store colors. In the IconEditor widget, we only use QRgb when dealing with the QImage; we use QColor for everything else, including the penColor property.
QSize IconEditor::sizeHint() const
{
 QSize size = zoom * image.size();
 if (zoom >= 3)
 size += QSize(1, 1);
 return size;
}
The sizeHint() function is reimplemented from QWidget and returns the ideal size of a widget. Here, we take the image size multiplied by the zoom factor, with one extra pixel in each direction to accommodate a grid if the zoom factor is 3 or more. (We don't show a grid if the zoom factor is 2 or 1, because the grid would hardly leave any room for the icon's pixels.)
A widget's size hint is mostly useful in conjunction with layouts. Qt's layout managers try as much as possible to respect a widget's size hint when they lay out a form's child widgets. For IconEditor to be a good layout citizen, it must report a credible size hint.
In addition to the size hint, widgets have a size policy that tells the layout system whether they like to be stretched and shrunk. By calling setSizePolicy() in the constructor with QSizePolicy::Minimum as horizontal and vertical policies, we tell any layout manager that is responsible for this widget that the widget's size hint is really its minimum size. In other words, the widget can be stretched if required, but it should never shrink below the size hint. This can be overridden in Qt Designer by setting the widget's sizePolicy property. The meaning of the various size policies is explained in Chapter 6 (Layout Management).
void IconEditor::setPenColor(const QColor &newColor)
{
 curColor = newColor;
}
The setPenColor() function sets the current pen color. The color will be used for newly drawn pixels.
void IconEditor::setIconImage(const QImage &newImage)
{
 if (newImage != image) {
 image = newImage.convertDepth(32);
 image.detach();
 update();
 updateGeometry();
 }
}
The setIconImage() function sets the image to edit. We call convertDepth() to make the image 32-bit if it isn't already. Elsewhere in the code, we will assume that the image data is stored as 32-bit QRgb values.
We also call detach() to take a deep copy of the data stored in the image. This is necessary because the image data might be stored in ROM. QImage tries to save time and memory by copying the image data only when explicitly requested to do so. This optimization is called explicit sharing and is discussed with QMemArray in the "Pointer-Based Containers" section of Chapter 11.
After setting the image variable, we call QWidget::update() to force a repainting of the widget using the new image. Next, we call QWidget::updateGeometry() to tell any layout that contains the widget that the widget's size hint has changed. The layout will then automatically adapt to the new size hint.
void IconEditor::setZoomFactor(int newZoom)
{
 if (newZoom < 1)
 newZoom = 1;

 if (newZoom != zoom) {
 zoom = newZoom;
 update();
 updateGeometry();
 }
}
The setZoomFactor() function sets the zoom factor for the image. To prevent division by zero later, we correct any value below 1. Again, we call update() and updateGeometry() to repaint the widget and to notify any managing layout about the size hint change.
The penColor(), iconImage(), and zoomFactor() functions are implemented as inline functions in the header file.
We will now review the code for the paintEvent() function. This function is IconEditor's most important function. It is called whenever the widget needs repainting. The default implementation in QWidget does nothing, leaving the widget blank.
Just like contextMenuEvent() and closeEvent(), which we met in Chapter 3, paintEvent() is an event handler. Qt has many other event handlers, each of which corresponds to a different type of event. Chapter 7 covers event processing in depth.
There are many situations when a paint event is generated and paintEvent() is called:
- When a widget is shown for the first time, the system automatically generates a paint event to force the widget to paint itself.
- When a widget is resized, the system automatically generates a paint event.
- If the widget is obscured by another window and then revealed again, a paint event is generated for the area that was hidden (unless the window system stored the area).
We can also force a paint event by calling QWidget::update() or QWidget::repaint(). The difference between these two functions is that repaint() forces an immediate repaint, whereas update() simply schedules a paint event for when Qt next processes events. (Both functions do nothing if the widget isn't visible on screen.) If update() is called multiple times, Qt compresses the consecutive paint events into a single paint event to avoid flicker. In IconEditor, we always use update().
Here's the code:
void IconEditor::paintEvent(QPaintEvent *)
{
 QPainter painter(this);

 if (zoom >= 3) {
 painter.setPen(colorGroup().foreground());
 for (int i = 0; i <= image.width(); ++i)
 painter.drawLine(zoom * i, 0,
 zoom * i, zoom * image.height());
 for (int j = 0; j <= image.height(); ++j)
 painter.drawLine(0, zoom * j,
 zoom * image.width(), zoom * j);
 }

 for (int i = 0; i < image.width(); ++i) {
 for (int j = 0; j < image.height(); ++j)
 drawImagePixel(&painter, i, j);
 }
}
We start by constructing a QPainter object on the widget. If the zoom factor is 3 or more, we draw the horizontal and vertical lines that form the grid using the QPainter::drawLine() function.
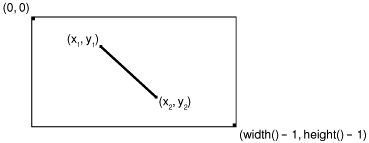
A call to QPainter::drawLine() has the following syntax:
painter.drawLine(x1, y1, x2, y2);
where (x1, y1) is the position of one end of the line and (x2, y2) is the position of the other end. There is also an overloaded version of the function that takes two QPoints instead of four ints.
The top-left pixel of a Qt widget is located at position (0, 0), and the bottomright pixel is located at (width() 1, height() 1). This is similar to the conventional Cartesian coordinate system, but upside down, and makes a lot of sense in GUI programming. It is perfectly possible to change QPainter's coordinate system by using transformations, such as translation, scaling, rotation, and shearing. This is covered in Chapter 8 (2D and 3D Graphics).
Figure 5.3. Drawing a line using QPainter
Before we call drawLine() on the QPainter, we set the line's color using setPen(). We could hard-code a color, like black or gray, but a better approach is to use the widget's palette.
Every widget is equipped with a palette that specifies which colors should be used for what. For example, there is a palette entry for the background color of widgets (usually light gray) and one for the color of text on that background (usually black). By default, a widget's palette adopts the window system's color scheme. By using colors from the palette, we ensure that IconEditor respects the user's preferences.
A widget's palette consists of three color groups: active, inactive, and disabled. Which color group should be used depends on the widget's current state:
- The active color group is used for widgets in the currently active window.
- The inactive color group is used for widgets in the other windows.
- The disabled color group is used for disabled widgets in any window.
The QWidget::palette() function returns the widget's palette as a QPalette object. The color groups are available through QPalette's active(), inactive(), and disabled() functions, and are of type QColorGroup. For convenience, QWidget::colorGroup() returns the correct color group for the current state of the widget, so we rarely need to access the palette directly.
The paintEvent() function finishes by drawing the image itself, using the IconEditor::drawImagePixel() function to draw each of the icon's pixels as filled squares.
void IconEditor::drawImagePixel(QPainter *painter, int i, int j)
{
 QColor color;
 QRgb rgb = image.pixel(i, j);

 if (qAlpha(rgb) == 0)
 color = colorGroup().base();
 else
 color.setRgb(rgb);

 if (zoom >= 3) {
 painter->fillRect(zoom * i + 1, zoom * j + 1,
 zoom - 1, zoom - 1, color);
 } else {
 painter->fillRect(zoom * i, zoom * j,
 zoom, zoom, color);
 }
}
The drawImagePixel() function draws a zoomed pixel using a QPainter. The i and j parameters are pixel coordinates in the QImagenot in the widget. (If the zoom factor is 1, the two coordinate systems coincide exactly.) If the pixel is transparent (its alpha component is 0), we use the current color group's "base" color (typically white) to draw the pixel; otherwise, we use the pixel's color in the image. Then we call QPainter::fillRect() to draw a filled square. If the grid is shown, the square is reduced by one pixel in both directions to avoid painting over the grid.
Figure 5.4. Drawing a rectangle using QPainter
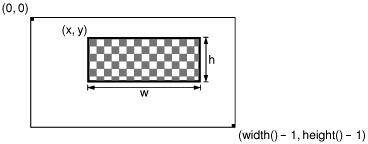
The call to QPainter::fillRect() has the following syntax:
painter->fillRect(x, y, w, h, brush);
where (x, y) is the position of the top-left corner of the rectangle, w x h is the size of the rectangle, and brush specifies the color to fill with and the fill pattern to use. By passing a QColor as the brush, we obtain a solid fill pattern.
void IconEditor::mousePressEvent(QMouseEvent *event)
{
 if (event->button() == LeftButton)
 setImagePixel(event->pos(), true);
 else if (event->button() == RightButton)
 setImagePixel(event->pos(), false);
}
When the user presses a mouse button, the system generates a "mouse press" event. By reimplementing QWidget::mousePressEvent(), we can respond to this event and set or clear the image pixel under the mouse cursor.
If the user pressed the left mouse button, we call the private function setImagePixel() with true as the second argument, telling it to set the pixel to the current pen color. If the user pressed the right mouse button, we also call setImagePixel(), but pass false to clear the pixel.
void IconEditor::mouseMoveEvent(QMouseEvent *event)
{
 if (event->state() & LeftButton)
 setImagePixel(event->pos(), true);
 else if (event->state() & RightButton)
 setImagePixel(event->pos(), false);
}
The mouseMoveEvent() handles "mouse move" events. By default, these events are only generated when the user is holding down a button. It is possible to change this behavior by calling QWidget::setMouseTracking(), but we don't need to do so for this example.
Just as pressing the left or right mouse button sets or clears a pixel, keeping it pressed and hovering over a pixel is also enough to set or clear a pixel. Since it's possible to hold more than one button pressed down at a time, the value returned by QMouseEvent::state() is a bitwise OR of the mouse buttons (and of modifier keys like Shift and Ctrl). We test whether a certain button is pressed down using the & operator, and if it is, we call setImagePixel().
void IconEditor::setImagePixel(const QPoint &pos, bool opaque)
{
 int i = pos.x() / zoom;
 int j = pos.y() / zoom;

 if (image.rect().contains(i, j)) {
 if (opaque)
 image.setPixel(i, j, penColor().rgb());
 else
 image.setPixel(i, j, qRgba(0, 0, 0, 0));

 QPainter painter(this);
 drawImagePixel(&painter, i, j);
 }
}
The setImagePixel() function is called from mousePressEvent() and mouseMoveEvent() to set or clear a pixel. The pos parameter is the position of the mouse on the widget.
The first step is to convert the mouse position from widget coordinates to image coordinates. This is done by dividing the x and y components of the mouse position by the zoom factor. Next, we check whether the point is within the correct range. The check is easily made using QImage::rect() and QRect::contains(); this effectively checks that i is between 0 and image.width() 1 and that j is between 0 and image.height() 1.
Depending on the opaque parameter, we set or clear the pixel in the image. Clearing a pixel is really setting it to be transparent. At the end, we call drawImagePixel() to repaint the individual pixel that changed.
Now that we have reviewed the member functions, we will return to the WStaticContents flag that we used in the constructor. This flag tells Qt that the widget's content doesn't change when the widget is resized and that the content stays rooted to the widget's top-left corner. Qt uses this information to avoid needlessly repainting areas that are already shown when resizing the widget.
Normally, when a widget is resized, Qt generates a paint event for the widget's entire visible area. But if the widget is created with the WStaticContents flag, the paint event's region is restricted to the pixels that were not previously shown. If the widget is resized to a smaller size, no paint event is generated at all.
Figure 5.5. Resizing a WStaticContents widget

The IconEditor widget is now complete. Using the information and examples from earlier chapters, we could write code that uses the IconEditor as a window in its own right, as a central widget in a QMainWindow, as a child widget inside a layout, or as a child widget inside a QScrollView (p. 145). In the next section, we will see how to integrate it with Qt Designer.
Part I: Basic Qt
Getting Started
Creating Dialogs
- Creating Dialogs
- Subclassing QDialog
- Signals and Slots in Depth
- Rapid Dialog Design
- Shape-Changing Dialogs
- Dynamic Dialogs
- Built-in Widget and Dialog Classes
Creating Main Windows
- Creating Main Windows
- Subclassing QMainWindow
- Creating Menus and Toolbars
- Implementing the File Menu
- Setting Up the Status Bar
- Using Dialogs
- Storing Settings
- Multiple Documents
- Splash Screens
Implementing Application Functionality
- Implementing Application Functionality
- The Central Widget
- Subclassing QTable
- Loading and Saving
- Implementing the Edit Menu
- Implementing the Other Menus
- Subclassing QTableItem
Creating Custom Widgets
- Creating Custom Widgets
- Customizing Qt Widgets
- Subclassing QWidget
- Integrating Custom Widgets with Qt Designer
- Double Buffering
Part II: Intermediate Qt
Layout Management
- Layout Management
- Basic Layouts
- Splitters
- Widget Stacks
- Scroll Views
- Dock Windows
- Multiple Document Interface
Event Processing
- Event Processing
- Reimplementing Event Handlers
- Installing Event Filters
- Staying Responsive During Intensive Processing
2D and 3D Graphics
Drag and Drop
Input/Output
- Input/Output
- Reading and Writing Binary Data
- Reading and Writing Text
- Handling Files and Directories
- Inter-Process Communication
Container Classes
Databases
Networking
XML
Internationalization
- Internationalization
- Working with Unicode
- Making Applications Translation-Aware
- Dynamic Language Switching
- Translating Applications
Providing Online Help
- Providing Online Help
- Tooltips, Status Tips, and Whats This? Help
- Using QTextBrowser as a Simple Help Engine
- Using Qt Assistant for Powerful Online Help
Multithreading
- Multithreading
- Working with Threads
- Communicating with the GUI Thread
- Using Qts Classes in Non-GUI Threads
Platform-Specific Features
EAN: 2147483647
Pages: 140
