| Windows XP Professional includes several tools that are used for monitoring, optimizing, and troubleshooting performance. These include Performance Console, the Task Manager, the Scheduled Tasks application, and several command-line utilities. Performance Console Performance Console replaces the Performance Monitor tool found in Windows NT and is similar to the Windows 2000 Performance Console. It includes two snap-ins: System Monitor (see Figure 9.1), which provides a real-time graph of computer performance, and Performance Logs and Alerts, which records computer performance into log files and alerts you to performance beyond specified levels. Figure 9.1. The System Monitor snap-in displays a real-time graph of activity for selected objects and counters. 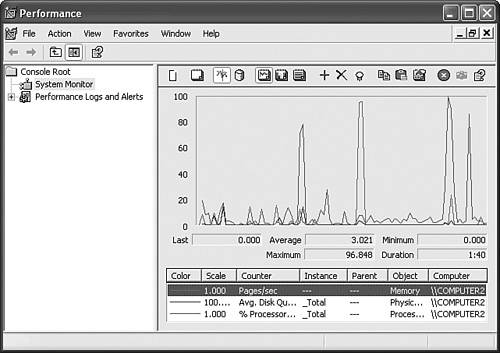
Performance Console enables you to perform tasks such as the following: Identify performance problems such as bottlenecks Monitor resource usage Track trends over time Measure the effects of changes in system configuration Generate alerts when unusual conditions occur
Before we discuss the Performance Console tool, you need to be familiar with the following terms, which are used in a specific manner when referring to performance metrics: Object A specific hardware or software component that the Performance Console is capable of monitoring. It can be any component that possesses a series of measurable properties. Windows XP Professional comes with a defined set of objects; applications such as Internet Information Services (IIS) installed on Windows XP may add more objects to the available set. Counter One of a series of statistical measurements associated with each object. Instance Refers to multiple occurrences of a given object. For example, if your computer has two hard disks, two instances of the PhysicalDisk object will be present. These instances are numbered sequentially, starting with 0 for the first occurrence. An instance labeled "_Total" is also present, yielding the sum of performance data for each counter. Note that not all objects have multiple instances.
Information on objects and counters is displayed in the following format: Object (_instance)\Counter. For example, Processor (_0)\%Processor Time measures the %Processor time on the first processor. The instance does not appear if only a single instance is present. System Monitor System Monitor is a snap-in contained within the Performance Console that enables you to obtain a real-time graph of computer performance statistics: Step by Step 9.1 shows you how. Step by Step: 9.1 Configuring System Monitor 1. | Click Start, All Programs, Administrative Tools, Performance.
| 2. | By default, System Monitor starts and displays the Memory\Pages/Sec, PhysicalDisk\Avg. Disk Queue Length, and Processor\%Processor Time counters.
| 3. | To add objects and counters, click the "+" icon on the toolbar.
| 4. | In the Add Counters dialog box that appears (see Figure 9.2), select the desired object from the Performance Object list.
Figure 9.2. You can select from a large number of objects from the Performance Object drop-down list in the Add Counters dialog box. 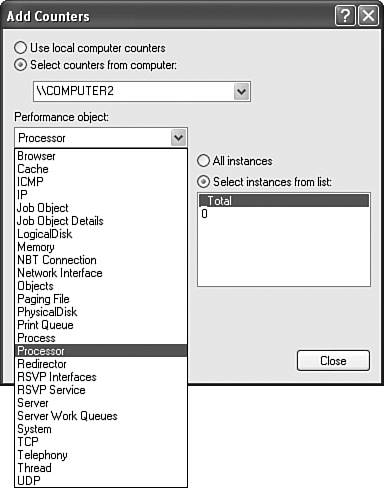
| 5. | This action displays a list of available counters and enables you to select one or more counters. To add counters to the graph, select the counter and click Add. To see an explanation of what the counter measures, click Explain (see Figure 9.3).
Figure 9.3. The Explain button brings up a brief explanation of the property measured by each performance counter. 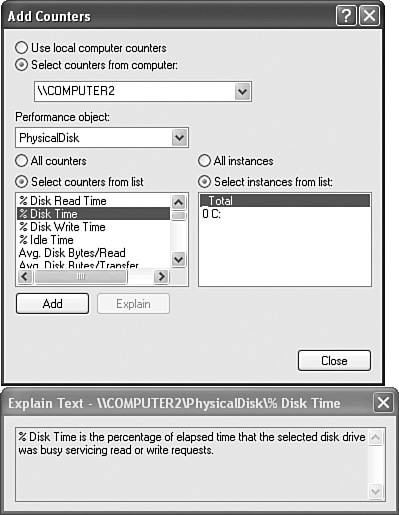
| 6. | Repeat steps 4 and 5 to add more counters. We discuss suitable counters in the sections to follow.
| 7. | When you are finished, click the Close button.
|
|
Note You can highlight individual counters in System Monitor To highlight an individual counter in the System Monitor display, select it from the list at the bottom of the details pane and click the yellow light bulb in the taskbar. The highlighted counter appears in a heavy line. You can use the up or down arrow keys to toggle through the list of counters and highlight each one in turn. This feature helps you to find the desired counter from a graph that includes a large number of counters.
Exam Alert Use the Explain button The extremely large number of performance counters can be daunting for even the experienced administrator. When selecting performance counters, make a habit of clicking the Explain button to view information on each counter.
Performance Logs and Alerts The Performance Logs and Alerts snap-in enables you to log computer performance over time while you are performing other tasks. Such logging is important because changes in computer performance often occur only after an extended period of time. Best practices state that you should create a performance baseline, which is a log of computer performance that you can save for comparing with future performance and tracking any changes that might have occurred over time. In this way you can identify potential bottlenecks in computer performance and take any required corrective measures. You can also monitor the effectiveness of any changes you make to a computer's configuration. Creating Performance Logs Performance logs are binary files that save performance statistics for later viewing and analysis in the System Monitor snap-in; you may also export them to spreadsheet or database programs for later analysis. The Performance Logs and Alerts snap-in provides you with this capability. Follow Step by Step 9.2 to create a performance log. Step by Step: 9.2 Creating a Performance Log 1. | In the console tree of the Performance snap-in, select and expand Performance Logs and Alerts.
| 2. | Double-click Counter Logs. By default, a log named System Overview appears in the details pane. The colored icon indicates the log's status: a green icon indicates that the log is running and a red icon indicates that it is stopped.
| 3. | To create a new log, right-click a blank area of the details pane and select New Log Settings.
| 4. | In the New Log Settings dialog box, provide a name for the new log and click OK.
| 5. | A dialog box labeled with the name you specified opens, allowing you to configure your log. To add all available counters for an object, click Add Objects and select the desired object from the Add Objects dialog box that opens. To add individual counters, click Add Counters. You receive the same Add Counters dialog box discussed in Step by Step 9.1 and shown in Figures 9.2 and 9.3.
| 6. | When you are finished adding counters, click Close to return to the previous dialog box. As shown in Figure 9.4, the counters you added appear in this dialog box.
Figure 9.4. The General tab of a log's Properties dialog box enables you to add counters and specify a sampling interval. 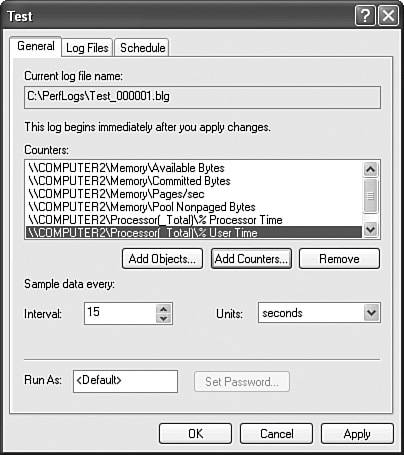
| 7. | Use the available drop-down boxes to select a sampling interval. You should select a short interval for capturing a brief snapshot of the computer's performance, or a longer interval for logging the computer's performance over one or more days.
| 8. | To configure log file properties, select the Log Files tab. This tab enables you to select several different log file types and several different endings for file names. You can choose sequential numbering, or number the logs with several available date and time formats. You can also add a descriptive comment if you desire.
| 9. | To schedule log collection, click the Schedule tab. As shown in Figure 9.5, this tab enables you to select different options for starting and stopping the log, as well as whether to start a new file or run a specified command when a log file is closed.
Figure 9.5. The Schedule tab of a log's Properties dialog box enables you to select several scheduling options. 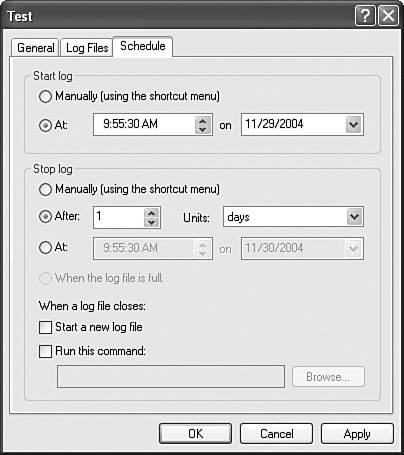
| 10. | When you are finished, click OK. The log you created appears in the details pane of the Performance snap-in. If so configured, logging begins immediately.
| 11. | To start or stop the log manually, right-click it and choose the appropriate option.
|
|
To view the contents of a log, open System Monitor and select View Log Data (the disk-shaped icon) from the taskbar at the top of the details pane. This opens a dialog box from which you can select the log file to be viewed. From the same dialog box you can also select a time range over which to display logged data. You can also configure trace logs from the Performance Logs and Alerts snap-in. Trace logs are similar to counter logs, but they log data only when a specific activity takes place, whereas counter logs track data continuously for a specified interval. Configuring trace logs is similar to configuring counter logs. Creating Performance Alerts The Alerts branch of Performance Logs and Alerts enables you to display an alert when a selected counter exceeds or drops beneath a specified value. Such alerts are useful for informing you that an unusual condition has appeared. Follow Step by Step 9.3 to configure alerts. Step by Step: 9.3 Creating an Alert 1. | In the console tree of the Performance snap-in, select and expand Performance Logs and Alerts.
| 2. | Click Alerts.
| 3. | Right-click a blank area in the details pane, and select New Alert Settings.
| 4. | Provide a name for the alert and click OK.
| 5. | In the dialog box that opens, click Add to add a performance counter. Specify the limiting value for displaying an alert and whether to display an alert for anything over or under this value. For example, you would configure Processor\%Processor Time to display an alert when it is above a certain limit and the Memory\Available Bytes counter to display an alert when it is below the specified limit. Also select a sampling interval.
| 6. | Click the Action tab to specify the type of action to be performed when the alert is triggered. You can log an entry in the Application event log, send a network message to a location you specify, start a performance log, or run a specified program.
| 7. | Click the Schedule tab to specify scheduling options, similar to those available with counter or trace logs.
| 8. | Click OK to start the alerts.
|
|
Optimizing and Troubleshooting Memory Performance Objective: Monitor, optimize, and troubleshoot performance of the Windows XP Professional desktop. The Memory object includes counters that monitor the computer's physical and virtual memory. Table 9.1 discusses the most important counters for this object. Table 9.1. Important Counters for the Memory ObjectCounter | What It Measures | Interpretation and Remedial Tips |
|---|
Pages/sec | The rate at which data is read to or written from the paging file | A value of 20 or more indicates a shortage of RAM and a possible memory bottleneck. To view the effect of paging file performance on the system, watch this counter together with LogicalDisk\% Disk Time. Add RAM to clear the problem. | Available Bytes | The amount of physical memory available | A value consistently below 4MB indicates a shortage of available memory. This might be due to memory leaks in one or more applications. Check your programs for memory leaks. You may need to add more RAM. | Committed Bytes | The amount of virtual memory that has been committed to either physical RAM or running processes | Committed memory is in use and not available to other processes. If the amount of committed bytes exceeds the amount of RAM on the computer, you may need to add RAM. | Pool Nonpaged Bytes | The amount of RAM in the non-paged pool system memory (an area holding objects that cannot be written to disk) | If this value exhibits a steady increase without a corresponding increase in computer activity, check for an application with a memory leak. | Page Faults/sec | The number of data pages that must be read from or written to the page file per second | A high value indicates a lot of paging activity. Add RAM to alleviate this problem. |
In addition to these counters, the Paging File\% Usage counter is of use when troubleshooting memory problems. This counter measures the percentage of the paging file currently in use. If it approaches 100%, you should either increase the size of the paging file or add more RAM. Lack of adequate memory may also have an impact on the performance of other subsystems in the computer. In particular, a large amount of paging, or reading/writing data from/to the paging file on the hard disk results in increased activity in both the processor and disk subsystems. You should monitor counters in these subsystems (which we discuss later in this section) at the same time if you suspect memory-related performance problems. Setting the Paging File The paging file is an area on the hard disk that is used as an additional memory location for programs and data that cannot fit into RAM (in other words, virtual memory). It is the same as the old Windows 9x swap file. By default, the paging file is located at %systemdrive%\pagefile.sys and has a default size of 1.5 times the amount of RAM in the computer. To improve performance on a computer equipped with more than one physical hard disk, you should locate the paging file on a different hard disk than that occupied by the operating system. You can also increase the size of the paging file or configure multiple paging files on different hard disks. Any of these configurations help to optimize performance by spreading out the activity of reading/writing data from/to the paging files. Note that you should retain a paging file on the system/boot drive to create a memory dump in case of a crash. This memory dump is useful for debugging purposes. Follow Step by Step 9.4 to modify the configuration of the paging file. Step by Step: 9.4 Configuring the Paging File 1. | Open the System applet in Control Panel, or alternatively, right-click My Computer and choose Properties.
| 2. | On the Advanced tab of the System Properties dialog box, select Settings under Performance.
| 3. | Select the Advanced tab of the Performance Options dialog box.
| 4. | In the Virtual memory section of this tab, click Change.
| 5. | As shown in Figure 9.6, the Virtual Memory dialog box displays the disk partitions available on the computer and the size of the paging file on each. To add a paging file to a drive, select the drive and choose Custom Size to specify an initial and maximum size in MB or System Managed Size to obtain a default size. To remove a paging file, select the drive holding the file and click No Paging File. Note that some programs may not work properly if you choose the No Paging File option. Then click Set.
Figure 9.6. You can modify paging file properties from the Virtual Memory dialog box. 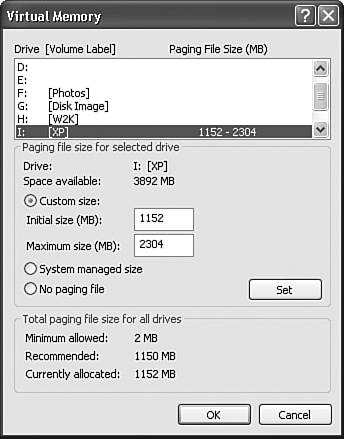
| 6. | Click OK three times to apply your changes, and to close the Performance Options and System Properties dialog boxes.
| 7. | Click Yes to restart your computer if so prompted.
|
|
Optimizing and Troubleshooting Processor Utilization Objective: Monitor, optimize, and troubleshoot performance of the Windows XP Professional desktop. The processor is the "heart" of the system because it executes all program instructions, whether internal to the operating system or in user-executed applications. The Processor object contains counters that monitor processor performance. Table 9.2 discusses the most important counters for this object. Table 9.2. Important Counters for the Processor ObjectCounter | What It Measures | Interpretation and Remedial Tips |
|---|
% Processor Time | The percentage of time the processor is executing meaningful actions (excludes the Idle process) | If this value is consistently greater than 85%, the processor could be causing a bottleneck. You should check the memory counters discussed previously; if these are high, consider adding more RAM. Otherwise, you should consider adding a faster processor (or an additional one if supported by your motherboard). | Interrupts/sec | The rate of service requests from I/O devices that interrupt other processor activities | A significant increase in the number of interrupts, without a corresponding increase in system activity, may indicate some type of hardware failure. Brief spikes are acceptable. |
You should also look at the System\Processor Queue Length counter. If the value of this counter exceeds 2, a processor bottleneck may exist, with several programs contending for the processor's time. As mentioned in Table 9.2, memory shortages may frequently manifest themselves in high processor activity. It is usually much cheaper and easier to add RAM to a computer than to add a faster or additional processor. Consequently, you may want to consider this step first when you are experiencing frequent high processor activity. Optimizing and Troubleshooting Disk Performance Objective: Monitor, optimize, and troubleshoot performance of the Windows XP Professional desktop. Disk performance is measured by two processor objects: The PhysicalDisk counters measure the overall performance of a single physical hard disk rather than individual partitions. LogicalDisk counters measure the performance of a single partition or volume on a disk. These counters include the performance of spanned or striped volumes that cross physical disks. PhysicalDisk counters are best suited for hardware troubleshooting. Table 9.3 describes the most important counters for this object. Table 9.3. Important Counters for the PhysicalDisk ObjectCounter | What It Measures | Interpretation and Remedial Tips |
|---|
% Disk Time | The percentage of time that the disk was busy reading or writing to any partition | A value of over 50% suggests a disk bottle-neck. Consider upgrading to a faster disk or controller. Also check the memory counters to see whether more RAM is needed. | Avg. Disk Queue Length | The average number of disk read and write requests waiting to be performed | If this value is greater than 2, follow the same suggestions as for % Disk Time. | Average Disk Sec/Transfer | The length of time a disk takes to fulfill requests. | A value greater than 0.3 may indicate that the disk controller is retrying the disk continually because of write failures. |
LogicalDisk counters are best suited for investigating the read/write performance of a single partition. Table 9.4 describes the most important counters for this object. Table 9.4. Important Counters for the LogicalDisk ObjectCounter | What It Measures | Interpretation and Remedial Tips |
|---|
% Disk Time | The percentage of time that the disk is busy servicing disk requests | A value greater than 90% may indicate a performance problem except when using a RAID device. Compare to Processor\% Processor Time to determine whether disk requests are using too much processor time. | Average Disk Bytes/Transfer | The amount of data transferred in each I/O operation | Low values (below about 20KB) indicate that an application may be accessing a disk inefficiently. Watch this counter as you close applications to locate an offending application. | Current Disk | The amount of data waiting to be Queue Length transferred to the disk | A value greater than 2 indicates a possible disk bottleneck, with processes being delayed because of slow disk speed. Consider adding another faster disk. | Disk Transfers/sec | The rate at which read or write operations are performed by the disk | A value greater than 50 may indicate a disk bottleneck. Consider adding another faster disk. | % Free Space | Percentage of unused disk space | A value less than about 15% indicates that insufficient disk space is available. Consider moving files, repartitioning the disk, or adding another disk. |
Note You should log disk activity to a different disk or computer The act of recording performance logs places an extra "hit" on performance for the disk on which logs are recorded. To obtain accurate disk monitoring results, record this data to a different disk or computer.
Optimizing and Troubleshooting Application Performance Objective: Monitor, optimize, and troubleshoot performance of the Windows XP Professional desktop. Monitoring and troubleshooting application performance in Windows XP Professional involves the use of several tools: Task Manager, the System applet of Control Panel, and use of the command prompt to start applications at a different priority. Task Manager Task Manager is a Windows XP utility that provides data about currently running processes, including their CPU and memory usage, and enables you to modify their priority or shut down misbehaving applications. You can use any of the following methods to start Task Manager: As shown in Figure 9.7, Task Manager has five tabs that perform the following tasks: Applications Displays all applications running on the computer. You can terminate an ill-behaved program by selecting it and clicking End Task. Processes Provides information on resources consumed by processes running on the computer. You can modify the property of a running application or terminate an ill-behaved process or one that is consuming a large amount of processor time. Performance Provides a limited performance monitoring function, showing processor and page file usage statistics. This tab is ideal for providing a quick snapshot of computer performance. Networking Provides information on network utilization across the local area interface. Users Displays the users that have sessions, active or disconnected, running on the local computer.
Figure 9.7. Task Manager enables you to troubleshoot applications that are currently running, including closing ones that are not responding. 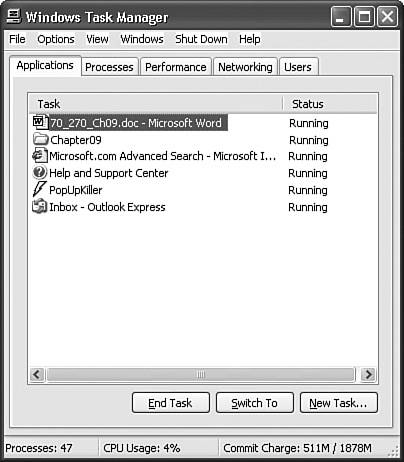
You can access additional options from the menu bar of Task Manager. In particular, you can start a new process from the File menu. Doing so is equivalent to using the Run dialog box, and is useful if the Explorer process has terminated or is misbehaving. The Options menu allows you to keep the Task Manager window always visible on the desktop. The View menu allows you to adjust the refresh rate of the graphs on the Performance and Networking tabs. It also allows you to modify what data is displayed on the Processes and Users tabs. Configuring Application Priority You can modify application behavior by adjusting its priority in Task Manager or by starting the application at a different priority. Windows XP Professional offers the following application priorities, arranged in decreasing order: Realtime The highest priority level. Use extreme caution when selecting this priority because it can hang the computer. High AboveNormal Normal The default priority. All processes run at this priority unless configured otherwise. BelowNormal Low The lowest priority.
You can modify an application's priority in either of the following ways: From Task Manager From the Processes tab, right-click the required process and choose Set Priority. Then select one of the priorities shown here. If you are unsure of the process associated with a given application, right-click the application in the Applications tab and select Go to Process. This switches you to the Processes tab, with the required process selected. From a command prompt Type Start /option executable_name, where option refers to one of the priorities shown in the preceding list and executable_name refers to the program's name.
Configuring the Relative Priority of Foreground and Background Tasks Depending on your computer's usage, you may be able to improve computer performance by changing the relative priority of foreground and background applications. As Step by Step 9.5 describes, you can accomplish this action from the Advanced tab of the System Properties dialog box. Step by Step: 9.5 Configuring Performance Optimizing Options 1. | Follow steps 1 to 3 of Step by Step 9.4 to access the Advanced tab of the Performance Options dialog box.
| 2. | Choose the appropriate options, as described in Table 9.5 under Processor Scheduling and Memory Usage.
Table 9.5. Performance Optimization OptionsSection | Option | What It Does |
|---|
Processor Scheduling | Programs (default) | Assigns more processor resources to programs currently running in the foreground (active programs) | | | Background services | Assigns equal amounts of resources to all programs, including those such as disk backup or defragmentation that are running in the background | Memory Usage | Programs | Assigns a larger share of memory to running programs | | | System cache | Assigns equal amounts of memory to running programs and to the system cache |
|
|
Configuring Application Compatibility Programs written for earlier versions of Windows may not work properly or may stop responding (hang). At times, such programs may exhibit a compatibility issue with Windows XP. Windows XP provides a compatibility mode that emulates the environment found on several previous versions of Windows. Follow Step by Step 9.6 to run an application in compatibility mode. Step by Step: 9.6 Running an Application in Compatibility Mode 1. | Right-click the executable or its shortcut and choose Properties.
| 2. | On the Compatibility tab of the Properties dialog box, select Run This Program in Compatibility Mode For and choose one of the options shown in Figure 9.8.
Figure 9.8. You can run a program in compatibility mode if it does not run properly under Windows XP. 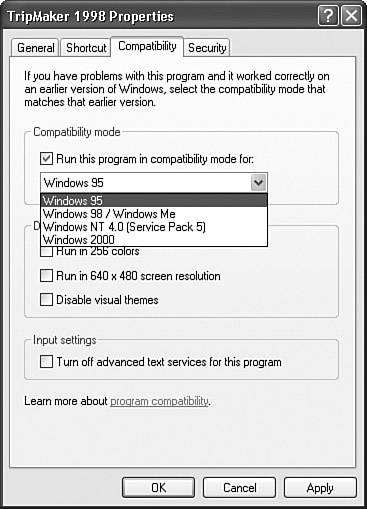
| 3. | Select additional options under Display Settings and Input Settings as required, and then click OK.
|
|
Note You can also use the Program Compatibility Wizard to run a program in compatibility mode Click Start, All Programs, Accessories, Program Compatibility Wizard, and follow the instructions provided. This wizard provides the same options available from the Compatibility tab described in Step by Step 9.6.
Configuring Multiprocessor Computers Windows XP Professional includes built-in capability for computers with two processors. Under most conditions, dual-processor computers provide enhanced computing power; however, you should be aware of several considerations that exist with regard to dual-processor computers: Use of Task Manager The Performance tab of Task Manager shows processor usage information for both processors by splitting the graph of CPU Usage History into two portions. Running 16-bit legacy applications Windows XP uses a special 32-bit application called a Windows NT Virtual DOS Machine (Ntvdm.exe) to emulate the older 16-bit environment. You can have multiple instances of the Ntvdm.exe process on a single computer; however, by default Windows XP runs all 16-bit applications in a single instance of Ntvdm.exe (also called a single memory space). This can cause two problems: first, if one application crashes or becomes unresponsive, all 16-bit applications are halted. Second, on a dual-processor computer, all 16-bit applications run on the same processor, thereby resulting in the possibility of this processor being overloaded while the other processor is under-utilized. To run 16-bit applications in separate memory spaces, click Start, Run, and type start /separate application.exe, where application.exe is the name of the 16-bit application. You can configure processor affinity for each application This capability enables you to specify on which processor a given process will execute, and can be utilized to distribute activity evenly across more than one processor. You can set processor affinity from Task Manager. Simply right-click the process from the Processes tab and choose Set Affinity. Then select the appropriate processor.
Challenge You are responsible for several hundred Windows XP Professional computers used by design engineers in your company's Design department. Each computer has a single hard disk with two partitions: Drive C: holds the operating system files and drive D: holds applications and data files. Engineers use processor- and memory-intensive computer-assisted design (CAD) applications that create large graphics files. Frequently, system slowdowns cause engineers to sit waiting for output that normally appears within a minute or two at other times. The manager of the department requests that you set up a monitoring program to address the system slowdowns that have been plaguing the department so that he can prepare a budget for computer hardware upgrades that will address these problems in the most economical fashion. Your task is to design a program that addresses the problems in stages so that the manager has the information that he needs to produce an appropriate budget. Try to complete this exercise on your own, listing the performance objects and counters that you should monitor, along with the recommendations for optimizing performance of the affected computers. After you have completed the exercise, compare your results to the following: Open the Performance Console and access the Counter Logs node of the Performance Logs and Alerts snap-in. Use the procedure of Step by Step 9.2 to create and start a performance log with the following counters: Processor\% Processor Time Processor\Interrupts/Sec System\Processor Queue Length LogicalDisk (_D)\% Disk Time LogicalDisk (_D)\% Free Space LogicalDisk (_D)\Avg. Disk Bytes/Transfer LogicalDisk (_D)\Current Disk Queue Length LogicalDisk (_D)\Disk Transfers/Sec Memory\Pages/Sec Memory\Available Bytes Memory\Committed Bytes
Log these counters while the engineers are performing their customary tasks and ask them to make a note of the time that they observe slowdowns. Use System Monitor to observe the collected logs and locate the points in time that the engineers observed slowdowns, and relate these to the counter activity that occurred at that point in time. To obtain additional confirmation data, use Performance Logs and Alerts to configure alerts based on the logged results. Run these alerts for a period of time while the engineers are keeping a record of what they were working on. Check the Application event logs to relate the appearance of alerts to the tasks being performed by the engineers.
|
Configuring, Managing, and Optimizing Scheduled Tasks Objective: Monitor, optimize, and troubleshoot performance of the Windows XP Professional desktop. The Scheduled Tasks application in Windows XP Professional enables you to schedule applications to run at preconfigured times. This GUI-based application is an improvement over the older command-line AT task scheduler used with Windows NT. You can start the Scheduled Tasks application in either of two ways: Click Start, All Programs, Accessories, System Tools, Scheduled Tasks Click Start, Control Panel, Performance and Maintenance, Scheduled Tasks
The Scheduled Tasks application displays icons for any scheduled programs, plus an Add Scheduled Task icon, which starts a wizard that guides you through the process of scheduling any program to run automatically. Follow Step by Step 9.7 to configure a scheduled task. Step by Step: 9.7 Configuring Scheduled Tasks 1. | In the Scheduled Tasks application, double-click the Add Scheduled Tasks icon.
| 2. | Click Next.
| 3. | The Scheduled Task Wizard displays a list of programs (see Figure 9.9). Scroll to select the desired program, or click Browse to locate a program that is not on the list. Then click Next.
Figure 9.9. The Scheduled Task Wizard enables you to select any program on the computer for automatic scheduling. 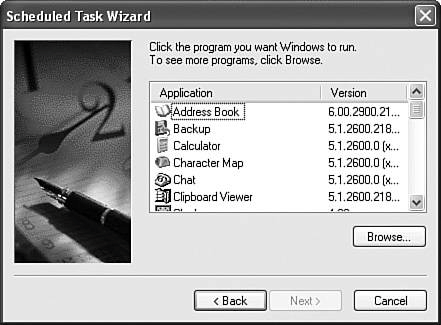
| 4. | Confirm or modify the name for the task, and select the frequency at which the task is to be performed. Then click Next.
| 5. | Select the desired starting date and time, and then click Next. Options on this screen vary according to the frequency you chose on the previous screen, and can include days of the week or months of the year in which you want the task performed.
| 6. | On the next screen, enter the name and password of the user under whose user account the task is to be run.
| 7. | The completion screen provides a summary of settings configured for the task, plus a check box that enables you to configure advanced task properties. Select this check box if required (for example, to specify the path to a file to be used in the execution of the task), and then click Finish.
|
|
An icon for the task you configured appears in the Scheduled Tasks folder. Unlike Windows 2000, this folder is not shared by default. However, you can still copy tasks to the Scheduled Tasks folders on other computers on the network. Consequently, you do not need to re-create the task at each computer on which you need to run it. Configuring Advanced Task Properties If you select the check box in step 7 of Step by Step 9.7, a properties dialog box for the scheduled task opens (see Figure 9.10). You can also open this dialog box by right-clicking the task and choosing Properties. Figure 9.10. The properties dialog box for a scheduled task enables you to configure additional task properties. 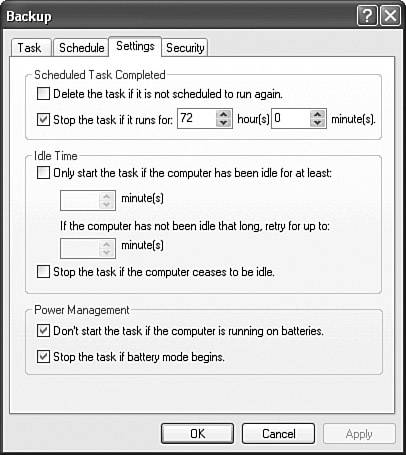
Table 9.6 describes the function of the tabs in this dialog box:  | |
Table 9.6. Functions of the Tabs of the Scheduled Tasks Properties Dialog BoxTab | Functions |
|---|
Task | You can specify which program is to be executed by typing the path to the file in the Run text box or clicking Browse to locate the program. You can also specify additional parameters, optional comments, and set the user account and password. New to Windows XP SP2, you can specify that the task can run only if its user account is logged on. | Schedule | You can configure additional scheduling options, including modifying the dates and times at which the task will run. | Settings | You can modify the additional settings shown in Figure 9.10 that govern what happens when the task is completed, whether the task runs if the computer is not idle, and power management settings for running the task on portable computers. | Security | You can configure permissions for the user account(s) under which the tasks will be run. This tab may not appear if Service Pack 2 (SP2) is not installed. |
Note You can also use the Schtasks.exe command-line tool to configure scheduled tasks This tool enables you to create new scheduled tasks, change the properties of an existing task, run a task immediately, end a running task, delete a task, or display the properties of tasks scheduled by all users of the computer. For more information, see the Help and Support Center.
Troubleshooting Scheduled Tasks Scheduled tasks often fail to run if their security context is incorrectly configured. In particular, they need to be configured to run under an account that has a password associated with it. Ordinary users may not have the permissions or rights associated with their user accounts for running certain tasks. In these instances, you may need to designate a different user account for the tasks to run, or modify the settings in the Security tab of the task's Properties dialog box. Legacy 16-bit applications may try to start the Task Scheduler service with different credentials. This does not work. Such a problem relates to the Task Scheduler service and not to a particular task. You may need to associate an account other than the Local System account with tasks created by the AT command. In versions of Windows previous to Windows 2000, administrators used the AT command and the Schedule service to configure tasks. For newer scheduled tasks, Microsoft recommends that you use the standard configuration of Scheduled Tasks, including the Scheduled Tasks Wizard. If an older legacy application needs to use a different user account for the Task Scheduler service, you can change this account by selecting AT Service Account from the Advanced menu in Scheduled Tasks. This brings up the dialog box shown in Figure 9.11. Click This Account, and specify the username and password of the required account. Ensure that this account has the proper permissions to run the task. You may also need to stop and restart the Task Scheduler service from the Services node of the Computer Management Console. Figure 9.11. The AT Service Account Configuration dialog box enables you to specify an alternate user account whose context will be used for running scheduled tasks. 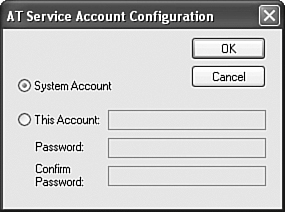
Note | Other scheduled task problems Microsoft has documented several other problems with Scheduled Tasks that are fixed by installing SP2. For more information, search the Microsoft Knowledge Base. |
Command-Line Utilities You can perform several tasks associated with performance monitoring and optimization from the command line. The following are several available tools: Logman Manages the Performance Logs and Alerts service. You can start, stop, and schedule the collection of performance and trace data. Relog Organizes and summarizes performance logs. Typeperf Displays performance data to the command prompt window or to a log file.
You can also use the Perfmon command to start the Performance Console from a command line. For information on running these tools, type the command name followed by /? at a command prompt. Review Break We have looked at several aspects of monitoring, optimizing, and troubleshooting the performance of Windows XP Professional. You should be aware of the following major points: Windows XP Professional offers several tools for monitoring and optimizing system performance. The Performance Console enables you to monitor system performance through the use of a wide range of performance objects and counters. This tool contains System Monitor, which displays a real-time graph of system performance, and Performance Logs and Alerts, which logs performance data for later viewing and creates alerts when conditions exceed preconfigured thresholds. Objects are components of the computer for which you can collect performance information. Important performance objects include Processor, LogicalDisk, PhysicalDisk, and Memory. Counters are individual statistical measurements available with each performance object. Instances are multiple occurrences of a given object such as two physical hard disks. Task Manager enables you to observe performance of programs and processes running on the computer. You can shut down programs that are not responding properly, configure application priority, and monitor network performance and users on the computer with this tool. The Scheduled Tasks application enables you to schedule applications to run at predetermined times in the future.
|
|