Monitoring, Managing, and Troubleshooting Access to Files and Folders
| The key to understanding how much file and folder management you can accomplish with NTFS in Windows XP Professional is to take a quick look at what the 16-bit File Allocation Table (FAT16) or 32-bit File Allocation Table (FAT32) file systems entail. FAT16 is nearly universally supported by all Microsoft DOS and Windows operating systems and many non-Microsoft operating systems. FAT16 limits a file's size based on the size of the partition on which it is installed. This, based on actual file sizes, usually results in files taking up far more space than they should. Also, because FAT16 is limited to a 4GB partition in Windows XP Professional and 2GB partitions in DOS and Windows 9x operating systems, it can't take advantage of current hard disk sizes that reach up to the tens of gigabytes. In addition to this limitation, FAT16 does not support its own file-level security, encrypted files, or native compression. Caution FAT16 is less secure than other file systems FAT16 is considered the least secure of all file systems for booting business-critical computers, whether they are workstations or servers. It is never considered a good practice to install a dual-boot computer in a production environment (although it's acceptable for labs), especially if a dual-boot environment would force you to keep FAT16 as the file system. FAT32 was launched as the new file system under Windows 95 OSR2 (OEM Service Release 2). By using 32 bits of data instead of 16, FAT32 is able to theoretically support drives up to 2 terabytes (TB) in size. Under Windows XP Professional, the FAT32 file system can format a drive only up to 32GB. It uses smaller clusters, which enables it to make a more economical use of hard disk space. FAT32 is not useful for dual booting because it is supported only by Microsoft operating systems newer than Windows 95 OSR2. Because FAT32 does not provide any native file-level security, encrypted files, or compression, it is not the recommended file system for Windows XP Professional. Windows XP Professional and Windows 2000 use NTFS version 5. Older versions of Windows NT use NTFS 4. For local file access, a Windows NT 4 computer must be upgraded with its Service Pack 1 (SP1) to be able to read files off a local partition that is formatted with NTFS 5. File access across a network, from a computer using any type of file system, is not affectedit's an issue only for local drive partitions. NTFS 5 in Windows XP provides native file and folder security, encrypted files, support for disk quotas, and compression. Theoretically, NTFS supports a 16-exabyte size drive. The limitations to this theory are found in the hardware because partition tables on disks with master boot records can sustain partition sizes of up to only 2TB. To create a larger disk partition in NTFS, you must use a dynamic volume. Dynamic volumes are not subject to a 2TB limit because they are managed in a database outside the partition table. A brief comparison of all three file systems is described in Table 5.1.
Although you should have a basic understanding of the differences between FAT16, FAT32, and NTFS, the 70-270 exam concentrates on the file and folder management features that only NTFS provides. Keep in mind that the most basic file and folder management, such as viewing and moving files, is the same regardless of the file system. However, file-level security, permissions, and compression apply only to NTFS-formatted disks. Configuring, Managing, and Troubleshooting File CompressionObjective: Monitor, manage, and troubleshoot access to files and folders.
NTFS supports compression natively. Although you can compress files and folders using a third-party utility such as WinZip on FAT16 and FAT32 drives, the difference in using native file compression is that it is completely transparent to the user. You can open a compressed file in an application the same way that you open a non-compressed file. The process of decompression and recompression is hidden from the user. By contrast, if you are using FAT16 and WinZip, you have to extract the file from the WinZip archive and then open it within the application. Only then can you work on it. After saving your file changes, you need to recompress the file using WinZip and replace the file in the archive manually. File compression provides efficient use of disk space. In an organization in which users share computers, an administrator may need to enforce disk quotas to ensure that there is sufficient space on the hard disks. What you save in space, however, you may lose in performance, especially with certain files. Note Measuring available disk space When measuring available disk space, Windows XP measures the size of compressed files as though they were uncompressed. NTFS offers the following features:
Exam Alert Know whether files and folders retain compression after being moved or copied Expect questions that refer to compressed files that are moved or copied. The following rules apply:
Step by Step 5.1 discusses the process for converting a FAT volume to NTFS and then compressing a file. NTFS is required for native file compression. Prior to running a file system conversion, you should make certain the computer is fully backed up and can be restored.
The process to compress a folder is nearly identical to that of compressing a file. The difference is that after you have clicked OK to start the compression, the computer prompts you whether you want to compress just the folder or you want to compress the folder along with its files and subfolders. As mentioned previously, you can compress an entire NTFS volume. To do so, open My Computer, navigate to the volume you plan to compress, right-click it, and select Properties from the shortcut menu. Select the Compress Volume to Save Disk Space option. Click OK and confirm the attribute changes in the resulting dialog box. Compressed folders can be password protected. To do this, you need to open the compressed folder, click File, and select Add a Password. Next, type the password, confirm it, and click OK. If anyone attempts to move, delete, or open the folder, a dialog box opens requesting this password. Caution Keep track of passwords Write down and safely store the passwords for compressed folders. These passwords are not recoverable, which means that you will not be able to access the folder's contents if you lose the password. Controlling Access to Files and Folders by Using PermissionsObjective: Monitor, manage, and troubleshoot access to files and folders.
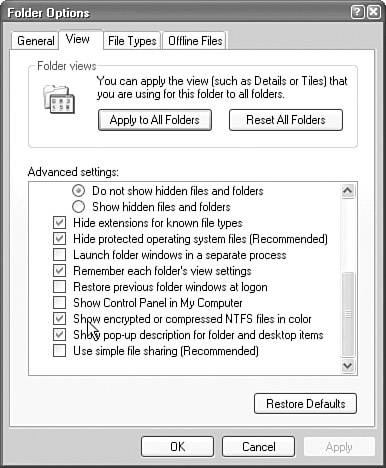
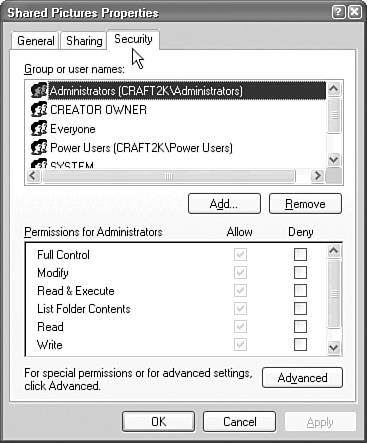
When you share files and folders in a workgroup in Windows XP Professional where the disk partition is formatted with NTFS, you can use simple file sharing (as in Windows XP Home Edition) or NTFS permissions. For granular control, NTFS permissions is the only way to control file and folder access. By default, a computer running Windows XP Professional in a workgroup uses Simple File Sharing. Simple File Sharing provides for a Shared Documents folder that contains the Shared Pictures and Shared Music subfolders. When a user wants to share a file, the user simply moves or copies the file to the Shared Documents folder or one of its subfolders. Also, when you're using Simple File Sharing, users who connect to the computer across the network automatically authenticate as the Guest accountthis is called ForceGuest. You cannot set NTFS permissions separately from shared folder permissions. Instead, you are allowed to establish a new share with only Full Control or Read access. Because of the limitations within Simple File Sharing, you must disable Simple File Sharing to have granular control over files and folders shared either locally or across the network. Simple File Sharing, by default, prevents you from seeing the Security tab where you can assign specific permissions. When you are connected to a domain, the advanced options for permissions are automatically provided on the Security tab. To configure a standalone or workgroup computer so that you can see and utilize the Security tab, you need to turn Simple File Sharing off. You can do this by opening the My Computer icon, clicking Tools, Folder Options, clicking the View tab, and then clearing the Use Simple File Sharing option in the Advanced Settings section. Note Some folders don't exist for domain members When a Windows XP Professional computer is a member of a domain, there are no Shared Documents, Shared Music, or Shared Pictures folders. Understanding NTFSWindows XP Professional NTFS volumes enable you to grant or refuse access to files or folders by applying permissions. Table 5.2 explains NTFS permissions.
Assigning Permissions to Files and FoldersWhen you create a new file in Windows XP Professional, you are given Full Control of that file. If you want to grant access for that file to another user, you need to assign permissions. To make these changes, you can follow the process in Step by Step 5.2.
If you want to deny only a specific right, such as the Write permission, simply click the Deny check box for that permission because it overrides the Allow permission. If a user has been denied access to a file, you can take ownership of the file as a troubleshooting method. To do this, you must be logged on to the computer as an administrator and Simple File Sharing must be disabled. To take ownership of a file or folder, click the Security tab in the Properties dialog box for that particular file or folder. Click the Advanced button and then click the Owner tab. For a file, under the list of names, select Administrator or the Administrators group and click OK. The administrator now owns the file and can apply further permissions as needed. For a folder named FOLDERX where you need to take ownership of the contents of the folder as well as the folder itself, under the list of names, select Administrator or the Administrators group, then select the Replace Owner on Subcontainers and Objects option and click OK. A message appears stating You do not have permission to read the contents of directory FOLDERX. Do you want to replace the directory permissions with permissions granting you Full Control? Click Yes to replace all permissions, and then click OK. Note Permissions are cumulative When you assign permissions, remember that they are cumulative. A user's actual permissions are the resulting collective allowed rights that have flowed down from upper-level folders, plus explicitly assigned permissions at that level, as long as there are no denied rights. Denied rights override allowed rights. Handling Permission InheritanceAs you can see, the process of granting and denying specific permissions to different users, especially if the permissions vary by user, can require hours of your time if you have to do this to each and every file on the computer. Thankfully, folder permissions can be inherited by the files and subfolders within them. Plus, you can create groups for users that are granted the same permissions. The combination of these two faculties in Windows XP Professional, along with a well-organized hierarchy of folders and files, can greatly reduce the time and effort it takes to administer the computer. Exam Alert Stopping automatic inheritance It is possible to stop the inheritance of permissions by clicking the This Folder Only option when you establish special permissions for a parent folder. Otherwise, the permissions are inherited. If you want to remove any inheritance for a folder that has already been established, right-click the folder, select Properties, click the Security tab, and click the Advanced button. The Advanced Security Settings dialog box opens, similar to the one shown in Figure 5.4. Clear the Inherit From Parent The Permission Entries That Apply To Child Objects check box. Include these with entries explicitly defined here. Figure 5.4. You can remove permission inheritance from a folder.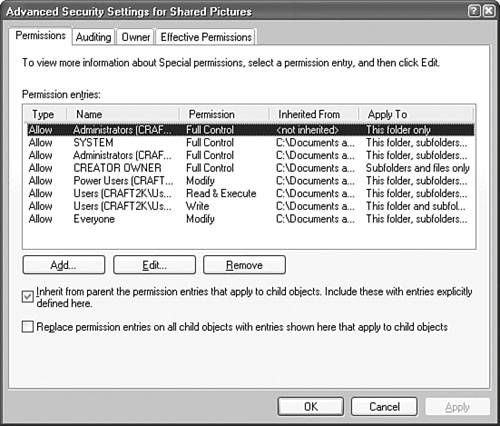 Securing the %systemroot% Folder and SubfoldersTo ensure that the Windows XP Professional operating system performs correctly, you should retain the default security settings on the %systemroot% folder and subfolders. If you modify these permissions, you may cause unpleasant problems for users attempting to log on or for applications that attempt to run. Handling Conflicting PermissionsWhen a user is a member of multiple groups, that user may have conflicting permissions for a file. For example, John is a member of GRP1 and GRP2. GRP1 is given Read access to FOLDER1 and GRP2 is granted Modify access to FOLDER1. As a result, John is automatically given the Modify access to FOLDER1. The only time this doesn't work in a cumulative manner is when there is an explicitly denied permission. If John had been denied the Modify permission to FOLDER1, he would not be able to Read or Modify it because the Modify right incorporates the ability to Read the file. Exam Alert Understand conflicting permissions Conflicting permissions for users who are members of multiple groups is a common problem to encounter on the exam. Not only should you be aware that Deny permissions always override Allow permissions, but explicit permissions always override inherited permissions. Calculating How Permissions Change When Moving or Copying a FileJust as compression attributes may change when moving or copying a file, permissions can also change when moved or copied. The obvious changes happen when you copy or move a file from an NTFS volume to a FAT16 or FAT32 volume. Because neither FAT16 nor FAT32 support native file security, all permissions are lost. If you move or copy a file from one NTFS volume to another, you can get a variety of results based on whether the file retains the former permissions or inherits new ones. Table 5.3 shows the results based on the type of file operation.
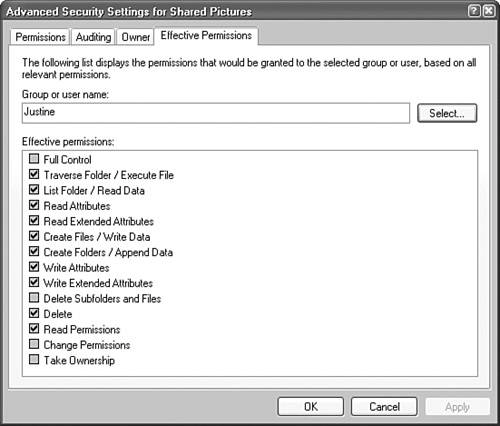
You can override the default results for permissions when you use the Xcopy command-line utility. The /o switch for the Xcopy command copies the file access control list (ACL), which includes all the permissions along with the file. In addition, you can use the /x switch with Xcopy, which copies the audit information in addition to the ACL. If a user experiences errors when attempting to access a file or folder, and you can't immediately determine the cause of the problem, check the user's effective permissions. Effective permissions are the actual permissions that the user has based on group membership, explicitly allowed or denied rights, and inherited allowed or denied rights. To determine what the effective permissions are for a particular user, you do not need to add the explicit and inherited permissions manually. Instead, Windows XP Professional allows you to view the effective permissions on each file or folder for any user or group. To do this, follow the process in Step by Step 5.3.
Optimizing Access to Files and FoldersObjective: Monitor, manage, and troubleshoot access to files and folders.
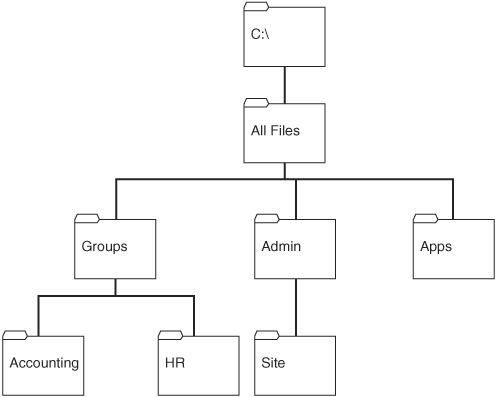
When you set permissions on a folder, all its subfolders inherit the permissions, even if the subfolder is created as a new folder after the fact. One of the easiest ways of granting permissions is to simply give everyone Full Control access at the top folder level. This, however, can cause problems with file management in the long term. Therefore, you should put thought into a folder hierarchy that you can replicate across multiple computers, and that will reduce your overall administration time. The key to a good folder hierarchy is to think counter-intuitively. Instead of determining how to build your folder structure from the top down, consider how to build it from the bottom up. You want to assign the most permissions to the lowest-level folders, and the fewest permissions to the top-level folders. For example, let's say you have two teamsHuman Resources (HR) and Telemarketing (TELE). Each team uses the same computers at different times of the day and needs to have access to particular files. Obviously, you don't want your telemarketers to have access to sensitive data such as salaries that HR might save to the hard disk. So, you must do two things to avoid any mixups:
After you have created the group-specific folders, you can then consider creating additional folders that may be used by other users or for general use by either HR or TELE. Work your way upward until you reach the top-level folder, where you will likely want to allow access only to administrators of the computer. Figure 5.7 depicts this entire hierarchy. Figure 5.7. A good folder hierarchy is built from the bottom up.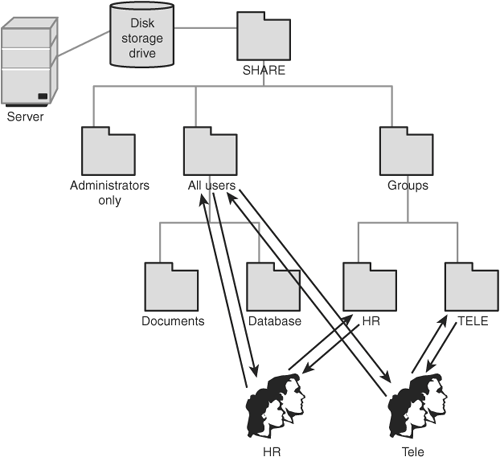 Keep in mind that Microsoft's recommended practice is to assign permissions as follows when your computer is participating in a domain:
In this manner, whenever you create a new user object, you can place global groups in the appropriate domain so that they quickly obtain the correct permissions to be functional. The fact that a domain global group can be placed within local groups on any computer in the Active Directory allows a user to be granted permissions to any computer or server. At the same time, removing rights for a user account is just as easily accomplishedsimply delete the user object's group memberships. For a computer that is in a workgroup rather than a domain, you do not have the luxury of domain global groups or domain users that can be created once and used on every computer. You can simplify administration, however, as follows:
Review BreakYou can apply NTFS compression to files, folders, or volumes. When a file is copied to a new folder, the file inherits the new folder's compression state. When a file is moved in the same NTFS volume, the file retains its original compression state. When a file is moved from one NTFS volume to a folder on another NTFS volume, the file inherits the new folder's compression state. When compressed files are moved or copied from NTFS to FAT16 or FAT32 volumes, the files lose compression. When you're using Simple File Sharing, users who connect to the computer across the network automatically authenticate as the Guest account. You cannot set NTFS permissions separately from shared folder permissions. Because of the limitations within Simple File Sharing, you must disable Simple File Sharing to have granular control over files and folders shared either locally or across the network. |
EAN: 2147483647
Pages: 193

