| Objective: Configure, manage, and troubleshoot a security configuration and local security policy.  | Group Policy for deploying SP2 and MSI packages has been touched only lightly in previous chapters. Group Policy is effectively a service delivered by a Windows 2000 or Windows 2003 Active Directory to apply configuration information to user accounts and computer resources that are installed with Windows 2000 Professional, Windows 2000 Server, Windows Server 2003, and Windows XP Professional. |
Microsoft developed Group Policy to be applied in layers, where a domain policy is applied before an organizational unit (OU) group policy, and the policy settings are applied in such a way that they flow down the tree until they reach the user or computer object. Before any of the Active Directoryrelated policies are applied, the settings configured on the local computer are applied first. You can open the group policies applicable to the computer, which is called the Local Computer Policy, in the Group Policy Object Editor by selecting the Local Computer rather than an Active Directory site, domain, or OU container. A subset of the local computer policies that apply to security is the Local Security Policy. To view the local security policies, click Start, Control Panel. Under the Performance and Maintenance category, select Administrative Tools (also available in the Accessories menu) and double-click Local Security Policy. The Local Security Settings console opens, as shown in Figure 12.9. Figure 12.9. The Local Security Policy is the subset of policies applicable to security on the local computer. 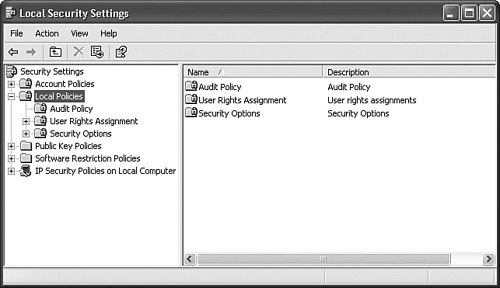
The local security policies include the following main subdivisions: Account Policies Contains Password Policy and Account Lockout Policy Local Policies Contains Audit Policy, User Rights Assignment, and Security Options Public Key Policies Contains the Encrypting File System policies Software Restriction Policies Contains the Security Levels and Rules that govern what software can be installed on the computer IP Security Policies Sets whether IPSec responds to security requirements as a client, requests Kerberos trust level security but will allow unsecured traffic, or requires only Kerberos trust level security
You can use a variety of tools when configuring security on a Windows XP Professional computer: Local Security Policy In Administrative Tools, allows you to directly configure the security policies on the computer. Group Policy Editor An MMC snap-in, allows you to configure security policies, as well as other types of policies, applicable to an Active Directory domain, site, or OU; plus you can configure this same set of policies for the local computer. Computer Management In Administrative Tools, provides the interface to manage users, groups, and shared folders. Security Templates An MMC snap-in, capable of creating text-based templates that include standard security settings. The templates can then be applied to network workstations and servers to ensure standard security settings. Security Configuration and Analysis A Microsoft Management Console (MMC) snap-in, scrutinizes security settings on the local Windows XP Professional computer based on the security template used. Secedit.exe A command-line utility, enables security configuration to be performed from the Command Prompt window.
Exam Alert Using Secedit.exe A security template is created as an .inf file. This file is imported into a database with an extension of .sdb. Make certain to familiarize yourself with its available switches, which are /analyze, /configure, /export, and /validate. In addition, you should memorize the provided security templates and their uses that are described in the article on Microsoft's website at http://www.microsoft.com/resources/documentation/windows/xp/all/proddocs/en-us/windows_security_default_settings.mspx. If you use Secedit.exe, the command to apply the security settings to overwrite existing security settings is secedit /configure /db <path>\database.sdb
Account Policies Local Security Policy settings apply to the local computer. Account policies apply to only the user accounts configured locally. If you intend to apply these settings to an Active Directory domain account, you need to create a Group Policy object (GPO) that contains these settings under the User Configuration node, and configure the Default Domain GPO for the domain containing that user. Note Account policies for passwords and account lockouts are applicable only to a domain When you configure a domain GPO for account policies, the settings apply to every user within that domain. The only way to have two or more sets of account policies applicable to domain users is to have two or more domains.
Password policies include the configurable options listed in Table 12.2. Table 12.2. Password PoliciesPolicy | Meaning | Default Value | Effect When Used |
|---|
Enforce Password History | The number of unique passwords the computer will remember | 0 | User is prevented from re-using a password for the number of password changes configured. | Maximum Password Age | Number of days after first being set until the user is forced to change the password | 42 days | User is periodically required to change the password. | Minimum Password Age | Number of days after first being set until the user is allowed to change the password | 0 days | User is prevented from changing a password multiple times in short period of time, which prevents continual reuse of the same password. | Minimum Password Length | Number of characters required for any password | 0 | User is prevented from using short, easy-to-guess passwords. | Password Must Meet Complexity Requirements | Requires that the password does not contain the username or real name, is at least 6 characters long, must be a combination of letters, numbers, and symbols | Disabled | User is required to use passwords that are difficult to guess. | Store Password Using Reversible Encryption | Allows user's passwords to be stored in reversible encryption, which is not much more secure than plain text | Disabled | When enabled, the policy becomes a security hole; however, it is required for remote access servers using CHAP, or when using Digest Authentication with IIS. |
The Account Lockout policies disable user accounts when there have been too many invalid logon attempts. This is a security setting that prevents a person from attempting to gain access to a private network. Table 12.3 lists the Account Lockout policies. Table 12.3. Account Lockout PoliciesPolicy | Meaning | Default Value | Effect When Used |
|---|
Account Lockout Duration | Number of minutes after being locked out before account is allowed to log on. Suggested value is 30 minutes. | N/A | A user who has had too many failed logons will not be allowed to try again for this period of time. | Account Lockout Threshold | Number of bad passwords that are accepted before the user account is locked out. Suggested value is 3 attempts. | 0 | A user is allowed this number logon attempts. | Reset Account Lockout Counter After | Number of minutes after submitting a bad password that the computer will "forget" that there was a failed logon attempt. Suggested value is 30 minutes. | N/A | A user who has submitted a bad password and then logs on successfully still has a bad password attempt remembered until this time period has passed. |
Local Policies Local policies offer configuration options for Audit Policy, User Rights Assignment, and Security Options. Audit policies, by default, are all set to No Auditing. If you have a security concern on the network or for a specific computer, you should enable the Audit Policy settings that can alert you to any events matching your concerns. For example, if you have a computer whose printer is supposed to be used only by a specific group of users and you suspect other users are printing to that computer, you can set the Audit Object Access policy to audit all successful access of objects on that computer. Later, you can view the Security log file and see what events were audited and which user accounts were used. Table 12.4 lists all audit policies. Table 12.4. Audit PoliciesPolicy | Meaning |
|---|
Audit Account Logon Events | Audits events where a user has attempted to log on to another computer, but this local computer is used to authenticate the logon. | Audit Account Management | Audits events in which a user or group account is created, modified, or deleted; in which a user account is enabled, disabled, or renamed; and when a password is changed. | Audit Directory Service Access | Used in the Default Domain Controller GPO to audit user attempts to access an object in the Active Directory. This policy is not applicable to workstations. | Audit Logon Events | Audits events in which a user attempts to log on, log off, or connect to this computer over the network. | Audit Object Access | Audits events in which a user attempts to access an object that has had user rights assigned to it, such as a file or a printer, for example. Can be used to troubleshoot a user whose rights appear to be correct but who cannot use the object. | Audit Policy Change | Audits any attempt to change security policies. | Audit Privilege Use | Audits when a user exercises a user right. Can be used to troubleshoot a user whose rights appear to be correct but who cannot perform a function on the computer. | Audit Process Tracking | Audits events for applications such as program activation or handle duplication. Can be used to troubleshoot application errors. | Audit System Events | Audits shutdowns, restarts, or any event that affects security or the Security log. |
Note Tips on auditing Auditing successful actions is good for capacity planning and performance analysis. Auditing failed actions is great for finding potential security problems. Use Windows Explorer to identify files and folders to audit. Use Regedit to locate and identify Registry keys for auditing.
User Rights Assignment includes a great number of the configurable options that were part of the Windows NT System Policies. There are 39 policies in this section. Unlike the other policies discussed up to this point, the user rights assignment policies are all enabled by default. Many of them have also been assigned to one or more groups. These user rights are required for the groups to whom they've been granted, and you cannot remove them. You can, however, add other groups or users to any of these policies to increase that particular group's rights. The Security Options section contains over 60 policies that are also configurable as Registry keys. Each is listed with a preceding category, such as Accounts or Domain Controller. The category indicates to what the policy itself is directly applicable. As you can tell by the Domain Controller category, some settings will not be applicable to a Windows XP Professional computer. These settings are set to Not Defined. The remaining policies can be enabled, disabled, granted to a group, or given a value. Some of the standout Security Options settings that you may wish to look at include the following: Accounts: Guest account status Enabled by default. Disable this to add greater security to the computer. Keep in mind that if the Guest account is disabled, then you should disable Simple File Sharing because it forces all users to use the Guest account using ForceGuest. Devices: Prevent users from installing printer drivers Disabled by default. Enable this to prevent a user from unnecessarily or accidentally installing printer drivers that may not be approved for your network. Interactive Logon: Message text for users attempting to log on No setting by default. Type the message that you want all users to see when they log on to the computer. Many organizations require a usage policy or privacy message to be displayed prior to logon on all computers. This is where you apply the message. Interactive Logon: Smart card removal behavior No action by default. Select from No Action, Lock Workstation, or Force Logoff. Apply this setting when you require smart cards to log on to computers and do not want users to leave workstations unattended and available for others to access using someone else's credentials.
Public Key Policies The Public Key policies configure various certificate-related objects. This section includes several additional policies when you are configuring an Active Directoryrelated Group Policy object, such as configuration of a trusted root CA, or automatic certificate requests. However, under the Local Security Policy, the Public Key Policies is limited to the Encrypting File System. In this left pane, right-click the Encrypting File System and select Add Data Recovery Agent. The Add Recovery Agent Wizard begins and you are shown a list of available users who have recovery agent certificates. You can configure another policy for the Encrypting File System by right-clicking Encrypting File System, selecting All Tasks, and then selecting Do Not Require Recovery Agents. Software Restriction Policies Software Restriction policies can ensure that users do not install unauthorized software on a computer. Not only can it prevent installation of commercial off-the-shelf software (COTS), it can ensure that users cannot unknowingly download and install malware applications from websites. To prevent a stealth application from installing, you can classify applications as trusted or untrusted. Furthermore, you can define how the computer will treat untrusted applications and what powers individual users will be given over any type of application. There are three individual policies within the Software Restriction Policies node: Designated File Types This is a list of what application extensions are considered to be executable on the computer. You can add or delete file extensions to the list provided. Enforcement You can select whether all users, or all users except local administrators, will receive the software restriction policies. You can also configure whether all software files, or most software files minus libraries (DLLs), will have the software restriction policies applied. Trusted Publishers This policy configures whether all users or only administrators can select trusted publishers, plus whether to check a certificate's publisher and/or time stamp to determine whether the publisher is trustworthy.
The remaining two nodes within Software Restriction Policies consist of Security Levels and Additional Rules. Security Levels state which users are authorized to run an application with two different policiesDisallowed and Unrestricted. If you select Disallowed as the default policy, no software can execute regardless of a user's access rights to the software. If you select Unrestricted, the software is allowed based on the user's access rights. Unrestricted is the default policy. Additional Rules contains four default path rules. These path rules state that any designated file type can run from the %systemroot% directory, any .exe file can run from the %systemroot% directory, any .exe file can run from the %systemroot%\system32 directory, and any designated file type can execute in the %ProgramFilesDir% directory (which is typically C:\Program Files). You can add other rules to configure further granular control over the way applications run. Each of these rules is used to identify the type of application, and the rule overrides the default software restriction security levels. The types of rules you can add are Certificate rule Applies to a publisher's certificate, which you select after importing it. The rule can either allow unrestricted use of the software or disallow all software associated with this certificate. Hash rule Applies to a specific application in which the hash algorithm uniquely identifies the software application and can prevent it from executing even if a user renames or moves the file. Internet zone rule Applies to Windows Installer packages only. Based on the zone from which the application is being installed, the Internet zone rule can override the default software policy. For example, if you set the default Security Level to Disallowed, you can define an Internet Zone rule that states that any application executed from the Local Computer is Unrestricted. This enables a user to run applications but not to install applications from any of the identified Internet zones, which are Restricted Sites, Internet, Trusted Sites, Local Intranet, and Local Computer. Path rule Applies to software run from certain paths. A path rule allows or prevent any designated file type to execute from a specific network share or local directory.
IP Security Policies on a Local Computer You can configure three IP security policies. These rules can be configured to match the type of traffic that is being transmitted to this computer. These rules are mutually exclusive; if you assign one policy, you automatically set the other two policies to be unassigned. To assign a policy, right-click it and select Assign from the shortcut menu. The three rules are Client (Respond Only) The computer responds securely when requested to do so. Secure Server (Require Security) The computer communicates securely and refuses connections if they are unsecured. Server (Request Security) The computer requests that others communicate securely, but the computer also communicates with unsecured traffic.
Each of these policies can be customized to meet your needs. For example, you might wish to require security only for remote access clients who are using TCP/IP. In that case, you would double-click the Secure Server policy, and highlight the All IP Traffic filter list, then click Edit. Then you would click the Connection Type tab, and select Remote Access, as shown in Figure 12.10. Figure 12.10. IP Security Policies can be configured to meet your IP traffic security needs. 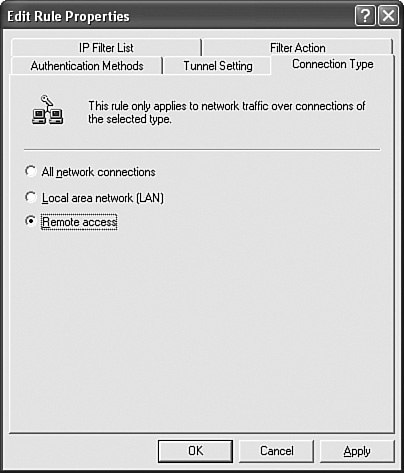
How Local Security Policy Works When Joined to a Domain Group policies greatly affect how Local Security Policy settings are applied when a computer is joined to a domain. The default behavior of GPOs is that when multiple GPOs exist, they layer settings onto the computer. When there are two or more GPOs with the same policy setting configured with conflicting settings, the last GPO to be applied wins. The sequence of application of GPO settings is: 1. | Windows NT 4 System policies found in NTConfig.pol
| 2. | Local policies
| 3. | Site group policies
| 4. | Domain group policies
| 5. | OU group policies
| 6. | Child OU group policies (applied after the group policies of the top-level OUs, and flow down the hierarchy of the Active Directory)
|
The only exception to the application of any settings is if there is an override or block policy setting in place. These exceptions do not apply to local policies, so the final policy settings that filter down from group policies override any conflicting settings that were configured for the local computer. For example, when a Windows XP Professional computer participates in an Active Directory domain, it receives the default domain account policy and applies it to its local accounts. If you configure the account policies in GPOs applied to an OU, the settings do not apply to the domain user account, however they will apply to and override any conflicting settings for the local Account policies. When a Windows XP Professional computer is a standalone computer or participates in a workgroup, you must configure the local account policies to apply these settings to local user accounts. File System, Registry, and System Services To configure security settings for the file system, the Registry, and system services, you need to create a security template and then use the Security Configuration and Analysis tool to apply it to the computer. Step by Step 12.5 walks you through this procedure. Step by Step: 12.5 Creating and Applying a Security Template 1. | Log on to the computer as an administrator.
| 2. | Click Start, Run, type mmc in the Open text box, and press Enter.
| 3. | Click the File menu and select Add/Remove Snap-in.
| 4. | Click the Add button and select Security Templates. Click Add. Select Security Configuration and Analysis and click Add again.
| 5. | Click Close and then click OK. A new console opens.
| 6. | Expand the Security Templates utility and right-click the path to the security templates store. (This should state C:\windows\security\templates.) Select New Template from the shortcut menu.
| 7. | Type a name for the security template. Click OK.
| 8. | In the left pane, click to select the new template. You should see a screen similar to Figure 12.11.
Figure 12.11. Restricted Groups, System Services, Registry, and File System security settings are found in the Security Templates console. 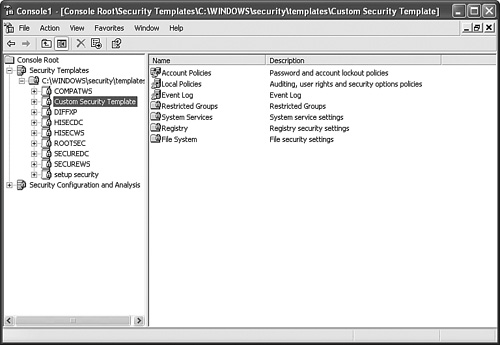
| 9. | You can apply the settings that you prefer to any of the Account Policies, Local Policies, Event Log, Restricted Groups, System Services, Registry, and File System items.
| 10. | Right-click File System and select Add File from the menu. Select a file or folder from the dialog and click OK. A Permissions dialog box is displayed. Select and apply the security options for the file or folder and click OK. The next dialog box lets you apply the settings to the current folder and to establish whether subfolders will also receive the new settings. Click OK.
| 11. | To configure security for a Registry key, right-click the Registry node and select Add key. Browse to the key that you want to secure and click OK. (We like to secure the HKLM\Software\Microsoft\Windows\CurrentVersion\Run key so that malware can't set itself to run every time you start up the computer.) Apply the settings you wish and click OK.
| 12. | To configure System Services, click the node in the left pane and view the security policies in the details pane. Each policy applies to a separate service. Double-click a policy, such as the Telnet policy. (Telnet is often a target for hackers.) Check the box Define This Policy Setting in the Template. The security dialog box opens for you to apply settings. Make the changes and click OK. Select the service startup mode and click OK.
| 13. | To configure Restricted Groups, right-click Restricted Groups and select Add Group. Type the name of the group and click OK. Select the members of the group, and groups to which this group can belong. Click OK.
| 14. | To apply the security template, right-click Security Configuration and Analysis and select Open Database.
| 15. | Type a name to create a new database, or click on an existing database, then click OK.
| 16. | Right-click Security Configuration and Analysis and select Import Template. Select your custom template and apply it to the computer. You can also select Analyze Computer Now to create a new log file; or select Configure Computer Now to view a log file.
|
|
|