| Another way to access commands quickly is to use keyboard shortcutscombinations of two or more keys that invoke a command. Keyboard shortcuts are particularly efficient if your hands are already on the keyboard typing document text. Word has a large variety of built-in keyboard shortcuts. For example, to format text as bold, you can simply select it and then press Ctrl+B. If a command you use frequently doesn't have a built-in keyboard shortcut, you can create one from the Customize page of the Word Options window. Clicking Customize at the bottom of this page opens the Customize Keyboard dialog box, where you can choose the categories and commands you want and assign keyboard shortcuts. In this exercise, you will assign keyboard shortcuts to two commands, and then test the keyboard shortcuts. There are no practice files for this exercise. OPEN a new blank document.
1. | At the right end of the Quick Access Toolbar, click the Customize Quick Access Toolbar button, and then in the list, click More Commands.
Customize Quick Access Toolbar  The Word Options window opens, displaying the Customize page.
| 2. | At the bottom of the window, to the right of Keyboard shortcuts, click Customize.
The Customize Keyboard dialog box opens. The Ribbon tabs are listed in the Categories box on the left, and the commands available for the selected category are listed in the Commands box on the right.
| 3. | In the Categories list, click Home Tab, and then in the Commands list, click Bold.
In the Current Keys box, Word displays the keyboard shortcuts already assigned to the Bold command.
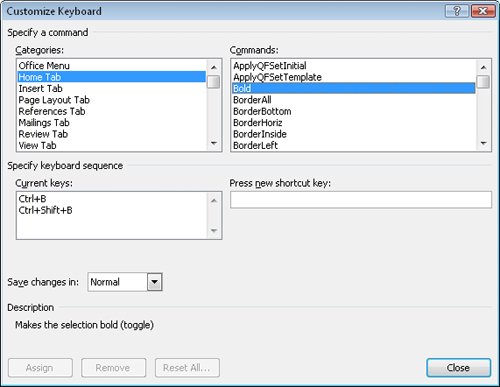 Tip To delete an existing keyboard shortcut to make it available for reassignment, select it in the Current Keys box, and then click Remove. | 4. | In the Commands list, click DecreaseIndent.
| 5. | Click to position the insertion point in the Press new shortcut key box, and then press  . .
Under the Current Keys box, Word tells you that this keyboard shortcut is already assigned to the FormatFont command.
| 6. | Press the  key (not key (not  ) to clear the Press new shortcut key box, and then press ) to clear the Press new shortcut key box, and then press  . .
Under the Current Keys box, Word tells you that this keyboard shortcut is currently unassigned (unless you have already assigned it to a different command).
| 7. | Click Assign.
| 8. | Repeat Steps 4, 5, and 7 to assign the keyboard combination  to the IncreaseIndent command. to the IncreaseIndent command.
| 9. | Close the Customize Keyboard dialog box and the Word Options window.
Tip Using the options in the Save Changes In list, you can save new keyboard shortcuts either in a template to make them available to all documents using that template, or in a specific document to make them available only within that document. Now let's test the new keyboard shortcut.
| 10. | On the View tab, in the Show/Hide group, select the Ruler check box to display the horizontal and vertical rulers.
| 11. | Press twice to indent the paragraph, and then press once to decrease the indent.
On the ruler, the indent markers jump to the 1-inch mark and then jump back to the 0.5-inch mark.
|
BE SURE TO remove any keyboard shortcuts you don't want to keep and to turn off the ruler display.
Tracking Down Built-In Keyboard Shortcuts The list of built-in Word keyboard shortcuts is extensive and too long to reproduce here. To print a list of these shortcuts: 1. | At the right end of the Ribbon, click the Help button.
| 2. | In the Search box, type keyboard shortcuts, and then click Search.
| 3. | In the results list, click Keyboard shortcuts for Microsoft Office Word.
| 4. | Click the Show All link at the beginning of the topic to display all the text, and then on the toolbar, click the Print button.
|
|
|