Making Changes to a Document
You will rarely write a perfect document that doesn’t require any editing. You will almost always want to insert a word or two, change a phrase, or move text from one place to another. You can edit a document as you create it, or you can write it first and then revise it. Or you might want to edit a document that you created for one purpose so that it will serve a different purpose. For example, a letter from last year’s marketing campaign might be edited to create a new letter for this year’s campaign.
Inserting text is easy; you click to position the insertion point and simply begin typing. Any existing text to the right of the insertion point moves to make room for the new text.
By default, Word is in Insert mode. In previous versions of Word, it was possible to accidentally switch to Overtype mode by inadvertently pressing the Insert key. In Overtype mode, existing text does not move to the right when you type new text; instead, each character you type replaces an existing character.
In Word 2007, you must deliberately switch to Overtype mode if you want to use it. Here’s how:
-
Right-click the status bar, and then click Overtype to display the Insert mode status at the left end of the status bar.
-
Click Insert on the status bar.
The word Overtype then replaces Insert. You can click the word to switch back to Insert mode when you have finished overtyping.
By default, pressing the Insert key has no effect on the mode. If you want the Insert key to turn Overtype mode on and off, follow these steps:
-
Click the Microsoft Office Button, and then click Word Options.
-
In the Word Options dialog box, click Advanced in the left pane, and then under Editing options, select the Use the Insert key to control overtype mode check box.
-
Click OK.
Deleting text is equally easy. If you want to delete only one or a few characters, you can simply position the insertion point and then press the Backspace or Delete key until the characters are all gone. Pressing Backspace deletes the character to the left of the insertion point; pressing Delete deletes the character to the right of the insertion point.
To delete more than a few characters efficiently, you need to know how to select the text. Selected text appears highlighted on the screen. You can select specific items as follows:
-
To select a word, double-click it. Word selects the word and the space following it. It does not select punctuation following a word.
-
To select a sentence, click anywhere in the sentence while holding down the Ctrl key. Word selects all the characters in the sentence, from the first character through the space following the ending punctuation mark.
-
To select a paragraph, triple-click it.
You can select adjacent words, lines, or paragraphs by positioning the insertion point at the beginning of the text you want to select, holding down the Shift key, and then pressing the Arrow keys or clicking at the end of the text that you want to select. If you want to select words, lines, or paragraphs that are not adjacent, you make the first selection and then hold down the Ctrl key while selecting the next block.
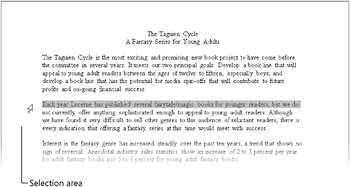
As an alternative, you can use the selection area to quickly select various items. This is an invisible area in the document’s left margin, where the pointer becomes a hollow rightpointing arrow. You can use the selection area as follows:
-
To select a line, click the selection area to the left of the line.
-
To select a paragraph, double-click the selection area to the left of the paragraph.
-
To select an entire document, triple-click the selection area.

After selecting the text you want to work with, simply press the Backspace or Delete key.
| Tip | To deselect text, click anywhere in the document window except the selection area. |
After selecting text, you can move or copy it in the following ways:
-
Use the Clipboard when you need to move or copy text between two locations that you cannot see at the same time-for example, between pages or between documents. The Clipboard is a temporary storage area in your computer’s memory. Select the text, and then click the Cut or Copy button in the Clipboard group on the Home tab. Then reposition the insertion point and click the Paste button to insert the selection in its new location. When you cut text, it is removed from its original location, and when you copy it, it also remains in its original location.
See Also For more information, see the sidebar entitled “About the Clipboard” later in this topic.
-
Use drag-and-drop editing (frequently referred to simply as dragging) when you need to move or copy text only a short distance-for example, within a paragraph or line. Dragging does not involve the Clipboard. Start by selecting the text. Then hold down the mouse button, drag the text to its new location, and release the mouse button. To copy the selection, hold down the Ctrl key while you drag.
If you make a change to a document and then realize that you made a mistake, you can easily reverse the change. You can undo your last editing action by clicking the Undo button on the Quick Access Toolbar. To undo an earlier action, click the Undo arrow and then click that actions in the list.
| Tip | Selecting an action from the Undo list undoes that action and all the editing actions you performed after that one. You cannot undo a single action except the last one you performed. |
If you undo an action and then change your mind, you can click the Redo button on the Quick Access Toolbar. You can redo only the last action that you undid.
In this exercise, you will edit the text in a document. You’ll insert and delete text, undo the deletion, copy and paste a phrase, and move a paragraph.
Use the 01_Changes document. This practice file is located in the Chapter02 subfolder under SBS_Office2007.
Be Sure To start Word before beginning this exercise.
Open the 01_Changes document.
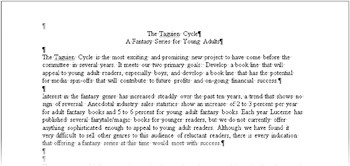
1. If non-printing characters are not visible in the document, on the Home tab, in the Paragraph group, click the Show/Hide ¶ button. 
2. In the third sentence of the first paragraph, click immediately to the left of the word between, hold down the ![]() key, and then click immediately to the right of the word fifteen (and to the left of the comma that follows it).
key, and then click immediately to the right of the word fifteen (and to the left of the comma that follows it).
Word selects the text between the two clicks.

3. Press the ![]() key to delete the selection.
key to delete the selection.
Word also deletes the space before the selection.
4. Select the word book in the first sentence of the first paragraph by double-clicking it, and then press the ![]() key.
key.
5. Double-click the word principal in the same paragraph, and then replace it by typing primary.
Notice that you don’t have to type a space after primary. Word inserts the space for you.
| Tip | Word inserts and deletes spaces because the Use Smart Cut And Paste check box is selected on the Advanced page of the Word Options dialog box. If you want to be able to control the spacing yourself, click the Microsoft Office Button, click Word Options, click Advanced, clear this check box, and click OK. |
6. Position the mouse pointer in the selection area to the left of the phrase A Fantasy Series for Young Adults, and then click once to select the entire line of text.
7. On the Home tab, in the Clipboard group, click the Copy button. ![]()
The selection is copied to the Clipboard.
8. Click the Next Page button below the vertical scroll bar to move to the beginning of the next page, press the ![]() key, and then in the Clipboard group, click the Paste button (not its arrow).
key, and then in the Clipboard group, click the Paste button (not its arrow). 
The Paste Options button appears below and to the right of the insertion. You can click this button if you want to change Word’s default way of pasting, but in this case, you can just ignore it.
9. Return to Page 1, and then in the numbered list, triple-click anywhere in the Bartimaeus Trilogy paragraph to select the entire paragraph.
10. In the Clipboard group, click the Cut button. ![]()
11. Press the ![]() key to move to the beginning of the Harry Potter series paragraph, and then in the Clipboard group, click the Paste button.
key to move to the beginning of the Harry Potter series paragraph, and then in the Clipboard group, click the Paste button.
The two paragraphs have effectively switched places and the list has been renumbered.
See Also For more information about numbered lists, see “Creating and Modifying Lists” in Chapter 3, “Changing the Look of Text.”
12. On the Quick Access Toolbar, click the Undo arrow, and in the list, click the third action (Paste). ![]()
Word undoes the previous cut-and-paste operation and the pasting of the copied text.
13. Press ![]() to move to the top of the document. Then move the pointer into the selection area adjacent to the paragraph that begins Interest in the fantasy genre, and double-click to select the paragraph.
to move to the top of the document. Then move the pointer into the selection area adjacent to the paragraph that begins Interest in the fantasy genre, and double-click to select the paragraph.
14. Point to the selection, hold down the mouse button, and then drag the paragraph up to the beginning of the paragraph above it.
When you release the mouse, the text appears in its new location.
15. With the text still selected, press the ![]() key.
key.
Word releases the selection and moves the insertion point to the end of the paragraph.
16. Press ![]() , and then press
, and then press ![]() .
.
Word deletes the paragraph mark, and the two paragraphs are now one paragraph.

17. In the selection area, click adjacent to the paragraph mark below the combined paragraph, and then press ![]() .
.
Close the 01_Changes document without saving your changes.
You can view the items that have been cut and copied to the Clipboard by clicking the Clipboard Dialog Box Launcher to open the Clipboard task pane , which displays up to 24 cut or copied items.
To paste an individual item at the insertion point, you simply click the item. To paste all the items, click the Paste All button . You can point to an item, click the arrow that appears, and then click Delete to remove it from the Clipboard, or you can remove all the items by clicking the Clear All button .
You can control the behavior of the Clipboard task pane by clicking Options at the bottom of the pane. You can choose to have the Clipboard task pane appear when you cut or copy a single item or multiple items. You can also choose to display the Clipboard icon in the status area of the taskbar when the Clipboard task pane is displayed.
To close the Clipboard task pane , click the Close button at the right end of its title bar.
EAN: 2147483647
Pages: 231