Showing a Presentation
To start a slide show from Normal or Slide Sorter view, you click the Slide Show button to display the current slide full screen. Then the simplest way to move linearly from one slide to the next is to click the mouse button without moving the mouse. But you can also move around by using the keyboard:
-
To move to the next slide, press the Spacebar, the Down Arrow key, or the Right Arrow key.
-
To move to the previous slide, press the Page Up key or the Left Arrow key.
-
To end the presentation, press the Esc key.
If you need to move to a slide other than the next one or the previous one, you can move the mouse pointer to display an inconspicuous toolbar in the lower-left corner of the slide. You can use this toolbar in the following ways:
-
To move to the next slide, click the Next button.
-
To move to the previous slide, click the Previous button.
-
To jump to a slide out of sequence (even if it is hidden), click the Navigation button, click Go To Slide, and then click the slide.
-
To display the slides in a custom slide show, click the Navigation button, click Custom Show, and then click the show.
-
To display a list of keyboard shortcuts for carrying out slide show tasks click the Navigation button, and then click Help . For example, you can press the H key to show the next hidden slide, press the E key to erase pen annotations, or press the A key to show the pointer arrow.
-
To end the presentation, click the Navigation button, and then click End Show.
Tip You can also display the Navigation button’s menu by right-clicking the slide.
During a presentation, you can reinforce your message by drawing on the slides with an electronic “pen” or changing the background behind text with a highlighter. You simply click the Pen button on the toolbar that appears when you move the mouse, click the tool you want, and then begin drawing or highlighting. You can change the pen or highlighter color to make it stand out on the slide by clicking the Pen button, clicking Ink Color, and then selecting the color you want.
In this exercise, you will move around in various ways while delivering a presentation. You’ll also use a pen tool to mark up one slide, change the color, and mark up another.
Use the 05_Showing presentation. This practice file is located in the Chapter16 subfolder under SBS_Offi ce2007.
Open the 05_Showing presentation.
1. With Slide 1 selected in Normal view, on the View toolbar, click the Slide Show button. ![]()
The background of the first slide is displayed.
2. Click anywhere on the screen, and then click again.
First the title moves onto the slide from the top, and then the subtitle moves onto the slide from the bottom.
3. Click the mouse button to advance to Slide 2.
The slide contents move in from the left.
4. Press the key to display the previous slide, and then press the
key to display the next slide.
5. Move the mouse.
The pointer appears on the screen, and the shadow toolbar appears in the lowerleft corner.
| Troubleshooting | If the pop-up toolbar doesn’t appear, press the Esc key to end the slide show. Then click the Microsoft Office Button, click PowerPoint Options, click Advanced, and in the Slide Show section, select the Show Popup Toolbar check box, and click OK. |
6. On the toolbar, click the Next button (the button at the right end of the shadow toolbar) to display Slide 3. 
7. Right-click anywhere on the screen, and then click Previous to redisplay Slide 2.
8. Right-click anywhere on the screen, point to Go to Slide, and then in the list of slide names, click 7 Pulling It All Together.
9. Display the toolbar, click the Navigation button, and then click Next to display Slide 8. 
10. Use various navigation methods to move around the slide show until you are comfortable moving around.
11. Right-click anywhere on the screen, and then click End Show.
Slide 8 appears in Normal view.
| Tip | If you click all the way through to the end of the presentation, PowerPoint displays a black screen to indicate that the next click will return you to the previous view. If you do not want the black screen to appear at the end of a presentation, click the Microsoft Office Button, click PowerPoint Options, and click Advanced. Then in the Slide Show area, clear the End With Black Slide check box, and click OK. Then clicking while the last slide is displayed will return you to the previous view. |
12. Display Slide 5, and switch to Slide Show view.
13. Right-click anywhere on the screen, point to Pointer Options, and click Felt Tip Pen.
The pointer changes to resemble the tip of a felt tip pen.
| Important | When the pen tool is active in Slide Show view, clicking the mouse does not advance the slide show to the next slide. You need to switch back to the regular pointer to use the mouse to advance the slide. |
14. Draw a line under the word Colorizing in the title.

15. Right-click the screen, point to Pointer Options, and then click Erase All Ink on Slide.
The line is erased.
16. Press ![]() to move to the next slide.
to move to the next slide.
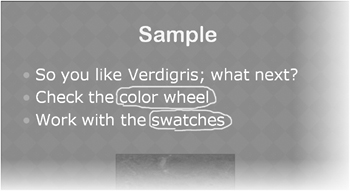
17. Display the toolbar, click the Pen button, point to Ink Color, and then in the palette, click a light purple color.
18. Draw circles around color wheel and swatches.

19. Right-click anywhere on the screen, point to Pointer Options, and then click Arrow.
The pen tool changes back to the regular pointer, and you can now click the mouse button to advance to the next slide.
20. Press ![]() to stop the slide show.
to stop the slide show.
A message asks whether you want to keep your ink annotations.
21. Click Discard.
Slide 6 appears in Normal view.
Close the 05_Showing presentation without saving your changes, and if you are not continuing directly on to the next chapter, quit PowerPoint.
If your computer can support two monitors, or if you will be presenting a slide show from your computer through an overhead projector, you might want to check out Presenter view. In this view, you can control the slide show on one monitor while the audience sees the presentation in Slide Show view on the other monitor or the projector screen.
To deliver a slide show on one monitor and use Presenter view on another:
-
Open the PowerPoint presentation you want to set up.
-
On the Slide Show tab, in the Set Up group, click Set Up Slide Show.
The Set Up Show dialog box opens.
-
Under Multiple monitors, click the Display slide show on arrow, and then in the list, click the name of the monitor you want to use to deliver the presentation.
The slide show will run full-screen on the specified monitor.
-
Under Multiple monitors, select the Show Presenter View check box, and then click OK.
-
Switch to Slide Show view to start the slide show on the specified monitor.
-
On the other monitor, use the Presenter view navigation tools to control the presentation.
You can see details about what slide or bullet point is coming next, see your speaker notes, jump directly to any slide, black out the screen during a pause in the presentation, and keep track of the time.
EAN: 2147483647
Pages: 231