Deleting Information from a Table
Over time, some of the information stored in a database might become obsolete. The Products table in our sample database, for example, lists all the products the company currently offers for sale or has sold in the past. You can indicate that a product is no longer available for sale by placing a check mark in the Discontinued field. Discontinued products aren’t displayed in the catalog or offered for sale, but they are kept in the database for a while in case it becomes practical to sell them again. A similar situation could exist with customers who haven’t placed an order in a long time or who have asked to be removed from a mailing list but might still place orders.
To maintain an efficient database, it is a good idea to clean house and discard outdated records from time to time. You could scroll through the tables and delete records manually, but if all the records you want to delete match some pattern, you can use a delete query to quickly get rid of all of them.
| Important | Keep in mind several things when deleting records from a database. First, you can’t recover deleted records. Second, the effects of a delete query can be more far-reaching than you intend. If the table from which you are deleting records is linked to another table, and the Cascade Delete Related Records option for that relationship is selected, records in the second table will also be deleted. Sometimes this is what you want, but sometimes it isn’t. For example, you probably don’t want to delete records of previous sales at the same time you delete discontinued products. To safeguard against these problems, it is a good idea to back up your database before deleting the records, or to create a new table (perhaps named Deleted<file name>), and then move the records you want to delete to the new table, where you can review them before deleting them permanently. |
In this exercise, you will create a delete query to remove all discontinued products from a database table.
Use the 08_Delete database. This practice file is located in the Chapter12 subfolder under SBS_Office2007.
Open the 08_Delete database.
1. On the Create tab, in the Other group, click the Query Design button. Access opens a new query object and the Show Table dialog box.
2. In the Show Table dialog box, double-click Products to add that table to the query window list area, and then click Close.
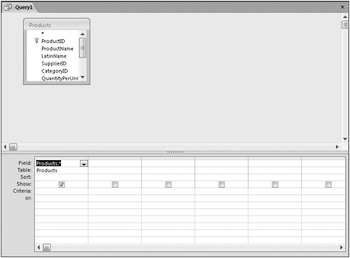
3. In the Products field list, double-click the asterisk to copy all the fields in the table to the query.
Products.* appears in the Field row of the first column of the design grid, and Products appears in the Table row.

| Important | Double-clicking the asterisk in the field list is a quick way to move all the fields in a table to the query, without having each field appear in its own column. However, selecting multiple fields in this way prevents you from setting Sort, Show, and Criteria values for individual fields. To set these values, you have to add the specific fields to the design grid, thereby adding them twice. To avoid displaying the fields twice, clear the check mark in the Show row of the duplicate individual fields. |
4. In the Products field list, double-click Discontinued to copy it to the next available column in the design grid.
5. In the Query Type group, click the Delete button to convert this select query to a delete query. 
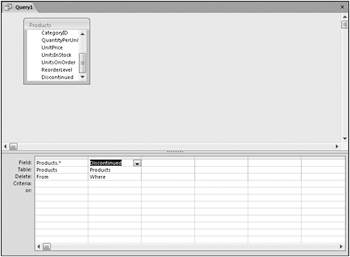
A Delete row appears in the design grid, and the Sort and Show rows disappear.

In the first column, which contains the reference to all fields in the Products table, the Delete row contains the word From, indicating that this is the table from which records will be deleted. When you add individual fields to the remaining columns, as you did with the Discontinued field, the Delete row displays Where, indicating that this field can include deletion criteria.
6. In the Criteria row, under Discontinued, type Yes.
The Discontinued field is set to the Boolean data type, which is represented in the datasheet as a check box that is selected to indicate Yes and cleared to indicate No. To locate all discontinued products, you need to identify records with the Discontinued field set to Yes.
7. To check the accuracy of the query, switch to Database view.
Testing the query results in a list of 18 discontinued products that would be deleted if you ran the query. Scroll to the right to verify that all records display a check mark in the Products.Discontinued field.
8. Switch to Design view. Then on the Design contextual tab, in the Results group, click the Run button to run the delete query. 
Access displays a warning to remind you of the permanence of this action.
| Tip | Before actually deleting records, you might want to display the Relationships window by clicking the Relationships button in the Show/Hide Group on the Database Tools tab. If the table you are deleting data from has a relationship with any table containing information that shouldn’t be deleted, right-click the relationship line, click Edit Relationship, and make sure that the Enforce Referential Integrity check box is selected and the Cascade Delete Related Records check box is not selected. |
9. In the Microsoft Office Access message box, click Yes to delete the records.
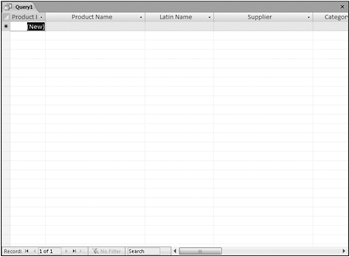
10. Switch to Datasheet view and verify that all the records were deleted.

11. If you think you might run the same delete query in the future, save and name the query.
| Tip | If you are concerned that someone might accidentally run a delete query and destroy records you weren’t ready to destroy, change the query back to a select query before saving it. You can then open the select query in Design view and change it to a delete query the next time you want to run it. |
Close the query and the 08_Delete database.
EAN: 2147483647
Pages: 231