Add or Remove Programs
| As you know, many programs come with their own installation (Setup) programs that handle all the details of installation, such as file copying, making Registry additions, making file associations, and adding items to the Start menus. An ever-growing number of applications even provide their own uninstall routine, which appears as a unique icon within their Start menu folder. You'll rarely add programs through the Add or Remove Programs applet. Most of what you'll use this applet for is to remove applications or portions thereof when a dedicated tool is not provided by the vendor. Change or Remove ProgramsYou've probably noticed that not all programs show up in the Add or Remove Programs applet. They don't appear because only programs complying with the 32-bit Windows API standard for installation get their filenames and locations recorded in the system database, allowing them to be reliably erased without adversely affecting the operation of Windows. Many older or less-sophisticated applications simply install in their own way and don't bother registering with the operating system. Most modern applications are written in compliance with the Microsoft Windows standards for installation and removal. Thus, you see them in your installed applications list in the Add or Remove Programs applet. This list is mainly the result of the PC software industry's response to kvetching from users and critics about tenacious programs that are hard to root out after they're installed. Some ambitious programs spread themselves out all over your hard disk like oil on your garage floor with no easy way of reversing the process. Users complained about the loss of precious disk space, unexplained system slowdowns, and so forth.
This problem was the inspiration for such programs as Uninstaller, CleanSweep, and other utilities that monitor and keep a database of the files a program installs; they wipe out these files effectively when you decide to remove the program, also returning any modified Windows settings to their previous state with any luck. This process is better relegated to those writing the operating system, I feel, and Microsoft rightly set up standards for installation and removal of applications, overseen by this applet. Even if an application isn't installed via the Add or Remove Programs applet per se, if well behaved, it should still make itself known to the operating system and register changes it makes, enabling you to make changes and/or uninstall it from there. TIP Never attempt to remove an application from your system by deleting its files from the \Program Files folders (or wherever). Actually, never may be too strong. Removal through manual deletion should only be as a last resort. Always attempt to use the Add or Remove Programs applet or the uninstall utility from the application first. For tips on manually removing programs, see "Program Doesn't Show Up" under the "Troubleshooting" section at the end of this chapter. What's more, the built-in uninstaller lets you make changes to applications, such as adding or removing suboptions (assuming the application supports that feature). Use of the uninstall feature of the applet is simple:
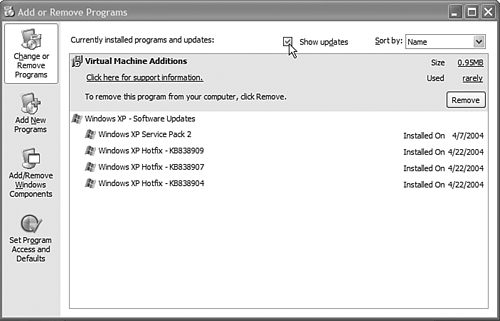
TIP Obviously, removing an application can't easily be reversed by, say, restoring files from the Recycle Bin because settings from the Start menu and possibly the Registry are deleted. Some applications (for example, Microsoft Office) prompt you to insert the program CD when you attempt to change or remove the app. These prompts can be annoying, but what can you do? The setup, change, and uninstall programs for some large suites are stored on their CDs, not on your hard disk. So, just insert the disc when prompted. NOTE Incidentally, Add or Remove Programs can only be run by users with Administrator credentials on their local computer. Although some applications can be installed or removed by non-administrators, most do require administrative privilege. Show/Hide UpdatesAs of Service Pack 2 (SP2), this applet evolved to provide a means for you to select whether or not updates, such as security updates downloaded from the Microsoft Web site, are displayed in the Currently Installed Programs list. This applies to the operating system as well as to applications whose vendors provide you with removable updates. A new Show Updates check box appears above the list, which enables you toggle between showing or hiding installed updates. This is helpful because, pre SP2, the list of installed programs was overwhelmed by the list of installed updates. The new option to filter out the updates from the list and only show installed programs makes this list easier for users to read. By default, Change and Remove Programs will not show installed updates to Windows. To see the updates that have been installed, you can select the Show Updates check box at the top of the list. Add New ProgramsAs you know, installation of new programs is usually as simple as inserting a CD into the drive. The autorun program on most application CDs does the rest. Or, when it doesn't, you can run the Setup file on the disk, and the rest is automatic. Ditto for programs you download off the Net. Still, you can install from the Add or Remove Programs applet if you want or if the program's instructions suggest it. This part of the applet provides a front end for running an application's Setup program. Big Whoop. But, what launching a setup through the applet does is gather uninstall data for applications that otherwise don't properly register with the OS for uninstallation. Here's what you do:
Installing Programs from the NetworkAs you learned in Chapter 1, "Introducing Windows XP Professional," an administrator of a Windows 2000 or Windows Server 2003 domain can "publish" or "push" applications to workstations. When an application is published over the LAN, it usually is automatic. In other words, the software is installed without the knowledge of the user or the necessity for user input. However, some applications can be marked as optional instead of mandatory. An optional application can be installed over the network from Add New Programs. When you choose Add New Programs, you have another option, showing applications that are available on the network.
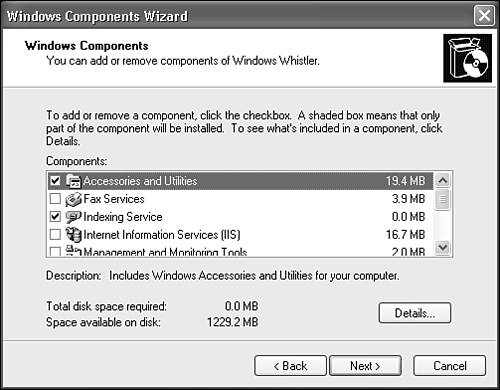
Next, open the box called Category, which you use to narrow down the class of application you want to install. (The system administrator makes up the categories.) When you select such an application for installation, note that the administrator who set it up for publishing may have turned off the possibility for you to make installation choices such as which portions, add-ins, or other options to install. The capability for a server system to push applications to clients is part of IntelliMirror. For more information on IntelliMirror and pushing applications to client systems, please consult the Windows XP Resource Kit and documentation on Windows 2000 Server or Windows Server 2003. NOTE In the case of "pushed" (or assigned) applications, when you log on to the machine or network, the applications assigned to you are added to your machine across the network automatically. In fact, if you accidentally or intentionally delete the application from your computer, it reinstalls itself. Add/Remove Windows ComponentsIn addition to managing add-on products and applications through the Add or Remove Programs applet, the components of Windows XP itself are installed and removed here. Clicking the Add/Remove Windows Components button opens the Windows Components Wizard dialog box (Figure 24.5). From here, you can install additional Windows XP components by marking their check boxes. Plus, you can remove existing components by clearing their check boxes. However, be careful since there are often many sub-levels of selections. Click on the name of an item, not its check box, and then click the Details button to view its sub-components. Marking or clearing a top-level item will install or remove all of its subcomponents. Figure 24.5. The Windows Components Wizard dialog box. After you've made your selections and clicked Next, the system will install or remove components based on your instructions. You may be prompted for the Windows XP distribution CD, so be prepared. Set Program Access and DefaultsThis new feature in Windows XP, added with Service Pack 1, enables you to choose your own default middleware applications. For more on how to do this, see the section "Department of Justice Consent Decree Compliance" in Appendix B. |
EAN: 2147483647
Pages: 450
