Making Services Available
| You might want to make some internal network services available to the outside world through your Internet connection. You would want to do this if
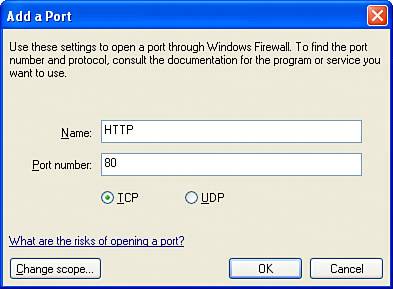
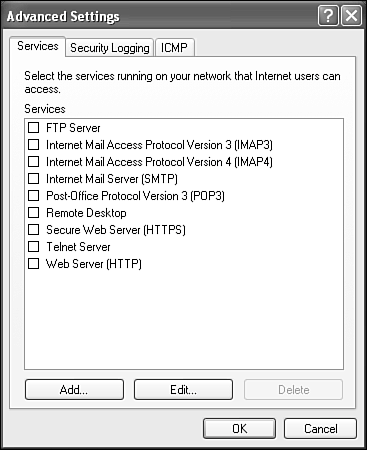
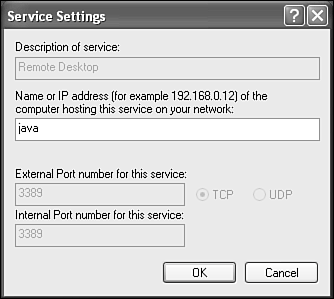
If you have set up routed Internet service with a router (as in the fourth setup in Figure 19.1), you don't have to worry about this because your network connection is wide open and doesn't use Network Address Translation. As long as the outside users know the IP address of the computer hosting your serviceor its DNS name if you have set up DNS serviceyou're on the air already. Otherwise, you have either Windows Firewall, Network Address Translation, or both in the way of incoming access. In order to make specific services accessible, you'll need to follow one of the sets of specific instructions in the next few sections, depending on the type of Internet connection setup you've used. Skip ahead to the appropriate section. Enabling Access with Internet Connection SharingWhen you are using Microsoft's Internet Connection Sharing feature, your network is protected from outside access. This is a good thing when it blocks attempts by hackers to get to your shared files and folders. It also blocks access to some of the neat services you might want the outside world to have access to: Virtual Private Networking, Remote Desktop, Remote Assistance, Web and FTP service, and so on. There are two steps needed to provide outside access to a given service provided by a computer on your network. First, the connection sharing system (ICS) must be told which computer on your network is to receive incoming connection requests for a particular service. Then, on the computer that provides the service, Windows Firewall must be told to let these requests through. Some services, such as Remote Assistance and Windows Messenger, use the Universal Plug and Play (UPnP) protocol to automatically perform this setup work, by communicating with the computer that is sharing its connection. So, when you are using ICS to share your network connection, these services will simply work. However, most server-type functions, for instance Remote Desktop and Internet Information Services, require manual setup. On the computer that is providing the service itself, you must tell Windows Firewall to allow incoming connections to the service by following these steps:
Then, you must instruct the computer that is sharing its Internet connection to forward incoming requests to the designated computer. On the computer that physically connects to the Internet, follow these steps:
When you've enabled the desired services, incoming requests using the selected service ports will be forwarded to the appropriate computer on your LAN. Windows Firewall will know to let these services through. CAUTION With the exception of incoming VPN connection service, I suggest that you don't run any other services on the computer that manages your Firewall and/or Internet Connection Sharing, especially IIS. There's too great a risk that a security flaw in the service might let hackers compromise the Firewall. TIP If you're not sure which port a given service uses, you can use the Firewall's logging feature to find out what ports are used. To do this, open the Advanced Settings page again, click Settings, and view the Security Logging tab. Check Log Dropped Packets and click OK. Then attempt to connect to the sharing computer from outside on the Internet using the service of interest. View the log file (by default, c:\windows\pfirewall.log). The eighth column in this file lists the "destination port" that you tried to use. This is the port your service needs to have forwarded. Enabling Access with a Sharing RouterIf you use a connection-sharing router on your LAN, you'll need to follow a somewhat different procedure to enable outside access to services on your network. You must still open the Windows firewall on the computer(s) providing services, as described in the first four-step procedure in the previous section. Then you must use a manufacturer-specific procedure to set up forwarding for services you want to expose to the Internet. One difficulty with these devices is that you must forward services by IP address, not by computer name, and normally, you set up computers to obtain their IP addresses automatically. This makes the computers moving targets, as their IP address could change from day to day. So, you'll have to make special arrangements for the computers on your LAN that you want to use to host services. On your router's setup screens, make a note of the range of IP addresses that it will hand out to computers requesting automatic configuration. Most routers have a place to enter a starting IP address and a maximum number of addresses. For instance, the starting number might be 2, with a limit of 100 addresses. For each computer that is going to be providing an outside service, pick a number between 2 and 254 that is not in the range of addresses handed out by the router, and use that as the last number in the computer's IP address. To configure the computer's network address, follow these steps:
Then you need to use the router's setup screens to set up forwarding to this computer. There are two ways you can set up forwarding. One is appropriate for services that use standard, well-known TCP or UDP protocol ports (like a Web server or Remote Desktop), and the other is appropriate for access to services that use non-standard protocols (like Microsoft VPN connections). Forwarding Standard TCP and UDP ServicesFor standard services with a known TCP or UDP port number, view the Forwarding setup page on your router's internal configuration screen. Enter the appropriate port number, protocol type, and target IP address. For example, Figure 19.20 shows a router set up to forward a whole slew of services into computers on my LAN. Table 19.3 shows what is being forwarded here. Of course, your gateway router might use different configuration screensyou'll have to check its documentation for examples appropriate for your setup. Figure 19.20. Service Forwarding configuration for a typical connection sharing router.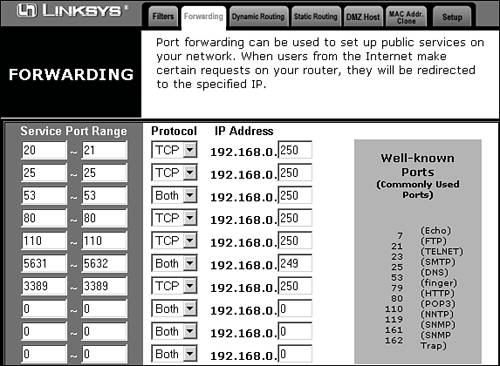
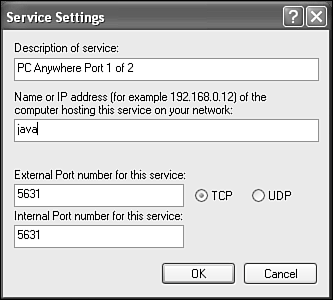
TIP You can set up Remote Desktop forwarding to more than one computer by a making a separate entry for each computer. Each must have a different "external" port number. For example, I use port number 3389 for the first computer, 3390 for the second, and so on. The "internal" port number must be 3389 in each case. Then, when I use the Remote Desktop Client to connect to my network from the Internet, I enter the URL mycompany.com:3389 to get to the first computer, mycompany.com:3390 to get to the second, and so on. Forwarding Non-Standard ServicesFor services that use TCP/UDP in unpredictable ways, you'll have to use another approach to forwarding on your LAN. Some services, such as Remote Assistance and Windows Messenger, communicate their private, internal IP address to the computer on the other end of the connection, and when the other computer tries to send data to this private address, it fails. To use these services with a hardware router, you must enable Universal Plug and Play (UPnP) as described earlier in the chapter. Other services use network protocols other than TCP and UDP, and most routers can't be set up to forward them. Incoming Microsoft VPN connections fall into this category. Some routers have built-in support for Microsoft's PPTP protocol, which is the basis of Virtual Private Networking. If yours has this support, your router's manual will tell you how to forward VPN connections to a host computer. Otherwise, to support non-standard services of this sort, you'll have to tell the router to forward all unrecognized incoming data to one designated computer. This in effect exposes that computer to the Internet, so it's a fairly significant security risk. In fact, most routers call this targeted computer a "DMZ host," referring to the notorious Korean no-man's-land called the Demilitarized Zone and the peculiar danger one would face standing in it. To enable a DMZ host, you'll want to use a fixed IP address on the designated computer, as described in the previous section. Use your router's configuration screen to specify this selected IP address as the DMZ host. The configuration screen for my particular router is shown in Figure 19.21; yours may differ. Figure 19.21. Enabling a DMZ host to receive all unrecognized incoming connection requests.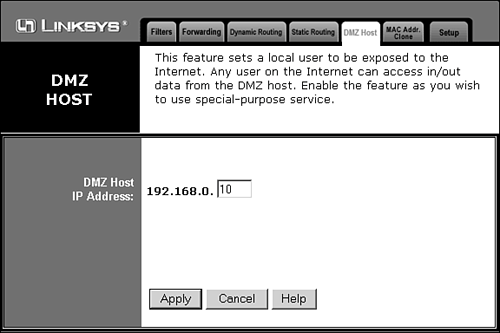 Now, designating a DMZ host means that this computer is now fully exposed to the Internet, so you must protect it with a firewall of some sort. You can enable Windows Firewall on this computer's LAN Connection, but you must also block access to Windows File and Printer sharing. You could disable these services on this computer by disconnecting them from the network adapter as shown in Figure 19.5. You should also set up filtering in your router to block ports 137 through 139 and 445. Figure 19.22 shows how this is done on my Linksys router; your router might use a different method. Figure 19.22. Configuring filters to block Microsoft file sharing services. TIP It's not a bad idea to enable filtering for these ports even if you're not using a DMZ host. It's essential to do this if you set up a DMZ host. |
EAN: 2147483647
Pages: 450