Configuring Your LAN
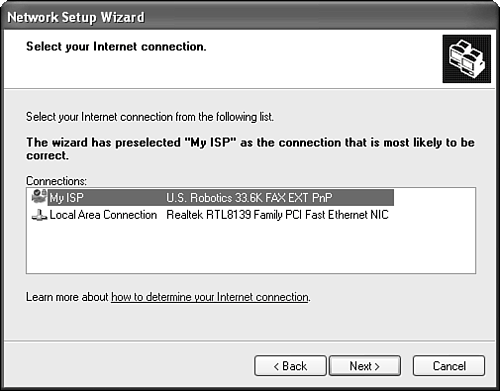
| You waited weeks for installation day, and the installer finally came. Now all you can think of is all those bits, just waiting to blast their way onto your network. Hang on; we're almost done. You now need to set up your network's TCP/IP software to let your computers talk through the Internet connection in a coordinated way. This step depends not so much on the connection type you chose but on the sharing system and the IP address system you'll use. In the following sections, I'll describe how to set up each of the connection schemes diagrammed in Figure 19.1. If you're still in the planning stages for your network, you might want to read all of the sections to see what's involved; this may help you decide what configuration you want to use. If your LAN is already set up and your Internet service is ready to go now, just skip ahead to the appropriate section. Scheme AMicrosoft Internet Connection Sharing with a Dial-Up ConnectionThis section shows how to set up the Internet connection method illustrated in Figure 19.1-A. The Internet Connection Sharing feature provided with Windows XP can share modem, ISDN or broadband connections that require a sign-on procedure. The connection is made automatically whenever any user on the network tries to access the Internet; this is called demand-dialing. The following section describes how to set it up. Setting Up the Shared ConnectionTo set up a shared connection, first install and test your modem and ISP information on the computer that will be used to share the connection. To do this, set up a standard dial-up connection using the procedure described in Chapter 8. Be sure that you can access the Internet properly by viewing at least one Web page. When you know this is working, you're ready to set up Internet Connection Sharing. You can do this with the Network Setup Wizard, or set it up manually. To use the wizard, follow these steps:
Connection sharing is now set up. You might want to walk through the manual process described next, just to confirm that all of the settings were made correctly. Otherwise you may skip ahead to the section titled "Configuring the Rest of the Network." If you don't want to or can't use the Network Setup Wizard on the connection-sharing computer, you can use the manual configuration process described next. Here is the procedure:
I suggest restarting your computer and confirming that your computer connects to your ISP when you try to view a Web page. Then, proceed by configuring the other computers on your LAN. Configuring the Rest of the NetworkWhen the shared connection is set up, configuring the rest of your LAN should be easy. The computer sharing its Internet connection is now running the Internet Connection Sharing service, which makes it
Its IP address is 192.168.0.1 and all your other computers simply refer to it for network services. To configure the other computers on the network, you can use the Network Setup Wizard, or configure manually. First, I'll give the steps for using the wizard. On each of your other computers (all except the connections-sharing computer), follow these steps:
NOTE When you're using a shared dial-up connection, it takes a while for the dialer to go through its paces if the connection wasn't already up, and before it can finish you might get an error from Internet Explorer saying it can't open the page. If this happens, just wait a few seconds and click Refresh to try again. If you are using Microsoft Internet Connection Sharing, or a connection sharing router that supports Universal Plug and Play (UPnP), the Network Connections window of all of the other computers on your network should have an icon that represents the shared Internet connection, as shown in Figure 19.7. Normally, Windows will automatically establish and drop the shared connection as needed. If necessary you can right-click this icon to control the connection manually (unless the owner of the shared connection disabled the remote-control feature on the shared connection's Advanced properties page). Figure 19.7. The other computers on your network can control the shared connection from their Network Connections window.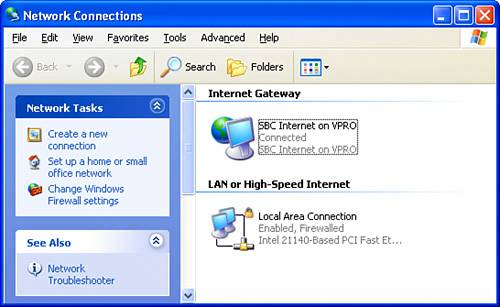 If you're a networking hotshot and want to configure other computers manually, you can use this procedure:
Now test the shared connection from a computer on your LAN by trying to browse a Web page.
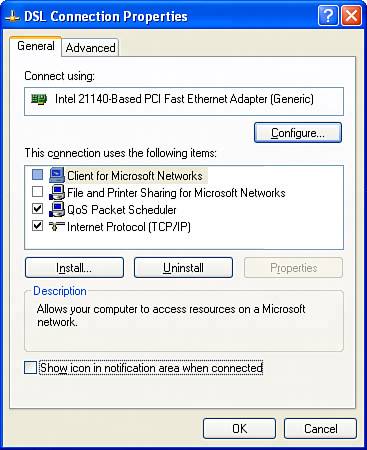
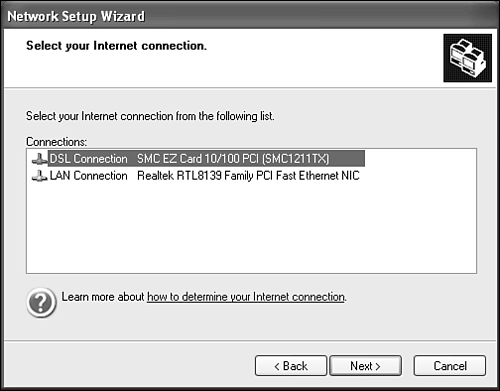
Scheme BMicrosoft Internet Connection Sharing with a Broadband ConnectionThis section shows how to set up the Internet connection method illustrated in Figure 19.1-B. The procedure for configuring a shared high-speed cable or DSL Internet connection with Microsoft ICS is very similar to that for setting up a shared dial-up connection. To prepare, be sure to install and test your DSL or cable connection on the computer you'll use to host the shared connection, as described in Chapter 8. It's essential that you have this working before you proceed to set up your LAN and the shared connection. TIP If your broadband service uses a LAN adapter rather than USB to connect your computer to the DSL or cable modem, you'll be installing two LAN adapters in this computer: one for the LAN, and one for the modem. I suggest that you install them one at a time. Install the one that you'll use for your broadband connection first. View the adapter's icon in Network Connections, right-click it, and rename it "DSL Connection" or "Internet Connection," or some other name that indicates what it's used for, as shown in Figure 19.8. Configure and test the Internet connection. Then, install the network adapter that you'll use to connect to your LAN. Rename this connection "LAN Connection" or leave it as "Local Area Connection." This will help you later on in the setup process when you need to know which connection goes to your ISP. Figure 19.8. Install and rename your network adapters one at a time, indicating what purpose they'll serve. "DSL Connection" or "Internet Connection" is much more informative than "Local Area Connection #2."
Verify that the broadband Internet connection is not connected to Windows file and printer sharing. To do this, follow these steps:
When your broadband connection is configured correctly and is working, follow these steps:
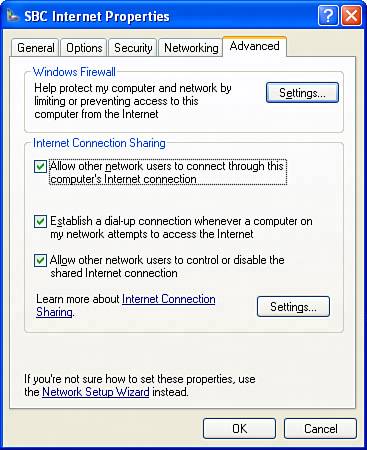
When Connection Sharing has been set up, follow the instructions under "Configuring the Rest of the Network" in the section immediately preceding this one. Because it's so important with these always-on broadband connections that Windows Firewall is actually working, I suggest that you view the icons in Network Connections to be sure that at least the broadband connection icon has the word "Firewalled" next to it, as shown in Figure 19.10. If it doesn't, use the following manual configuration steps to set it up. Figure 19.10. Be sure that your shared broadband connection says Firewalled.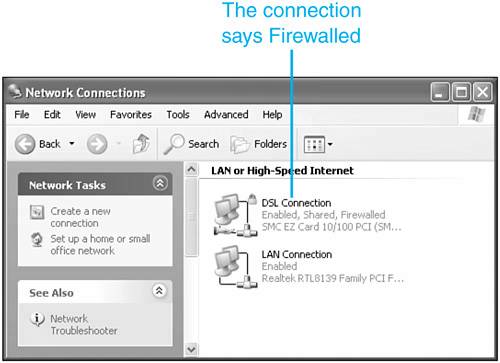 If you want to confirm that the wizard did its job properly, or if you want to configure Connection Sharing manually, rather than using the wizard, you can follow these steps on the computer with the broadband connection:
I suggest restarting your computer and confirming that your computer connects to your ISP when you try to view a Web page. Now, skip back to the section titled "Configuring the Rest of the Network" on page xxx. Scheme CSharing Router with a Broadband or Dial-Up ConnectionThis section shows how to set up the Internet connection method illustrated in Figure 19.1-C. Your router's manufacturer will provide instructions for installing and configuring it. If you're using cable or DSL Internet service, you'll connect your broadband modem to the router using a short Ethernet patch cable. If you're using a dial-up or ISDN account, you'll need to set up the router and a modem. Then, you'll connect the router to your LAN using one of the two methods shown in Figure 19.11. Figure 19.11. Connecting a connection sharing router to your LAN.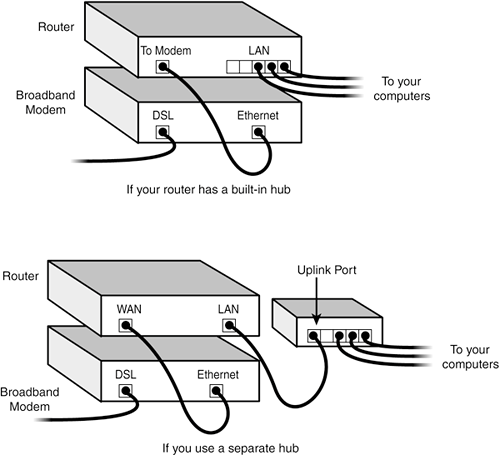 If you connect your router to a separate hub, be sure that the "Link" indicators come on at both the hub and the router. If they don't you might need to switch the hub end of the cable from a regular port to an uplink port or vice versa. You'll then configure the router, telling it how to contact your ISP, and what range of IP addresses to serve up to your LAN. Every device will use a different procedure, but I can show you the basic steps used by the Linksys Cable/DSL Sharing Routers that I have been so happy with. The procedure will go something like this: When the router is attached to your network, you'll set up one of your computers' LAN adapter to obtain its IP address information automatically. Then you will use Internet Explorer to connect to the router by viewing http://192.168.1.1. (The address may be different for your router.) A password is required; on my router the factory default value was admin. (On some routers you have to enter both a username and a password.) You'll fill in your ISP's IP and sign-on information, if any, on a Web page similar to the one shown in Figure 19.12. Figure 19.12. Sample setup page for a cable/DSL connection sharing router. You might need to enter a static IP address, if one was assigned to you by your ISP. If your ISP uses DHCP to assign IP addresses dynamically, the router may need to be assigned the host and domain name expected by your provider. This is common with cable Internet setups. If your ISP uses PPPoE to establish a connection, you'll need to enable PPPoE and enter your logon and password. Most DSL service works this way. If your DSL provider does use PPPoE, you should enable the router's auto-sign-on feature, and you can optionally set up a "keep-alive" value that will tell the modem to periodically send network traffic even if you don't, in order to keep your connection active all the time. (This might violate your service agreement with the DSL providerbetter check before you do this.) If you use cable Internet service and your ISP didn't provide you with a special host name that you had to give to your computer, your ISP probably identifies you by your network adapter's MAC (hardware) address. You'll probably find that your Internet connection won't work when you set up the router. One of your router's setup pages should show you its MAC address. You can either call your ISP's customer service line and tell them that this is your new adapter's MAC address, or, you can configure the router to "clone" your computer's MAC address, that is, copy the address from the computer you originally used to set up your cable connection. Your router's setup manual will tell you how to do this. CAUTION Be sure to change the factory-supplied password of your router after you install it. (And write the password down somewhere in the router's manual.) Also, be sure to disable outside (Internet) access to the router's management screens. As you are configuring your router, you may wish to enable Universal Plug and Play (UPnP). I'll discuss this later in this chapter. You may also opt for even better hacker protection by having your router filter (block) Microsoft file and printer sharing data. This is usually done on an advanced set up screen labeled Filtering. See "Scheme FRouted Service Using a Router" later in this chapter for the list of ports that you must block. When the router has been set up, go to each of your computers and follow the instructions under "Configuring the Rest of the Network," on page 752. You can configure all of the computers manually, or you can use the Network Setup Wizard. If you use the wizard, select My Computer Connects Through Another Computer or a Residential Gateway. If you set up the computers manually, select Obtain an IP Address Automatically and Obtain DNS Information Automatically. Using Universal Plug and PlayIf you use a hardware connection sharing router, you may want to consider enabling a feature called Universal Plug and Play (UPnP). UPnP provides a way for software running on your computer to communicate with the router. Here's what UPnP can do:
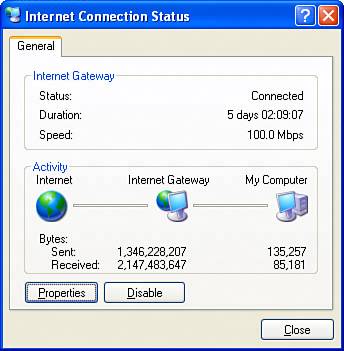
UPnP has a downside, howeverit has no built-in security mechanism, so any program on any computer on your network could potentially take control of the router and open "holes" for incoming connections. (I am confident that we will soon see computer viruses and Trojan Horses that take advantage of this.) However, Windows Firewall will still provide some protection and will warn you if an undesired program attempts to receive incoming network connections, so this is not yet a serious problem. If you use Remote Assistance or Windows Messenger, the benefits that UPnP provides outweigh the risks. To use UPnP, you must enable the feature in your router. It's usually disabled by default. If your router doesn't currently support UPnP, you may have to download and install a firmware upgrade from the manufacturer. Most routers now do support UPnP. By default, Windows XP provides support for detecting UPnP enabled routers. If you have a UPnP router or Windows Internet Connection Sharing running on your network, the Network Connections screen should display an icon for the router as shown in Figure 19.13. Figure 19.13. If your router supports UPnP, an Internet Gateway icon should appear in Network Connections.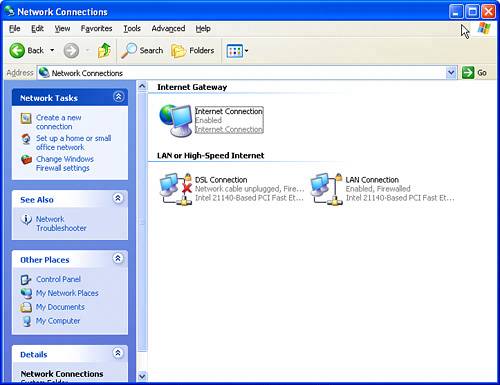 NOTE If the icon doesn't appear, click Advanced, Optional Networking Components, select Networking Services, and click Details. Be sure that Internet Gateway Device Discovery and Control Client is checked. While you're here, check UPnP User Interface as wellthis enables support for future UPnP devices. Then, on the task list, click Change Windows Firewall Settings. View the Exceptions tab and be sure that UPnP Framework is checked. If you right-click the Internet Connection icon and select Status, you'll see a dialog similar to the one shown in Figure 19.14, displaying the status of the router's connection. If your Internet service uses a connection-based system like PPPoE or standard dial-up service via a modem, this dialog may display a buttons that let you connect to and disconnect from your ISP. Figure 19.14. Router Status displayed via UPnP.
Click Properties and then Settings to display a list of network services for which the router is forwarding incoming connections to computers on your network. This list shows only forwarding settings made via UPnP. Services forwarded by the setup screens on your router, a process discussed later in this chapter under "Making Services Available," do not appear here and new settings need not be made herethey may disappear when the router is reset. Scheme DCable Internet with Multiple ComputersThis section shows how to set up the Internet connection method illustrated in Figure 19.1-D. As I mentioned earlier in the chapter, you cannot safely use file and printer sharing with this setup. You would only use this setup if you don't want file and printer sharing at all, and just want to have several computers with Internet access. Here is the procedure to follow:
If you later decide that you want to use file and printer sharing, do not simply enable the Client and Sharing items. Instead, set up a shared connection using schemes B or C, or install a second LAN as described in the next section. Scheme ECable Internet with Multiple Computers and a Separate LANThis section shows how to set up the Internet connection method illustrated in Figure 19.1-E. If you want to have file and printer sharing and have multiple computers on a cable Internet connection but for some reason do not want to use a connection sharing setup, you must set up a second, private network for file sharing that is physically separate from the network used for the Internet connection. To do this, set up and test the LAN for the cable service as described in the previous section. Then, on each of the computers that is to participate to file and printer sharing, perform the following steps:
Now, file and printer sharing will use your second, private LAN while the first LAN is used only for Internet service. Scheme FRouted Service Using a RouterThis section shows how to set up the Internet connection method illustrated in Figure 19.1-F. Some Internet service providers will sell you service that provides multiple, fixed IP addresses. This is the case for all frame relay service, and in some cases, higher-priced business-class DSL service. You should really have a good reason for going this way, beyond just wanting to connect multiple computersit's not as secure as a single shared connection. Good reasons might be that you want the reliability of frame-relay service, or you need fixed IP addresses in order to host Web, email, or other Internet-based services on several different computers. For this type of service, if you are using a cable, DSL, satellite, or Frame Relay modem with a built-in router, your ISP will help you configure your network. In this setup, you will be provided with a fixed set of IP addresses, which you'll have to parcel out to your computers. Your ISP should help you install all of this, but I can give you some pointers. First of all, it is absolutely essential that your router be set up to protect your network. You must ensure that at least these three items are taken care of:
CAUTION If your router is not properly configured to filter out NetBIOS traffic, your network will be exposed to hackers. This is absolutely unacceptable. If you're in doubt, have your ISP help you configure the router. Also, after setting things up, visit http://www.grc.com and use the "Shields Up!" pages there to be sure your computers are properly protected. For more information about network security please see Chapter 21. Second, you'll need to manually set up a fixed IP address for each computer that is to host a service reachable from the "outside." You can make address settings manually in all of your computers, or just the ones that are hosting services, with your router providing DHCP service to configure the other computers. Make a list showing the name of each computer that is to get a static IP address, and the IP address you want to assign. You'll also have to manually enter the network mask, gateway IP address, and DNS server addresses supplied by your ISP, on each of these computers. Follow these steps on each computer that is to get manual settings:
Finally, be sure to run the Network Setup Wizard on every one of your computers, however configured. When asked to choose a connection method, select Other, and on the next page, choose This Computer Connects to the Internet Directly or Through a Network Hub. The wizard will give you some grief about the security risk involved in your Internet setup and will enable Windows Firewall on your LAN adapter. Don't let it disable File and Printer sharingleave it turned on. |
 If you want to make services available to the Internet, continue with "Making Services Available" later in this chapter.
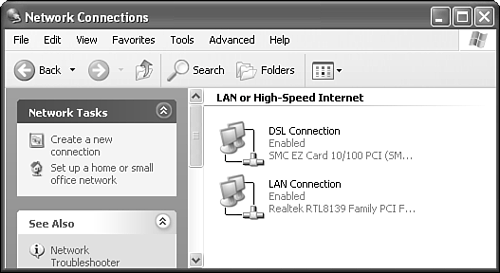
EAN: 2147483647
Pages: 450