Exploring and Searching the Network
| Of course, before you can use a network resource, you have to know where to find it. I suggest that you take a moment right now to get familiar with your network. If you are a member of a workgroup or home network, you can look through your network for shared folders and printers by exploring in the following areas in turn:
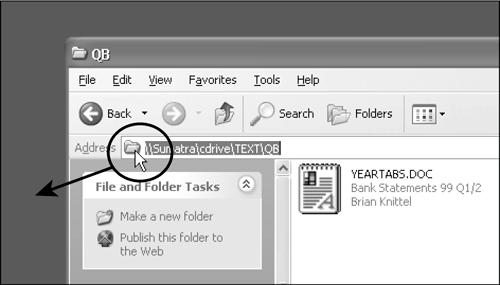
If you're on a domain-type network with Active Directory Network, you'll have an additional item in Network Tasks called Search Active Directory. I'll discuss searching later in this chapter. The network searching tool can help you locate printers, computers, people, and files anywhere in your organization. If you'll be using any shared folders, Web sites, FTP sites, or Web folders repeatedly, add them to My Network Places for a quick return later. You can use the Add a Network Place Wizard to do so, or you can just drag a shortcut from Explorer's Address bar onto your desktop or other folder, as shown in Figure 17.6. Figure 17.6. You can drag the icon from Explorer's Address bar to the desktop or to another folder to make an instant shortcut.
For example, if you visit a particular FTP site frequently for program or driver updates, highlight the FTP site's name in Explorer and drag the folder icon in the Address bar to your desktop. Release the mouse button when the shortcut arrow appears.
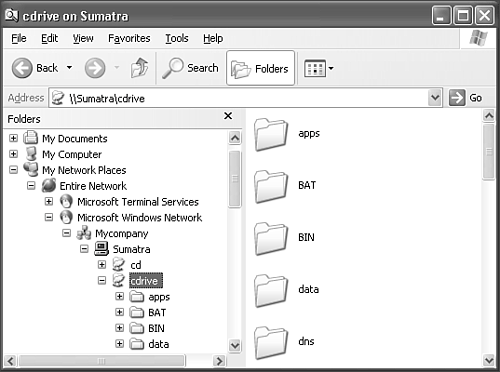
You also can explore your network from the Folders view of Explorer, as shown in Figure 17.7. (You can bring up the Folders view in any Explorer window by clicking the Folders button.) This view lets you see that your network is structured like the folders of your hard drive. Figure 17.7. The Folders view in Explorer lets you browse through your network. This view shows the shared folder "cdrive" on the computer named Sumatra.
As you can see, within Entire Network is a list of network types, which contain workgroups and domains, which contain computers, which contain shared resources, which contain folders and files. Understanding Shared ResourcesIf you do a bit of poking around, you might find that some computers share folders that may not make much sense. Server computers on a domain network, in particular, offer some network resources to member computers that are used by automatic services or for maintenance. Table 17.1 shows some of the shared resources you might see and what they do.
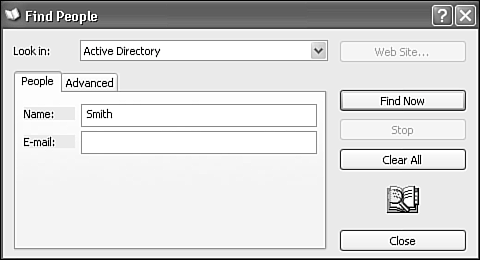
NOTE Share names ending with $ usually are hidden from being displayed in Explorer's browsing lists. Of these folders, only Printers and Scheduled Tasks are of interest, and then only to administrators. The operating system uses the others, which should not be modified. Some computers will have a SharedDocs folder. This is the computer's Shared Documents folder as presented to the network. Any other folders were shared by the computer's users or managers. Searching the NetworkYou can locate shared folders or printers by exploring My Network Places, or you can use the search links under Start, Search. Users with Active Directory at their disposal have more searching choices than those without Active Directory. You can get to the search tools by clicking Start, Search. Domain network users with Active Directory can also get to the network searching tools by viewing My Network Places and clicking Search Active Directory. The Search functions let Windows explore resources on your network just as efficiently as it searches your hard disk. Searching for PrintersActive Directory networks provide a very powerful printer search tool. In a large corporate network, hundreds or thousands of network printers may be scattered over a large area. Search for Printers lets an AD network user find just the right type of printer using a powerful query form, which I'll show you in "Searching for Printers in Active Directory" later in this chapter. Searching for ComputersIf you want to quickly locate shared resources on a computer whose name you already know, with or without AD, select Computers or People, A Computer on the Network. You can enter either the full computer name or a fragment of its name. Windows lists the matching computers, as in Figure 17.8. Figure 17.8. When you're searching for computers by their network names, you can enter full or partial names. Select one of the matching computer icons to explore its shared contents.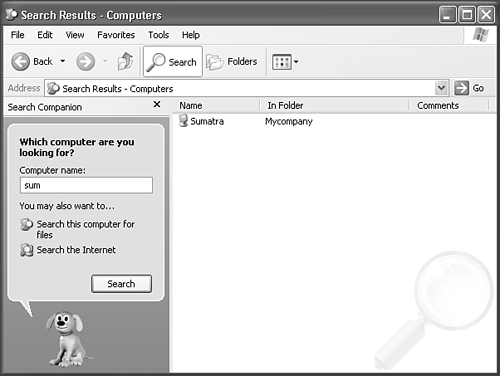 You can explore any of the listed computers to view its shared folders or printers; if you delve into the shared folders, you can open or copy the available files as you find them. Searching for PeopleThe Windows search tool lets you locate people by name or by email address. It can look in your personal address book (the one used by Outlook email), in various Internet directories, or, on a domain-type network, in the Active Directory. To search, click Start, Search, Computers or People, People in Your Address Book. The Find People dialog box will appear, as shown in Figure 17.9 Figure 17.9. Using Find People, you can search by name or email address in the Active Directory or in any of several Internet Directory services.
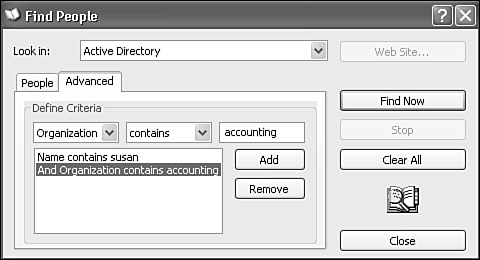
Choose a directory under Look In. You can select from several choices, including Address Book, Active Directory, Bigfoot Internet Directory, and WhoWhere Internet Directory. (I presume that the commercial directory companies have to pay to be placed in the list you see, so the list might change over time.) Using the Advanced tab of Find People (shown in Figure 17.10), you can perform a more specific search. Figure 17.10. Advanced searching properties let you specify multiple searching criteria.
To perform an advanced search from the Start menu, follow these steps:
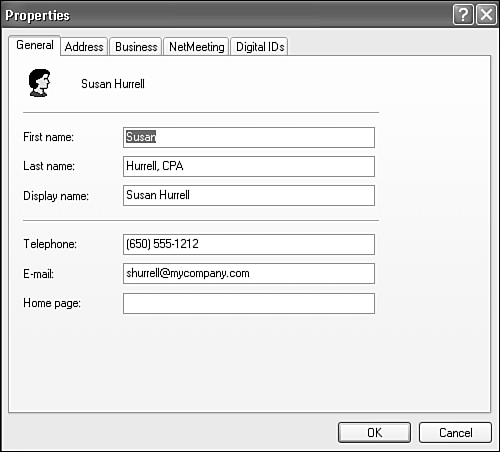
The two search tabs on the Find People dialog operate independently of one another, so selections on one tab do not influence searches made with the other. You can open any entries returned by the search to view comprehensive information about the user, as shown in Figure 17.11. The information is spread out over five tabs:
Figure 17.11. Find People returns information about the user.
NOTE You can change and update any of the information for your own account made available for user-level editing by the domain administrator. You also might be able to edit the information for employees you manage, if this is permitted on your network. Searching for Files or FoldersWhen you use Windows Search to look for files and folders, you can tell Windows to look on the network as well as on your own computer. When entering your search request, under Look In, choose Browse. In the Browse for Folder dialog box, open My Network Places. You can select Entire network if you want Windows to scan every shared folder on every computer of your network. You also can dig down to a specific computer or shared folder to narrow things down. (On the other hand, if you don't know where to look, it's nice to know that Windows can do the schlepping for you.) As Windows finds matching files, it displays them along with the computer name on which the file was found, as shown in Figure 17.12. Figure 17.12. When searching the network for files or folders Windows displays the names of the computers on which the matches were found.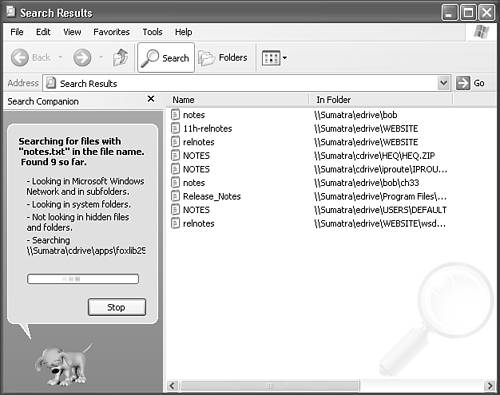 You can view or open the files you've found on the network just as you can files you've found on your own computer. On an Active Directory network, the domain administrator may choose to list, or publish, some shared folders in the directory; they might contain important resources that the company wanted to make widely accessible and easy to find. See "Advanced Active Directory Searching" later in the chapter for more information. If you are trying to find a particular shared folder, and it has not been explicitly published in the directory, you're out of luck; there's no other way to find it besides browsing. TIP If you have Administrative privileges on a network computer (that is, you are logged in as Administrator, or an equivalent account, and your administrator credentials are valid on the remote computer), you can have Explorer view the special shared folder C$. C$ displays the entire contents of the computer's hard drive. Windows automatically shares a network computer's entire hard disk for use by administrators. However, the default "full drive" shares do not work when the remote computer is on a Workgroup network and has Simple File Sharing enabled. What can you do with the contents of shared folders, assuming you have the appropriate access rights? Just as with folders on your system, you can
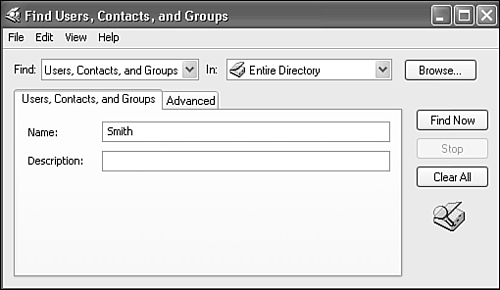
Remember, using Windows XP's Search tools and specifying what you're looking for can be much faster than simply browsing to the location you need, especially if you're not certain where the file or folder is located. Advanced Active Directory SearchingI've already shown you how to find users and computers on an Active Directory network, and have promised to talk about finding printers shortly. I'd like to point out that the Active Directory contains information on many more objects than just users, computers, and printers. It includes shared folders, organizational units, certificate templates, containers (business groupings), foreign security principals, remote storage services, RPC services (used for advanced client/server software applications), and trusted domains. It can also contain information for other objects defined by your own organization. Most of this information is used only by domain administrators to configure Windows networks over vast distances; however, you can search for anything and can specify your qualifications based on more than 100 different criteria. To make an advanced search, open My Network Places, and select Search Active Directory. The AD search tool appears, as shown in Figure 17.13. You can select various search categories in the list after the word Find. Figure 17.13. Using the advanced Active Directory search tool, you can use a simplified form for any of several categories of directory objects, or use the Advanced tab to construct queries using any of the objects fields.
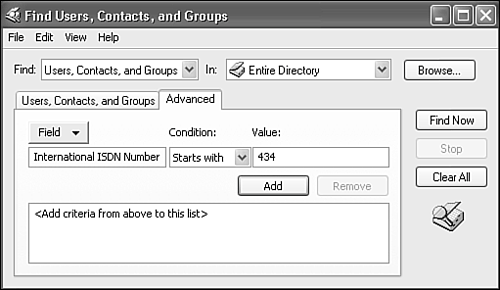
Using the advanced search tool, you can use a quick form-based search for any of the most useful objects, similar to the forms you saw when you searched for users. You can also use the Advanced tab to build specific queries such as "Last Name Starts with xxx." But this is the full-blown search system, and here you'll have 53 fields to choose from when searching for users, everything from Assistant to ZIP Code: A to Z, if you need. For example, Figure 17.14 shows what to do if you need to know who belongs to a particular international ISDN telephone number. For advanced searches, you can select various search fields and conditions (such as Last Name, Starts With), and enter values to match. You must click Add to add each search criterion to the search list. Add as many fields as necessary, and then click Find Now. Figure 17.14. Advanced searches let you dig into the most arcane information imaginable, but where else would you find information like this?
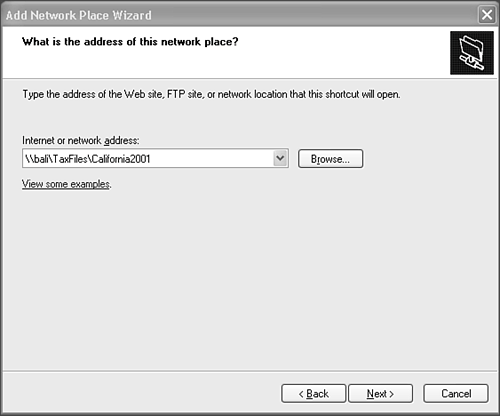
If you choose Custom Search, you have the whole gamut of fields to choose from, and in the Advanced tab, you can enter LDAP (Lightweight Directory Access Protocol) queries directly for submission to the AD service, as shown in Figure 17.15. This is the native query syntax for Active Directory, and it's available here mostly for system debugging. (Strangely, in Custom Search, any qualifiers set in the form-based search are applied along with a manually entered LDAP query; you should be sure to clear out the form if you are not likely to need LDAP directly.) Figure 17.15. Querying the Active Directory Server directly with its native LDAP query syntax.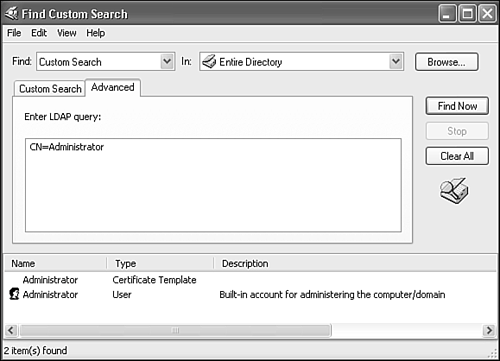 Adding Network PlacesBy using the Add a Network Place Wizard, you can add shortcuts in My Network Places to network shared folders, for a quick return when you need them in the future. I find Windows a bit hyper-helpful with its Favorites, Histories, Shortcuts, and now Network Places. However, this aid is actually useful because entries in My Network Places appear in the list of choices in every application's Save As dialog, as shown in Figure 17.16. This is very handy for saving files to a remote drive that will be backed up by network administrators, as well as to your applications' default local drive file location, such as My Documents. Figure 17.16. My Network Places is handy because you can select network folders when you're saving files in any application. You can delve deeper into the shared folders, if necessary.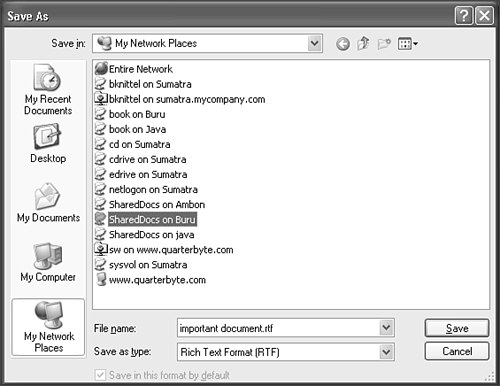 NOTE The shortcuts in Network Places differ from those in Internet Explorer's "favorites" list. When you open a "favorite" location, you are shown a Web-based view of the contents of the location. When you open a "network place," you can actually manipulate the files in the remote folder. You might find that Windows automatically adds locations to Network Places whenever you open a remote folder by name using Windows Explorer or Internet Explorer's Web Folder view. If you want to add a network place shortcut by hand, do the following:
TIP When you're browsing through your network or browsing the Internet using Internet Explorer, you can drag network folders or Web page addresses to My Network Places to instantly make a Network Place shortcut without the Add Network Place Wizard. Likewise, you can drag the address from the Explorer window's Address bar to your desktop or to a folder to make an instant network shortcut. If your my Network Places folder is getting crowded, Windows can organize the items in My Network Places in several different ways:
To select a sorting order, right-click the My Network Places window and select Arrange Icons By. If you also check Show in Groups, Windows will arrange the items in distinct groups based on the selected sort order, and within the groups will sort the icons by resource name. Using a Shared Disk DriveShared folders don't have to be subfolders. Computer owners can share the root folder of their disk drives, making the entire drive available over the network. This is especially useful with CD-ROM, floppy, and Zip disk drives. If an entire CD-ROM drive is shared, you can access the entire CD from any computer on the network. Just so you know, Windows automatically shares your entire hard drive with the special name C$. (Any other hard drives would also be shared as D$, E$, and so on.) These shares don't show up when you browse the networkthe dollar sign at the end tells Windows to keep the name hidden. But you can enter the share name directly, like \\ambon\c$, in Explorer or other programs, to view the entire drive. (You must have Administrator rights on the remote machine to use this feature. Also, on a workgroup network with Simple File Sharing enabled, these administrative shares are never accessible, as all network users are treated as Guest.) TIP If you need to install CD-ROM-based software on a computer with a broken CD-ROM drive but a good network connection, you can put the CD-ROM in another computer's drive, and share the entire drive. See the section, "Mapping Drive Letters," later in this chapter to see how to access the CD from the disabled computer. Using Internet-Based File Storage ServicesStarting with Windows XP, Microsoft has added the ability to make Network Places shortcuts to commercial services that provide file storage space over the Internet. To use these services, you must first visit the provider's Web site to obtain a username and password (and to take care of small details like payment!). When your account is set up, you can use the Add a Network Place Wizard to create a shortcut to the services. Then, when you're online, you can easily move files to and from your personal folder on the provider's network, simply by opening the service's Network Place icon. I'll talk more about this type of service in Chapter 18, "Windows Unplugged: Remote and Mobile Networking." Mapping Drive LettersIf you frequently use the same shared network folder, you can make it a "permanent houseguest" of your computer by mapping the network shared folder to an unused drive letter on your computerone of the letters after your hard drive's "C:" and the CD-ROM drive's "D:" (assuming you have one hard drive and one CD-ROM drive and have not already changed your drive mappings). You can give the shared folder \\server\shared the drive letter J:, for example, so that it appears that your computer has a new disk drive J:, whose contents are those of the shared folder. Mapping gives you several benefits:
If you've used Novell or older Windows networks in the past, this may be the only way you've ever used a network! Good news: You still can. To map a drive, select Tools, Map Network Drive in any Explorer window (such as My Computer). Or you can right-click My Network Places and select Map Network Drive. Next, select an unused drive letter from the drop-down list, as shown in Figure 17.18. If possible, pick a drive letter that has some association for you with the resource you'll be using: E for Editorial, S for Saleswhatever makes sense to you. Figure 17.18. You can select an unused drive letter to use for the drive mapping.
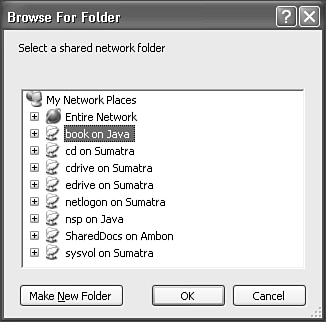
Then select the name of the shared folder you want to assign to the drive letter. You can type the UNC-formatted name if you know it alreadyfor example, \\servername\sharenameor you can click Browse to poke through your network's resources and select the shared folder. Find the desired shared folder in the expandable list of workgroups, computers, and share names, as shown in Figure 17.19, and click OK. Figure 17.19. Browsing for a shared folder. You can open the list view to see network types, workgroups, computers, and shared folders.
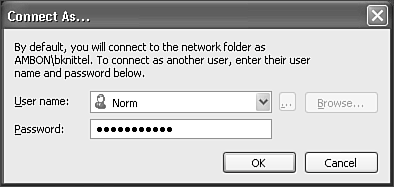
After you select the shared folder and click OK, the folder name appears in the dialog, and you have two options:
NOTE You must use the same username for all connections to a given computer. If you have other drive letters already mapped to the other computer with your original username, you'll have to unmap those drives before you can make a drive mapping with a different username. After you map a drive letter, the drive appears in your My Computer list along with your local disk drives. You might notice a couple of funny things with these drives:
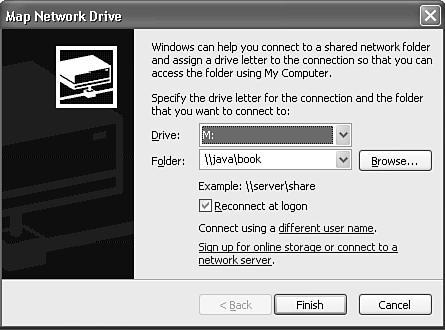
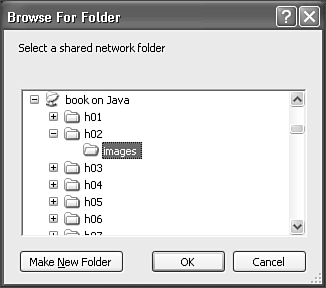
If you enjoy the more esoteric aspects of networking, there are a couple of nifty features for youmapping a drive to a subfolder and mapping shared folders with no drive letter. Mapping a Drive to a SubfolderWhen you're setting up a mapped drive and you browse to find a shared folder, notice that Windows lets you delve into the shared folders themselves. If you drill down into a subfolder and select it as the location to use in mapping a drive letter, you'll find that the mapped drive starts at the subfolder. The subfolder becomes the mapped drive's "root directory," and you can't explore upward into the shared folder that contains it. NetWare users call this the map root function. See Figure 17.21, in which I've selected the subfolder h02\images from the shared folder \\java\book. If I map drive M: to that folder, drive M: will contain the contents of folder \\java\book\h02\images, and it can't be made to see up into \\java\book\h02 or higher. The root, or top-level, directory of M: will be the images folder. Figure 17.21. By delving into a shared folder, you can map the root directory of a drive letter to a deeper point in the share.
TIP This feature is most useful to administrators, to set up scripts to map drives based on a user's login name. For example, mail might be stored in subfolders of \\server\mail according to username. Mapping drive M: to folder \\server\mail\%username% lets users get at their mail (directly) via drive M: and discourages users from poking around in other peoples' mail folders. This way, users can configure their mail programs to get mail from drive M:, and the same configuration will work for everyone. Mapping a subfolder can be a good thing because it makes any program that uses the mapped drive letter see just that subfolder as the drive's root directory. Mapping a Shared Folder Without a Drive LetterYou can make an established connection to a shared folder, keeping it readily available for quick response without assigning it a drive letter. Follow the procedure shown earlier for mapping a drive letter. When you select the letter to map, go all the way to the bottom of the Drive letter drop-down list, and select (None), the last choice. Continue through the rest of the process as described. Mapping a shared folder to (None) doesn't add a drive to your My Computer list, but it does make for speedier response from the server when you're accessing that folder. The shared folder will be visible, however, if you choose Map Network Drive, Disconnect Network Drive, or if you use the net use command from the command line. |
EAN: 2147483647
Pages: 450
 To learn how to use the Add a Network Place wizard,