Opening an Existing File
|
|
If you want to open a previously saved project file, you can do so by clicking the Open Document button located on the Standard toolbar. Alternately, you can open a file by choosing File Ø Open from the File menu. Each of these methods brings you to the Open dialog box. The Open dialog box is used in all Microsoft applications; if you spend the time to learn what it has to offer, it can save you a lot of time. This section walks you through the various features of the Open dialog box to ensure that you have an understanding of its capabilities.
Although the main function of the Open dialog box (Figure 5.7) is to open files, you can also use it to rename files, create folders, find files, print files, and move files.
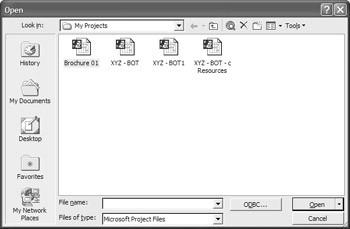
Figure 5.7: The Open dialog box
The Open dialog box first open to a default folder. This default folder is set as the location for your project files. If location this is incorrect, go to Tools Ø Options and then click on the Save tab to change the file location for your projects.
To open an existing file, it is necessary to first locate the file. The following information will help you determine the best method for finding or locating your files. File locations can vary, based on whether your project plans are stored on your hard drive or, a corporate server, or web application. The default file types in Microsoft Project 2002 are listed in Table 5.1. Project can also import a number of other file types, as detailed in Chapter 18.
| Extension | File Type |
|---|---|
| .mpp | Microsoft Project documents |
| .mpt | Microsoft Project templates |
| .mpw | Microsoft Project workspaces |
| .mpd | Microsoft Project databases |
| .mpx | Microsoft Project Exchange files |
Navigating with the Places Bar
The Places bar, located on the left side of the Open dialog box, contains five different folders or areas you can easily navigate to by clicking the appropriate icon. Depending on where your files are stored, you may find the Places bar to be a quick way to locate your project files.
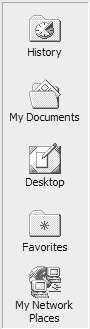
Click History to see your most recently used folders and files. My Documents takes you to your personal My Documents folder. Desktop takes you to your computer desktop and any files stored there. Favorites displays those files and subfolders you’ve placed in your Favorites folder, and Web Folders takes you to documents and project files posted to a shared folder on your corporate network.
After you locate the file you want to open, double-click the folder icon or click the Open button to open the file.
Using the Toolbar
The toolbar on the Open dialog box helps you manage files and folders.
![]()
The Look In drop-down list shows you all the drives and folders available on your system. From here, if you know exactly where your file is located, you can go there, select the file, and open it by either double-clicking the file icon or clicking the Open button in the Open File dialog box. Table 5.2 shows each button on the toolbar and how it can help you find files.
| Button | Description |
|---|---|
|
| If you are searching through folders, you can go back to your last location by clicking the Backbutton. |
|
| Use the Up One Level button to move up one folder level. |
|
| Use the Search the Web button to find the file on a website. |
|
| Click the Delete button when you want to delete the file or folder you currently have selected. |
|
| Create a new folder to help you organize files. |
|
| Use the Views button to switch between List, Details, Preview, Properties, and Preview views, and to arrange icons in List view. |
| | Click the Tools button to access the Find, Delete, Rename, Print, Add to Favorites, Map Network Drives, and Properties options. |
Opening Files
After you have located the project file you want to open, select it and then use one of the following three methods to open the file:
-
Double-click the file.
-
Right-click and select Open from the shortcut menu.
-
Click the Open button on the Open toolbar.
Opening a File as Read-Only
By opening a file as read-only, you protect the original from any changes you make to the project. If you decide to save the file with the changes, Project forces you to give the read-only file a new name.
To open a file as read-only, follow these steps in the Open dialog box:
-
Select the file you want to open.
-
Click the down arrow on the Open button, and choose Open as Read-Only.
Opening as a Copy
Sometimes, you may want to open a file as a copy rather than working on the original (if you want to create a new project based on a previous project plan, for example). To open a file as a copy from the Open dialog box, follow these steps:
-
Select the file you want to open as a copy.
-
Click the down arrow on the Open button and then choose Open as Copy.
Opening a Password-protected File
Some project files are protected so that only specific individuals have access to modify the project plan. Project prompts you to enter the password when you attempt to open the file. If you don’t know the password, you are out of luck. If the password was applied with a Read-Only recommendation (see “Saving Project Files,” later in this chapter), Project displays a dialog box that gives you the option of opening it as read-only.
|
|
EAN: 2147483647
Pages: 241