Creating Project Applications
|
|
The term application is generally applied to any software that requires one or more external modules to function. Applications are not self-contained software programs, but an application of code modules to achieve a specific goal. It has long been debated whether there is such a thing as a true program in the Windows environment or whether all Windows programs are actually applications. Project itself is often referred to as an application, but if it is an application, it is an executable application because, aside from Windows, it doesn’t require external modules to run.
A Project application is simply a collection of customized objects—toolbars, custom Project forms, and VBA modules—designed to work together to achieve a common objective. Applications created in Project are macro applications, as opposed to executable applications (programs), because Project applications require external modules from Project. Project applications must be stored within a project document and run from within Project. The only real distinguishing feature between a simple macro (or any of the individual custom components that you have worked with so far) and a macro application is numbers. If you bring all the individual pieces together properly, their worth is greater than the sum of their individual parts.
Managing Project Applications
In Microsoft Project, you will work with two types of applications: template-based applications and global applications.
Template-based applications contain customized functionality that applies only to a given template. Template-based applications often rely on views and custom fields that only exist within a template. The customized components for macros are placed in the template file.
Global applications are far more generalized applications. These applications are designed to extend the functionality of Project itself. A properly constructed global application should be able to run on any Project document. Global applications cannot rely on specific items (tasks, resources, or assignments) that exist within the project file. Likewise, they are far more constrained in the use of custom fields.
All the customizations that make up the application need to be saved in the same place. If not, your project will not run correctly. After you have finished your application, use the Organizer to make sure that all the components of your project are stored together. The Organizer, discussed in Chapter 23, can also be used to distribute Visual Basic components between projects.
| Tip | UserForms are a type of Visual Basic module, and are listed on the Modules tab of the Organizer, not on the Forms tab. The Forms tab lists Project custom forms. |
Global applications are stored in a special project document, global.mpt. When Project starts, it automatically loads this file, giving users access to all applications placed within it. Although most objects default to being created in the global.mpt, VBA modules created with the VB Editor default to being created in whichever project is the currently selected, active VBA project in the VB Editor.
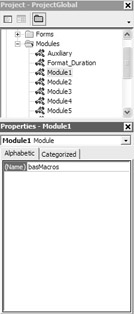
Public subroutines created in other standard modules can be used as macros, but the Macros dialog box always returns to the same module to create new macros. Even if you add standard modules to a project or rename the module, the Macro Recorder will still return to this module when you create new macros. By default, the first module created in the VBA project is named Module1. Because this module is used to store macros, you should rename the module to reflect its special status. By convention, standard module names are prefixed with 'bas' to denote the type of module; basMacros would be a suitable name. To rename Module1, select Module1 in the Project Explorer and change the module’s Name property in the Properties window:
| Tip | Even if an application is a global application, you should save a copy of your application independently in a project document. If you ever need to reinstall the application (for example, after the accidental deletion of global.mpt) or distribute it to someone else, you will have a clean copy with which to work. |
Automating Other Applications from Project
VBA is not limited to Project. You can automate any application that supports automation (also referred to as OLE automation, ActiveX automation, or OLE Inprocess serving) from within Project. If you have been following along with the examples, you have already used ActiveX automation. VBA procedures, including macros, control Project through ActiveX automation. There is not much difference to automating other programs in VBA; you simply need to have access to the objects of the application. There are two ways to access an object, just as there are two ways to declare VB variables. Late binding, also called weak typing, is analogous to implicit declaration; early binding (strong typing) resembles explicit declaration.
Accessing an Object with Late Binding
The simplest way of accessing an object is through a process called late binding. In late binding, you use the CreateObject or GetObject functions to retrieve an object. The following example opens the Excel workbook 'C:\My Documents\Employees.xls'. It then reads rows 2 through 11 of the Excel spreadsheet, and creates a Project resource for each line, setting the standard rate and the overtime rates for the default pay rate table. Of course, you could do the same thing using the Import Wizard (see Chapter 16), but you can’t always access the wizard in the middle of a separate application. (In a few pages, we’ll create a similar procedure to link rather than import Excel data from Project.)
Dim pjResource As Resource Dim xlSheet As Object Dim i As Integer Set xlSheet = GetObject("C:\My Documents\Employees.xls") For i = 2 To 11 Set pjResource = Resources.Add(xlSheet.Cells(i, 1).Value) pjResource.StandardRate = xlSheet.Cells(i, 2).Value pjResource.OvertimeRate = xlSheet.Cells(i, 3).Value Next I
Accessing an Object with Early Binding
Alternatively, you can use early binding, which is analogous to explicit variable declaration. With early binding, you declare the type of application that an object comes from before using it:
Dim xlApp as Excel.Application
You can then refer to specific objects within the Excel Application object in your procedure.
Early binding has two major advantages:
-
Applications run more quickly and efficiently because part of the work is handled atcompile time.
-
You can use the Object Browser and the Auto List Members feature of VBA to create the code.
Early binding also has one huge disadvantage. If the object library that includes the object isn’t installed on the machine, your application won’t run, even if the application does not need the object at the time. To use early binding, you need to add a reference to the object library for the program you want to automate. Whether or not you use early binding, adding the library reference is worthwhile because of the error checking and Auto List help it provides. Add the library reference as follows:
-
In the VB Editor, open the Object Browser and choose Tools Ø References to open the References dialog box:
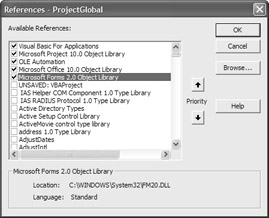
The References dialog box lists all the object libraries installed on your system. If you use Microsoft Office, you’ll see libraries for familiar applications such as Excel, Outlook, and Word. Libraries that are currently loaded are listed at the top of the list (with check marks). The Visual Basic for Applications, Microsoft Project 9.0, and OLE Automation libraries are automatically referenced when you work with the VB Editor from Project.
-
Scroll down the list, and select the library(ies) you want to use in your application. For our application, we need to add the Excel object library.
-
Click OK to close the References dialog box.
Now, you can access all the objects in the Excel object model. The VB Editor will correctly highlight code that uses incorrect methods or events.
| Tip | Don’t include library references that aren’t required in the current application; libraries use system resources whenever the project file is opened. |
Creating the Charged Cost Budget Application
Project is primarily designed for internal project management. The budget features are not equipped to handle many of the needs of contractors. Project managers for contractors or consulting firms will actually want to track two budgets: an actual cost budget, and the charged cost budget. The need to track two sets of costs is not unique to contractors. Departments often charge a fixed rate for work done for other departments, but need to track and manage internal costs as a project progresses.
One solution is to create two projects with different rates, but this involves double entry as you receive status reports. We’re assuming that you have other, more pressing project management tasks to occupy your time.
Our approach takes advantage of the multiple rate tables available in Project. There are five rate tables for resources, accessible from the Costs tab of the Resource Information form.
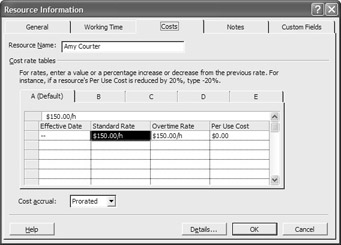
If we place internal costs in Table A and charged costs in Table B, switching the rate table for all the assignments in a project will switch budgets.
This simple application automates the process of switching between rate tables. For this application, you really need only a command bar with two macros. One sets all the assignments to Rate Table A, and the other sets all assignments to Rate Table B. Although you could build this macro application by recording a find and replace action, you would have to record changing to a view with assignments in it. If you build this application using Assignment objects, you will not need to alter the view.
Because this project will require a number of private procedures, we’ll create a new module. Open the Visual Basic Editor, and add a new module to your VBProject (global.mpt).
-
In the Project Explorer, choose the global.mpt VB project.
-
Choose Insert Ø Module from the menu.
-
Select the new module in the Project Explorer.
-
In the Properties window, name the module basChangeCostTable.
You start by building the subroutine that will actually do the work. For a procedure to run as a macro, it must be declared as a public subroutine without parameters. Any procedure that meets these requirements will be listed as an available macro, even if it was not created by the Macro Recorder. You can add the macro to a command bar, if you want. A public subroutine without parameters begins with the familiar snippet you saw beginning in Chapter 26. Here’s an example from earlier in this chapter:
Public Sub ShowTravelCostSettings()
We don’t want our procedure to appear on the list of macros in the Macros dialog box, but we don’t have to worry in this instance. We’re creating a private subroutine that includes parameters.
| Tip | If you do not want a procedure to be listed for users as an available macro, you should declare it either as a private subroutine, as a function, or as a subroutine with parameters. |
The method for changing the tables is identical, so it makes sense to build the method as a subroutine and pass it the table identifier as a table. This procedure uses a nested loop structure, discussed in Chapter 26, to change the CostRateTable property of all the assignments in the project.
The Assignments collection is not directly accessible from the Project object; each Task has its own collection. The outer loop iterates (moves) through each Task object in the Project to get that task’s Assignments collection. The inner loop then iterates through each Assignment object in the collection and changes the CostRateTable.
Private Sub ChangeAssignedRateTable(TableId As Integer) Dim colTasks As MSProject.Tasks Dim objTask As MSProject.Task Dim objAssign As MSProject.Assignment Dim colAssigns As MSProject.Assignments Set colTasks = ActiveProject.Tasks 'start outer loop to iterate through tasks in the task collection For Each objTask In colTasks 'start inner loop to iterate through assignments for this task Set colAssigns = objTask.Assignments For Each objAssign In colAssigns objAssign.CostRateTable = TableId Next objAssign 'end of inner loop Next objTask 'end of outer loop Set colTasks = Nothing Set objTask = Nothing Set objAssign = Nothing Set colAssigns = Nothing End Sub
| Tip | The last four Set commands in the code aren’t truly required. When an object drops from scope, its value is set to Nothing; however, it’s better form (and minimizes the chance for error) to actually set these objects to Nothing in code. |
Because the subroutine has a parameter (the name of the rate table), we need to create procedures that can be run as macros to front-end the actual workings of the application. The two procedures listed below simply call the subroutine that does the work, and pass the appropriate constant value for the macro. These two public subroutines without parameters will be included in the Macros dialog box, and can be placed on a command bar button.
Public Sub Use_Rate_Table_A() Call ChangeAssignedRateTable(0) End Sub Public Sub Use_Rate_Table_B() Call ChangeAssignedRateTable(1) End Sub
At this point, you have a simple yet functional application. To make the application user friendly, you’ll need to create a command bar for your application (refer to Chapter 24).
As the application stands, there are still limitations. Although only one of the two budgets can be baselined, this should be a minor limitation in most cases. The work, duration, and date baseline values will be identical. The actual and total costs will be accurate, with the exception of fixed costs, mentioned as follows. You will be able to calculate variances on only one budget, however.
This simple application does not adjust fixed costs. Fixed costs are not dependent on a rate table. This is a problem if the charged cost for fixed costs is different from the internal value for fixed costs. A possible solution would be to create two custom Cost fields for tasks—one for fixed cost to be used in Table A and the other for fixed cost in Table B. You could then add code to the procedure so that when it executes, it copies the current value out of the Fixed Cost field and places the appropriate value into the table.
Creating the Linked Expense Application
Your company has a beautiful Excel workbook template for calculating the fixed costs of a project. Currently, you enter or copy and paste values from the workbook into the appropriate cell of the project’s Task table. Values in the workbook change occasionally, so importing the workbook’s contents into a project isn’t a one-time solution. It would be nice if you could link the value of a Fixed Cost cell in a Project file to a specific cell in an Excel workbook. Unlike Word and Excel, however, Project does not support a field links feature.
Though it is doubtful that the degree of field linking that is offered in Word or Excel can be achieved in a VBA project, the potential benefits of even limited field linking are too good to pass up. Double entry is not only inefficient, it also increases your chances of data-entry errors.
As you can see, this application implements a basic linked field. While this falls far short of plumbing the potential VBA offers for creating linked fields, it does provide a good starting point for understanding linking, using automation outside Project, and creating a neat application, all at the same time.
There are several requirements for using this application. To accomplish the linking task, it’s not enough to simply create a link; you want to be able to do the following:
-
Select the Excel workbook that contains budget information that is linked to the project.
-
Edit and remove the file link.
-
Link the specified cell in Excel to the Project Fixed Cost field.
-
Remove these links.
-
Update the project file when the information in the Excel workbook changes.
-
Release Excel.
It takes a fair amount of time to open up Excel. To prevent unnecessary opening and closing of Excel, the macros will be designed to see whether the workbook is already open. If not, they will open the workbook. When the macro is done, it will leave the workbook open so other macros can use it.
Issues in the Linked Expense Application
That covers the minimum steps that you need to implement this Project application; however, you can add other features as well. It would be nice, for example, to be able to open up the Excel workbook from Project. Adding this feature requires one additional macro, so we’ll include it in the application.
Before we begin coding, we need to make some other decisions that affect how the application functions. For example, we must decide whether we want this application to be globally available or part of a template. The application as designed has one critical limitation: Because it holds a reference to the Excel workbook in a public object variable, the macro will work for only one project at a time. If this application is placed in global.mpt, the user will have to close the budget of one project before opening the budget of another project document. This can be corrected by adding one line at the end of each macro:
Set xlWorkbook = Nothing
Doing this, however, will cause Excel to open and close every time one of the macros is called. This might get rather tedious when a user is initially linking fields to the workbook.
Creating the Custom Field
You will need to have one custom field to store link information. (See Chapter 25 for detailed information on creating and using custom fields.) Rename the custom Task field Text30 "Budget Link Source". You could use any field you want, but our macros are written for the field Text30. This field was chosen because it is unlikely that it has been customized for other use. To rename a custom field in Project, follow these steps:
-
In Project, choose Tools Ø Customize Ø Fields to open the Customize Fields dialog box.
-
Use the option buttons to choose Task or Resource; then select the Type of field you want to customize from the drop-down list.
-
Select a field from the field list, and click the Rename button.
-
In the Rename dialog box, type a new name for the field and then click OK.
-
Click OK to close the Customize Fields dialog box.
Renaming a custom field in the Customize Fields dialog box has no effect on the object model. For example, you renamed the custom Task field Finish1 as SubmitToAccounting. To access your custom field from VB, you would still use the Finish1 property, not the SubmitToAccounting property.
| Warning | Although Project allows you to use custom fields for tasks and resources, you should avoid using them in VBA whenever possible. In Project, you can’t really create custom fields for tasks and resource items. When you create a custom field, you’re really changing the Display name of a predefined extra field in Project. Conflicts in your applications can occur if two macros use the same custom field to store macro-specific information. Having said that, we’ll be using a custom field in this application. |
Creating the Application Code
Open the Visual Basic Editor, select the project you want to create the application in, and create a new Module. Name the module Excel_Budget. The following paragraphs describe the forms and procedures that handle the application requirements listed at the beginning of this section. The descriptions are followed by the code for the application.
Selecting the Excel Workbook
To select the Excel workbook, you could use a UserForm like the form we created earlier in this chapter. Because we need to collect only one text value, a macro with an input box will suffice. The macro Excel_Budget_Workbook_Link collects the information and stores it in a custom document property.
Removing Current Document Properties
The macro Excel_Budget_Workbook_UnLink clears the document property and all the custom link fields.
Linking the Excel Cell to Project
Linking an Excel cell reference to a Task Fixed Cost field requires more than just a simple button on a toolbar. We need a UserForm to collect the linking information from the user. The UserForm dlgLinkExcelCell, which we’ll create in a few pages, also handles storing the information to link the cell to the Fixed Cost cell in Project. As with any UserForm, we’ll need a way to display the form, so we’ll create the macro Excel_Budget_Add_Link to show this form.
Breaking the Link
Unlinking a cell does not require a UserForm; a simple button on a toolbar will do. This will be handled by the macro Excel_Budget_Remove_Link. This macro will unlink only the task for the active cell.
| Tip | This is all our application needs. For example, if you want to redesign this macro to unlink all selected tasks, review the information on the Selection object in Chapter 26 or the Object Browser. |
Updating the Links
When an item is initially linked, the current value stored in Excel will be copied to the fixed cost; however, like linked fields in Word or Excel, the links in this application will not automatically be updated. Your application will need a method to refresh the links. This is accomplished by the macro Excel_Budget_Update_Links.
Closing Excel After You Finish
We decided that the individual macros for managing links would open Excel if it were not already opened, but would not close Excel. The user wouldn’t appreciate this application closing an Excel session they were using. The Object Variable that refers to Excel is placed in a standard module in the Global template. After Excel is opened, the reference will be held until project closes. Though Excel is opened invisibly, it is still loaded into memory. After the user is done with Excel, there is no reason to continue using system resources to run it.
Because your application cannot tell when the user is finished with Excel, you need to provide the user with a way of informing your application that they are finished. This can be handled through a command bar button. The macro Excel_Budget_Deactivate contains the code for this command button.
Showing Excel from Project
Unlike many applications, Excel opens invisibly when it is called through automation. To open Excel so the user can edit the linked workbook, you merely have to make Excel visible. The macro Excel_Budget_Show handles the settings to make the workbook visible to the user.
Private Procedures
The application will need three additional procedures. These procedures should be called only by this application, so they will be private. The first two handle reading and writing the workbook path to a custom document property. The other procedure opens Excel and the workbook if they are not already opened.
Listing 27.1 is completed code for module Excel_Budget.
Listing 27.1: Completed Code for VBA Module Excel_Budget
'Way of refering to the Excel workbook (for macro procedures) Public xlWorkBook As Object 'String to hold error Message for Connection to Excel Error. Const strConnectErrMsg = "Error Connecting to Linked Worksheet. " & "Check Budget Settings, to verify " & "workbook location is correct." Public Sub Excel_Budget_Add_Link() If ActivateExcel Then dlgLinkExcelCell.Show Else 'Report error if can not connect MsgBox strConnectErrMsg, vbCritical End If End Sub Public Sub Excel_Budget_Remove_Link() 'Clear link information ActiveCell.Task.Text30 = "" End Sub Public Sub Excel_Budget_Show() If ActivateExcel Then 'Excel Starts invisible show it now xlWorkBook.Application.Visible = True xlWorkBook.Activate Else 'Report error if can not connect MsgBox strConnectErrMsg, vbCritical End If End Sub Public Sub Excel_Budget_Update_Links() Dim objTasks As Tasks Dim objTask As Task Dim strField As String Dim strMsg As String On Error Resume Next 'Check that we can access Workbook before update If ActivateExcel Then Set objTasks = ActiveProject.Tasks 'Iterate through list and For Each objTask In objTasks strField = objTask.Text30 If Len(strField) > 0 Then objTask.FixedCost = xlWorkBook.Names(strField).RefersToRange.Value If Err.Number <> 0 Then strMsg = "An Error occured while attempting to update Task:" & objTask.ID & ")" & objTask.Name & "From Excel Cell:" & strField & vbCrLf & "Error " & Err.Number & ":" & Err.Description Err.Clear 'Report error MsgBox strMsg, vbCritical End If End If Next objTask 'Report Update done MsgBox "Update Complete", vbInformation Else 'Report error if can not connect MsgBox strConnectErrMsg, vbCritical End If Set objTask = Nothing Set objTasks = Nothing End Sub Public Sub Excel_Budget_Workbook_Link() Dim strPath As String strPath = GetXlsBudgetPath strPath = InputBox("Enter Full Path to Excel Workbook:", strPath) 'Input box Returns "" if user clicks cancel. If Not (strPath = "") Then 'If user did not update path SetXlsBudgetPath strPath 'If the user was connected then we need to disconnect from old 'workbook and connect to new workbook. If (xlWorkBook Is Nothing) Then 'Disconnect from old workbook Set xlWorkBook = Nothing 'Connect to new workbook. If Not ActivateExcel Then 'Report error if can not connect MsgBox strConnectErrMsg, vbCritical End If End If End If End Sub Public Sub Excel_Budget_Workbook_Unlink() 'Errors will occur if attempt to set values in 'Summary tasksñthis just ignores these errors. On Error Resume Next Dim intResult As Integer Dim objTasks As Tasks Dim objTask As Task 'Display confirmation message intResult = MsgBox("Are you sure you want to unlink the Excel Workbook and all linked fields?", vbYesNo) If intResult = vbYes Then Set objTasks = ActiveProject.Tasks 'Remove any links to Excel cells For Each objTask In objTasks objTask.Text30 = "" Next objTask 'Clear path SetXlsBudgetPath "" End If Set objTask = Nothing Set objTasks = Nothing End Sub Public Sub Excel_Budget_Deactivate() 'Disconnect from workbook Set xlWorkBook = Nothing End Sub Private Function GetXlsBudgetPath() As String Dim objDocProps As DocumentProperties Dim objDocProp As DocumentProperty On Error Resume Next Set objDocProps = ActiveProject.CustomDocumentProperties 'If Doc Prop not found will return error Set objDocProp = objDocProps.Item("ExcelBudgetWorkbook") If Err.Number = 0 Then 'error 0 is no error GetXlsBudgetPath = objDocProp.Value Else 'Return no path GetXlsBudgetPath = "" End If Set objDocProps = Nothing Set objDocProp = Nothing End Function Private Sub SetXlsBudgetPath(Path As String) Dim objDocProps As DocumentProperties Dim objPropLocation as DocumentProperties Set objDocProps = ActiveProject.CustomDocumentProperties If Len(Path) > 0 Then Set objPropLocaion = objDocProps("ExcelBudgetWorkbook") If objPropLocation Is Nothing Then objDocProps.Add "ExcelBudgetWorkbook", False, msoPropertyTypeString, Path Else End If Else Set objPropLocation = objDocProps("ExcelBudgetWorkbook") If Not (objPropLocation Is Nothing) Then objPropsLocation("ExcelBudgetWorkbook").Delete End If End If Set objDocProps = Nothing End Sub Private Function ActivateExcel() As Boolean Dim strPath As String On Error GoTo Err_Hnd 'If The Object Variable points to nothing attempt to Get workbook object If Not (xlWorkBook Is Nothing) Then 'Lookup stored Path strPath = GetXlsBudgetPath 'Check to see we have a path, before opening workbook If strPath <> "" Then 'Attempt to get object Set xlWorkBook = GetObject(strPath) End If 'Else: Already Connected to workbook End If ActivateExcel = True Exit Function Err_Hnd: Set xlWorkBook = Nothing ActivateExcel = False End Function
Creating the UserForm
The next step is to create a new UserForm in the same VBA project that contains the module Excel_Budget. Change the name of the form to dlgLinkExcelCell.
This form is similar to the form you built in the introduction to UserForms earlier in this chapter. The form will have three controls. You will need to add a CommandButton, Label, and a ComboBox:
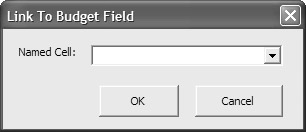
Add the controls and set these properties for dlgLinkExcelCell:
| Control | Property | Value |
|---|---|---|
| Commandbuton1 | (Name) | CmdApplyLink |
| Caption | OK | |
| Default | True | |
| CommandButon2 | (Name) | CmdCancel |
| Cancel | True | |
| Caption | Cancel | |
| Label1 | (Name) | LblCellNames |
| Caption | Named Cell: | |
| Combobox1 | (Name) | CmbCellNames |
| MatchRequired | True | |
| UserForm | (Name) | dlgExcelCellLink |
| Caption | Link to Budget Field |
Adding Code to Respond to UserForm Events
After you have set the properties and arranged the controls on the form, switch to the code window for the form. There are only three events that we care deeply about (or even care minimally about) in this form. They are the following:
-
When the user Clicks on cmdCancel
-
When the user Clicks on cmdApplyLink
-
When the form loads
Sound familiar? You will find that most normal dialog boxes need only these three events.
The Update macro relies on cells that are named. Excel has a collection object of all the names in the workbook. The ComboBox will list all the names that the Update macro will accept as valid. The main purpose of the Initialize event procedure is to load the names from the Names collection into the cmbCellNames list. The event procedure cmdCancel_Click is identical to that used in the UserForm you designed earlier. The last event will link an Excel cell to the fixed cost field of the currently selected task. Listing 27.2 is the completed code for the user form.
Listing 27.2: Completed Code for VBA UserForm dlgLinkExcelCell
Private Sub cmdCancel_Click() Me.Hide Unload Me End Sub Private Sub cmdApplyLink_Click() 'Link Cell ActiveCell.Task.Text30 = cmbCellNames.Value ActiveCell.Task.FixedCost = xlWorkBook.Names(cmbCellNames.Value). RefersToRange.Value 'Close Form Me.Hide Unload Me End Sub Private Sub UserForm_Initialize() Dim colNames As Object 'Names Dim objName As Object 'Name Set colNames = xlWorkBook.Names 'Exit Sub 'Clear List cmbCellNames.Clear 'Add items to list For Each objName In colNames cmbCellNames.AddItem objName.Name Next objName Set colNames = Nothing Set objName = Nothing End Sub
Before you release the application, you would create a custom command bar with menu items or buttons for the seven macros. See Chapter 24 for examples and instructions. You will need to create a command bar with a button or menu item to run each of the following macros, which were discussed earlier in the chapter:
-
Excel_Budget_Workbook_Link to establish the link to the Excel spreadsheet
-
Excel_Budget_Workbook_UnLink to clear the document property and the link fields
-
Excel_Budget_Add_Link to show the user form
-
Excel_Budget_Remove_Link to break the link
-
Excel_Budget_Update_Links to refresh the links to the Excel worksheet
-
Excel_Budget_Show to make the workbook visible
-
Excel_Budget_Deactivate to close the Excel session
You’ll also need to display the custom fields and fixed cost fields in a task view (such as the Gantt Sheet). Refer to Chapter 17 for information on displaying fields.
Further Suggestions for the Linked Expense Application
With the current macros, you are limited to pulling cells from a single Excel workbook. It would be nice if you could determine the workbook on a per-field basis. Obviously this would require some modifications to the UserForm, but it will also require some additional custom fields or a method of parsing the information from a single field.
A true Open File dialog box would be superior to the input box; however, this is not a feature built into VBA. To get access to standard dialog boxes, you would need to make Windows API calls or use an ActiveX control such as the Microsoft Common Dialog Control.
| Tip | See the VBA Help files for information on API calls from DLLs and adding ActiveX controls. We also recommend the VBA Developer’s Handbook, Second Edition, published by Sybex (Ken Getz and Mike Gilbert: 0-7821-2978-1). |
This application does not bind to summary tasks because summary tasks have calculated values. Like other costs, the fixed cost of a summary task is the sum of the fixed costs of all its subtasks.
Project does not include travel time or travel costs in the budget unless you include them as fixed costs or per-use costs, either of which must be hand calculated when a project task requires more than one trip. When we were initially brainstorming project ideas for this chapter, we considered creating a travel cost calculator, which is a Project application that we’d use on a regular basis. The functionality that we desire includes the following:
-
Calculating the total travel cost for a particular task, based on mileage to and from the work site and the number of days a resource is assigned to the site
-
Calculating mean travel time for tasks completed at remote work sites
-
Calculating duration, work, and units in a manner that accurately reflects mean travel time for project scheduling and cost analysis
The first two are easy. The last, however, is really nasty. In our spare time, we’re still working on the application…and working and working. It didn’t take us long to discover that calculating travel costs for a project is a little trickier then it would first appear, so this is an application that’s still in development. But as part of our work, we’ve spent a considerable amount of time with a new collection in Project, the TimeScaledValues collection. The TimeScaledValues collection provides a means for examining time-phased information on a field of an item (Task, Resource, or Assignment). The TimeScaledData Method of an item returns a TimeScaledValues collection.
The following lines of code create a collection of time-phased values for the work field of objTask. It then iterates through the values and counts the days within work scheduled.
Function TaskDaysScheduled(objTask As Task) as Integer Dim objTSVs As TimeScaleValues ' Holds all days for Task Dim objTSV As TimeScaleValue ' Holds a single day Dim intCount As Integer ' Count of Days with work Dim sngWork As Single ' The Number of hours in the TSV Set objTSVs = objTask.TimeScaleData(objTask.Start, objTask.Finish, pjTaskTimescaledWork, pjTimescaleDays) [SdbrCont.eps] For Each objTSV In objTSVs If IsNumeric(objTSV.Value) Then sngWork = CSng(objTSV.Value) If (sngWork > 0) Then intCount = intCount + 1 End If Next objTSV TaskDaysScheduled = intCount End Function
A nested loop such as the one used in the Charged Cost Budget application would be even better then the previous code. In this case, you would call the TimeScaledData of the Assignment, not the Task. For an accurate travel-cost application, custom information will need to be stored with the assignments, not with tasks or resources. Project does support custom fields for assignments; however, these fields can only be accessed programmatically. UserForms will be needed to fill in information for these fields. You will not be able to add these custom fields to views, so you will likely need custom fields in tasks and resources to store summaries and macros to roll the information into those custom fields. Finally, you will need a method of rolling the custom costs into the budget.
|
|
EAN: 2147483647
Pages: 241
- Step 2.1 Use the OpenSSH Tool Suite to Replace Clear-Text Programs
- Step 3.1 Use PuTTY as a Graphical Replacement for telnet and rlogin
- Step 3.2 Use PuTTY / plink as a Command Line Replacement for telnet / rlogin
- Step 4.6 How to use PuTTY Passphrase Agents
- Step 5.2 Troubleshooting Common OpenSSH Errors/Problems