Creating User Forms
|
|
A UserForm, which is a form module in VBA, should not be confused with a Project custom form, although they’re similar. Like other Microsoft Office applications, Project has two types of forms, each with its own capabilities and creation methods. It is important to differentiate between the two types. Project custom forms, created by using Project’s Custom Form Editor, were discussed in Chapter 25. Here in this chapter we discuss the second type of form you can use in Project—the UserForm.
For simplicity, we can say that a UserForm is a VBA form. It is created using the VB Editor. Most of the programming done in VB (as opposed to VBA) is built on forms. Without the application interface provided by Project or other Office applications, programmers have to use forms to develop an interface on which to hang their code. You’ll find uses for forms in VBA, too, such as when you want to collect information from users, provide structured choices, or give feedback.
To create a UserForm, just open Project and then create a new project. Choose Tools Ç Macros Ø Visual Basic Editor to open the VB Editor. Choose Insert Ø UserForm to open a new form.
| Note | When we were planning the applications to be illustrated in this book, the idea foremost on our minds was a Travel Cost Calculator. The form described here is taken from this application. It is a fairly simple form that introduces the basics of building a dialog box and demonstrates a method used to add custom fields directly to a project. If you are curious about the ultimate fate of our Travel Cost Calculator, see our note at the end of the chapter. |
Selecting Controls
Our form will be used to collect two pieces of information from the user. There are several spreadsheets that include travel information. Users can select any of the spreadsheets to grab location data. The user will select a location in which an Excel spreadsheet is stored. The user will next select a rate per mile traveled. We also need a way for the user to let us know they have finished entering the data, or to discard the data they entered. To create our user interface, we’ll use form controls from the Toolbox.
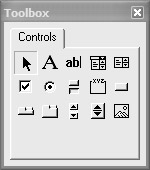
The Control Toolbox is similar to the tool palette of a paint program. When you click a control’s button on the Toolbox, the mouse pointer turns into an icon for that type of control. After you have selected the type of control you want to use, draw it onto the form as you would draw a shape in a paint program. Table 27.3 details the individual controls in the Toolbox.
| Button | Control | Description |
|---|---|---|
|
| Selection tool | Not a control, per se; when you click this button, you activate the Selection tool. You use this tool to select one or more controls. (Hold down the Ctrl key to select multiple controls.) After the control is selected, you can move it, resize it, or modify its properties. Occasionally, the pointer does not change back to the selection control after you paint a control. If this happens, click on the Selection tool to get your normal mouse pointer back. |
|
| Label | Allows you to place text on the form that a user cannot edit. You use this control to place labels for your TextBox and other controls. Users are used to labels not doing anything, so you should avoid placing event procedures on labels. |
|
| TextBox | Provides users with a boxed area where they can edit or input text. You use the TextBox control to collect information from the user. |
|
| ComboBox | A combination of a TextBox and a ListBox control. When you want users to select one item from a list, or to enter an item that doesn’t appear on the list, use a ComboBox. In drop-down list mode, the ComboBox functions as a ListBox that allows the user only one choice. Drop-down list boxes are useful on forms that have many controls because they require less room. |
|
| ListBox | Enables you to display to the user a list of predefined options. This control can be set to accept a single option from the list, or to let the user make multiple selections. ListBox controls are user friendly by providing the user with a list of items from which to choose. |
|
| CheckBox | Used to provide the user with one or more pre-defined options, from which they can select a multiple options. |
|
| OptionButton | Used to provide the user with a list of pre-defined options, from which they can select a single option. This control is similar to a CheckBox, in that it’s a box that users can check to indicate a selection; unlike a CheckBox control, users can only select a single OptionButton in a group, as OptionButtons are mutually exclusive. For that reason, OptionButton controls should be grouped so that a user can select only a single option. (There are two ways to create an option group in Visual Basic: place OptionButton controls in a frame, or assign the same GroupName property to each OptionButton control.) |
|
| ToggleButton | Similar in function to a CheckBox, provides an alternate graphical appearance to the CheckBox for yes/no controls. Normally, the CheckBox is used on UserForms for data entry (or on Userforms that could be printed forms), whereas ToggleButtons appear on forms that function like control panels. |
|
| Frame | A container that lets you group other controls together. Users are accustomed to frames, so using the Frame control makes your forms more understandable. |
|
| CommandButton | The control you use to create a button on your form. The CommandButton control is used for actions that happen immediately, such as canceling a dialog box, opening another form, or printing a report. You use the Click event of the CommandButton control to respond to the users’ actions. |
|
| TabStrip | Allows you to place a row of tabs on a control, similar to those in a property sheet. The TabStrip control is not a container control, and is normally used only when tabs are used to change the view or filter options of a forms control. (Under most circumstances, the MultiPage control will be more useful.) |
|
| MultiPage | A container control with tabs for each page. Each tab is a separate page within the dialog box on which you can place controls. When the user switches tabs, the control automatically hides the controls from other pages, and shows the controls on the active page. |
|
| ScrollBar | Similar to the SpinButton control, except that it has a graphical slider that indicates the relative position of the control’s current value in its range. In addition to the Min, Max, and SmallChange properties, the ScrollBar has a LargeChange property, which determines the value change if the user clicks in the slider region. |
|
| SpinButton | Allows users to select a numeric value. You can set a Min and Max range for the value; you can also set the SmallChange property of the control to determine how much the value changes with each click. This control provides no indication to the user of its current value, so it is normally paired up with another control, such as a Label or TextBox, to display the value. |
|
| Image | Lets you place images on a form. You can use this control to add your company’s logo to the form, or to add an image that represents the purpose of the form. |
Placing Controls on a User Form
We can begin work on the UserForm by placing two command buttons: one that saves the data, and one that cancels the action by closing the UserForm. To place a command button, select the CommandButton button in the toolbox, and click in the UserForm to place a button of the default size. Drag the outline that appears on the form to create a larger or smaller button, or simply click to place the default button and then resize it.
To change the appearance of the button, you change the button’s properties. Select the first button, and look at the Properties window, shown here:
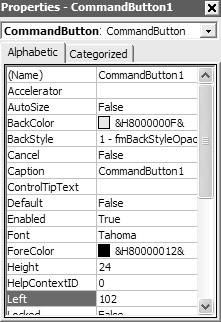
For more information about a property, click its name in the Properties window and then press F1. To change a property, click its name in the Properties window, and type a value or choose a value from a drop-down list. For example, you would change the button’s name by clicking on the Name property and typing text. The properties you’ll want to change on the first button are shown in the following table:
| Property | Value | Description |
|---|---|---|
| (Name) | cmdSaveSettings | Name used to refer to the button in code; cmd is the command button prefix. |
| Caption | OK | Text for button face. |
| Default | True | User can “click” this button by pressing Enter key. |
Select the other button and change these properties as follows to create a Cancel button:
| Property | Value | Description |
|---|---|---|
| (Name) | cmdCancel | Name used to refer to the button in code. |
| Cancel | True | User can “click” this button by pressing Esc key or closing form. |
| Caption | Cancel | Text for button face. |
Then, select the UserForm by clicking anywhere on the form’s background and change its properties as follows:
| Property | Value | Description |
|---|---|---|
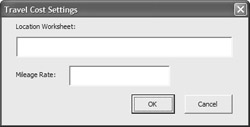
| (Name) | dlgTravelCostSettings | Name used to refer to the form; dlg is the prefix for a dialog box. |
| Caption | Travel Cost Settings | Text for form title bar. |
Each form can have only one button where the Default property is True and one button with a Cancel property that’s True, but they can be the same button. You set the Cancel button’s Default property to True when confirming an action that’s often selected by mistake, and when not canceling results in an irreversible action such as deleting a file.
Next, you need to add two TextBox controls and two Label controls. The only properties that need to be changed for the text boxes are the Name properties, so we can refer to the controls easily in our code. The first control is named txtXlsLocation, and the second text box is named txtMileageRate.
The Label controls really do not need to have their Name properties changed; they are just labels and won’t be referred to programmatically. We’d label them anyway, just for consistency, using the lbl prefix: lblXlsLocation and lblMileageRate.
The Caption property is the critical property for a label. Set the lblXlsLocation (label1) Caption property to "Location Worksheet:" and the lblMileageRate (Label2) Caption property to "Mileage Rate:" to label the UserForm controls as shown here:
| Tip | You may be tempted to change the background of the UserForm or switch to an extremely conspicuous font for the option button labels. Don’t. Users know how a good interface looks and acts. For example, if the user changes the system colors in the Control Panel, the colors used in your application should change, too. If you lock in a specific background, your users may not complain, but you’ve already planted the seeds of doubt. All experienced Windows users know, if only subconsciously, that "real" programs use the system colors set in Windows. |
Adding Code to the Form
The procedures you have previously written using the VB Editor or the Macro Recorder have been general procedures that can be run from a toolbar, menu bar, shortcut key, Macros dialog box, or the VB Editor. Event procedures, in contrast, are blocks of code attached to an object’s events that run in response to an action: a mouse click, a keypress on the keyboard, or a system event.
In this form, there are three events to care about. You need events to handle a user’s clicking either of the two command buttons. And you will need a procedure attached to one of the UserForm’s events to do a little setup when the form loads. You may be asking: "But what about my text boxes?" You really don’t care when a user types an entry in the text boxes; you just care what the text is when they click the cmdSaveSettings button (captioned OK). If the user clicks the cmdCancel button (captioned Cancel), the contents of the text boxes won’t matter. But as soon as either command button is clicked, it’s time for action, so we’ll create code attached to events on these two command buttons.
Coding the Cancel Button
The Cancel button doesn’t need to do too much, so let’s create that event code first. Select the Cancel button, right-click, and choose View Code; or double-click the command button to open the module attached to the UserForm. You won’t find this module in the Project Explorer; it’s only accessible when you’re editing the UserForm. You’ll notice that the snippets for the command buttons have already been created. There’s an underscore before Click in the subroutine names because the code is assigned to a button’s Click event:
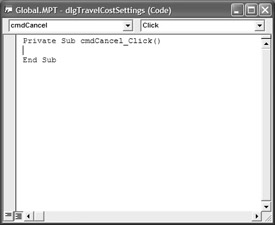
If the user clicks the Cancel button (or presses Esc), the appropriate response is to close the form. This code does the trick:
Private Sub cmdCancel_Click() dlgTravelCostSettings.Hide Unload dlgTravelCostSettings End Sub
After you create an object, it’s added to the VBA Project’s Objects list. You’ll find your form dlgTravel-CostSettings and all of its controls on the Objects list.
When an object appears on the Objects list, you don’t have to type the entire object name. To add the object name, just type enough unique letters of the name (such as dlg), hold Ctrl, and press the spacebar. The VB Editor will fill in the remainder of the name.
You also don’t need to manually enter an event for the object. Just type a period after the object name, and the VB Editor will display a pop-up menu of events and objects. (This is called the Auto List Members feature.) Select an event from the list, and it will be placed in your code before the selected object.
In our ongoing example, if you enter dlg and then press Ctrl+spacebar, the object dlgTravelCostSettings is entered into your code. If you then type a period after the object name, the following pop-up menu is displayed:
Select Unload from the list, and the complete line of code (Unload dlgTravelCostSettings) is entered automatically.
You can test your code by clicking the Run Macro button. The form will appear; clicking the Cancel button should close the form, and return you to the VB IDE.
| Tip | You don’t have to use the form’s name explicitly, as we do in our examples. You can omit the name of an active object and jump straight to methods; so, if the form is active, the Hide command hides the active form. If you prefer, you can use the pronoun Me to refer to the active object: Me.Hide hides the object that currently has focus. Including the form name increases the amount of code, but it also provides documentation and makes debugging easier, so we generally list objects explicitly in our code. |
Use the View Object and View Code buttons at the top of the Project Explorer to switch back and forth between the form and code windows.
Coding the OK Button
When a user clicks the cmdSaveSettings button, you want to store the location of the Excel worksheet and the rate that the user entered in the TextBox controls. You need to store this information in a way that you can recall it when the user reopens the project file. A simple variable will not work because, regardless of scope, variables are removed from memory when you unload the application in which they’re created. To keep a value from one Project session to another, you need to use a document property.
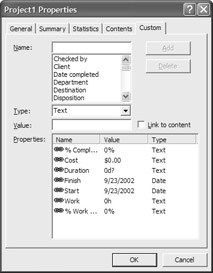
A document property is a custom property or piece of information that has been assigned to a document in Microsoft Office. To see the custom properties for a file, choose File Ø Properties from the application menu and then click the Custom tab. The properties for a Project file are shown here.
You use the custom documents to store information that applies to the project as a whole. Here are the properties in the Project Object Browser:
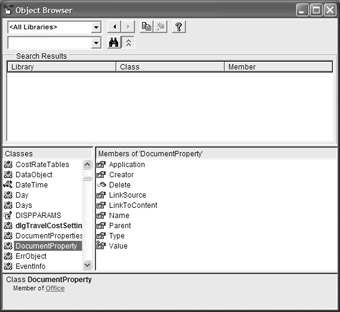
The DocumentProperties collection contains all the DocumentProperty objects for a project document, Project object.
| Tip | Custom DocumentProperties is a standard object in Microsoft Office Products. In Project, the Project object is the document of the application, but other Office products also have documents with custom properties. Excel workbooks and Word documents, for example, have DocumentProperties collections to store custom information. |
Creating and Using DocumentProperties
We’ll first declare a DocumentProperties object:
Dim objDocProps As DocumentProperties
We’ll then use the Set command to set the object to the current project document’s collection of document properties:
Set objDocProps = ActiveProject.CustomDocumentProperties
We’ll add a new property named TravelCostWorksheet to the collection, and set the value of the property in one line of code.
objDocProps.Add "TravelCostWorksheet", False, msoPropertyTypeString, txtXlsLocation.Text
The new property, an object of the Project object, contains the user-entered value in (the Text property of) the txtXlsLocation text box. We’ll create a similar line of code to store the text entered in the txtMileageRate control.
Following the Procedure Declaration, there’s a line of code that redirects program flow in case of an error while the procedure is running. The command is part of an error handler:
On Error Resume Next
Error handling allows you to plan for potential errors. Within your error routines you write code to correct problems, if possible, or at least to report the problem to the user and exit cleanly. In this case, you are telling the program to go to the next line if an error is encountered. This assumes that the next line will check for an error and correct it, if one should arise.
In addition to runtime errors, your error handlers will also need to handle validation errors. Validation errors are errors that will not cause runtime errors—at least not at their origin—but produce invalid results.
Another part of error handling is validation. Validation attempts to catch errors before they actually become a problem. The first step in this procedure is to make sure that both text boxes contain values. If the data entered by the user is invalid, the procedure notifies the user and exits without taking any further action. This allows the user to correct the data and resubmit it.
After the appropriate information has been stored, we’ll use the same code as the Cancel button to hide and unload the UserForm. Here’s the complete procedure for the cmdSaveSettings button:
Private Sub cmdSaveSettings_Click() Dim objDocProps As DocumentProperties Dim objPropLocation As DocumentProperty Dim objPropRate As DocumentProperty On Error Resume Next If (Len(txtXlsLocation.Text) = 0) Or (Len(txtMileageRate.Text) = 0) Then MsgBox "You need to enter both a location " & "And a rate to proceed." Else Set objDocProps = ActiveProject.CustomDocumentProperties Set objPropLoctaion = objDocProps("TravelCostWorksheet") If objPropLocation Is Nothing Then objDocProps.Add "TravelCostWorksheet", False, msoPropertyTypeString, txtXlsLocation.Text Else ObjPropLocation = txtXlsLocation.Text End If Set objPropRate = objDocProps("TravelCostRatePerMile") If objPropRate Is Nothing Then objDocProps.Add "TravelCostRatePerMile", False, msoPropertyTypeString, txtMileageRate.Text Else ObjPropRate = txtMileageRate.Text End If dlgTravelCostSettings.Hide Unload dlgTravelCostSettings End If Set objDocProps = Nothing Set objPropLocation = Nothing Set objPropRate = Nothing End Sub | Tip | Before a form can be displayed, it must be loaded in memory. If you loaded the form with code, you’d use a command line such as Load formname; however, if you forget to load the form and just display it by invoking the form’s Show method (formname.Show), VB loads the form and then displays it. When you don’t want to display the form, you can hide it with its Hide method (formname.Hide), but the form is still in memory. To close the form, you must also unload it: Unload formname. |
You also want the form to see whether settings have already been saved for these properties. If the settings have been saved, they should be displayed when the form opens. The event in this case would be the startup or Initialize event of the UserForm itself. For this procedure, you will need to use the drop-down lists at the top of the Code window. Select UserForm for the Object (left) drop-down list; then select Initialize from the Event (right) drop-down list (see Figure 27.4). Here’s the procedure:
Private Sub UserForm_Initialize() Dim objDocProps As DocumentProperties Dim objDocProp As DocumentProperty On Error Resume Next Set objDocProps = ActiveProject.CustomDocumentProperties Set objDocProp = objDocProps.Item("TravelCostWorksheet") If Err.Number = 0 Then txtXlsLocation.Text = objDocProp.Value End If Set objDocProp = objDocProps.Item("TravelCostRatePerMile") If Err.Number = 0 Then txtMileageRate.Text = objDocProp.Value End If End Sub 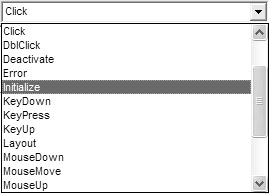
Figure 27.4: Selecting the Initializing Event procedure
Test the procedure to ensure that it works. Open the Properties dialog box of the Project document (select File Ø Properties) to make sure that the document properties were saved.
Some basic error handling has been added in these procedures, but it is far from thorough. See the VBA Help file for more information on error handling.
Opening the UserForm
We still need one more procedure—a global procedure to open the UserForm. This procedure will allow you to assign the form to a command bar button. In the Project Explorer, activate Module1 and then create the following code to display the UserForm:
Public Sub ShowTravelCostSettings() dlgTravelCostSettings.Show End Sub
This user form isn’t used in any application yet. In our completed Travel Cost application, we will display the form by calling it with a macro or program code.
|
|
EAN: 2147483647
Pages: 241