Creating Custom Forms
|
|
A form is a window or container for working with information within Project. Forms are used for data entry, and allow access and updating of fields not displayed in the current view. Forms make data entry easier, and reduce the chance of data entry error by placing fields consecutively in the order they are generally entered.
Each form contains a number of controls—interface elements such as text boxes, option buttons, and command buttons—that you use to interact with the form. You’ll be familiar with most (if not all) of these controls from your work with other Windows applications as well as with the default dialog boxes and forms used in Project. In addition to the Task Information and Resource Information dialog boxes, there are 12 built-in forms used for specialized data entry, described in Table 25.5.
| Form Name | Type | Description |
|---|---|---|
| Cost Tracking | By Task | Compares costs and percentage of work and duration completed. |
| Earned Value | By Task | Displays calculations of Schedule Variance, Cost Variance, and Variance at Completion. You can enter only the Percent Complete in this form. |
| Task Entry | By Task | Allows users to enter the Task Name, Duration, and Dates fields and Rollup indicator. |
| PERT Entry | By Task | Allows users to enter the Optimistic, Expected, and Pessimistic duration estimates. |
| Schedule Tracking | By Task | Displays the Start and Finish Dates baseline, actual, and calculates the duration. You can change the Percent Complete. |
| Task Relationships | By Task | Displays the list of predecessors and successors for the task you select. |
| Tracking | By Task | Displays the duration and dates for the selected task. You can change the Percent Complete. |
| Work Tracking | By Task | Allows users to update the Actual and Baseline Work fields, along with the Work Percent Complete and Task Percent Complete. |
| Cost Tracking | By Resource | Displays the total work and costs for a resource for all tasks, as well as total percent complete. |
| Entry | By Resource | Displays basic entry for a resource: name, initials, group, standard rate, and max available units. |
| Summary | By Resource | Displays overall cost and work information. You can update the Maximum Available Units or add Notes. |
| Work Tracking | By Resource | Compares the percent of work completed to the baseline. |
Any custom form you create or change is saved in your active project file unless you use the Organizer to move the form to the global.mpt file.
Why Create Custom Forms?
Project’s built-in forms provide a great deal of flexibility and functionality straight out of the box. For many business purposes, however, you will need to extend or modify their functionality. For example, if you are managing a project where the team members travel, you might want to track the travel dates and costs. By using custom forms, you can do this easily. Likewise, you might be able to speed up the creation of frequent task changes or assignment additions by creating custom forms that already contain or automatically enter part of the information for you.
You can customize a form in several ways:
-
Present the information on the form so that you don’t have to fill it in each time you create an item based on the form. For example, if you regularly need to create new tasks for “Implementing a Product” at different locations, you can create a custom form that contains all information except the Location Name and Date.
-
Add fields to or remove them from an existing form. For example, you might choose to add one or two extra fields to the standard Resource Entry form so you could enter their contact information (phone number and e-mail address) at the same time you enter a resource.
-
Create a new form with text, group boxes, buttons, and/or fields.
-
Change how the controls on the form work.
As with Microsoft Outlook, the primary method of creating a custom form in Project is by basing it on one of the existing forms. For minor customizations, you can simply extend the existing functionality of a form by adding custom fields and features. For more radical customizations, you can remove most of the existing components for a form, providing yourself with an almost clean slate for designing your own form. You can also build a custom form from scratch.
Opening a Custom Form
Before you start with a brand new form, check Project’s predefined forms. You can see all the custom forms from any view, but you can only apply custom forms from a view of the correct associated table. For example, you must go to a view based on the Resource table, such as Resource Sheet, Resource Graph, or Resource Usage view to apply a custom resource form.
To open a custom form, do the following:
-
Select Tools Ø Customize Ø Forms to open the Customize Forms dialog box, shown in Figure 25.9.
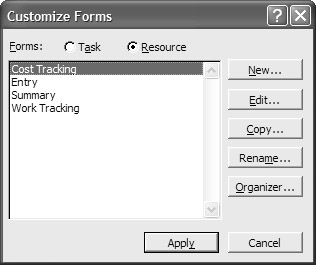
Figure 25.9: The Customize Forms dialog box contains a list of all the custom forms. -
Choose Tasks or Resources to choose the type of form you want to display.
-
Select a form from the Forms List.
-
Click the Apply button to view the custom form.
Creating a Custom Form
If you need to enter or view information in ways not covered by the predefined custom forms, you can modify an existing form or create your own custom form. We will be using the Custom Form Editor to create a new custom form. This form, called Travel Information, contains the two custom fields we added in the last section—Location and Travel Cost—as well as the Task Name.
Creating a custom form in Project (using the Custom Form Editor) is similar to creating a form in Microsoft Access—except that Project’s Custom Form Editor is less sophisticated than its Access counterpart. It should be sophisticated enough, however, for most of your Project needs. You select the table that contains the information you want to display, format the information, add labels and text, and assign actions to be performed.
When making a custom form, you have three possible ways to proceed:
Edit an Existing Form From the Customize Forms dialog box, you can select an existing form and then press the Edit button. This displays the Custom Form Editor with the selected form open for editing. Any changes you make and save to the selected form will change the predefined custom form in this project only.
Copy an Existing Form You can use an existing form as a template when making a new custom form. Clicking the Copy button in the Customize Forms dialog box opens a dialog box where you can name your new form and assign it a shortcut key. After you click OK, the Customize Forms dialog box opens the selected form for editing, as shown in Figure 25.10.
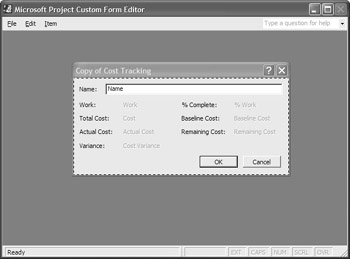
Figure 25.10: The Custom Form Editor
Create a New Form When you click the New button in the Customize Forms dialog box, the Custom Form Editor opens with a small empty dialog box open for editing. The only buttons that are on the new form are the OK and Cancel buttons.
| Note | The Custom Form Editor is an application invoked by Project. The Editor doesn’t have toolbars, so use the File, Edit, and Item menus to work on custom forms. To exit the application and return to Project, select File Ø Exit. |
Working in the Custom Forms Editor
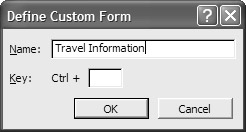
After you select a custom form to edit or copy, or choose to create a new form, name the form in the Define Custom Form dialog box and then enter the Custom Form Editor. Here’s a step-by-step walkthrough of the process required to create a new form called Travel Information.
| Note | This form uses the two custom fields created earlier in this chapter. Information entered in the form is used in the VBA application you’ll create in Chapter 26. For some hands-on practice with Project’s Custom Form Editor, launch Project and then open the project file that contains the two custom fields, Travel Cost and Location, created earlier (see ”Mastering the Opportunities: Practice with Custom Fields”), or create the two custom fields in a new project file now. |
From the Customize Forms dialog box, select the Task option and then click the New button. The Define Custom Form dialog box is displayed. Enter the name of the new form; then click the OK button. This opens the Custom Forms Editor.
Adding Fields to a Custom Form
The first thing we will do is add the required fields to our Travel Information form. Fields come from your project and Project displays the most current data. Fields can be defined as display-only or updateable. We’ll add three fields to this form: Task Name, and two custom fields created for this form, Travel Cost (Cost1) and Location (Text1).
To add a field to a custom form, follow these steps:
-
In the Custom Form Editor, select Item Ø Fields. The Item Information dialog box, shown in Figure 25.11, is displayed.
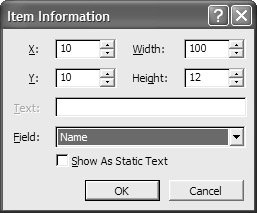
Figure 25.11: Add a field to a: form via the Item Information dialog box. -
Complete the information on the Item Information dialog box for each field you want to place on your form:
Field Select the field (Name for the Task Name field) from the drop-down list.
X and Y Select the horizontal and vertical offsets from the upper left corner of the new form. It’s easier to move the field after it has been created, rather than entering values for X and Y, so we’ll leave the default settings.
Width and Height Specify the width and height (in pixels) of the field you are adding to the form. This can also be adjusted by sizing the field after it has been created, so we’ll leave the defaults.
Show as Static Text check box When checked, the field displays as read-only text rather than as an editable field. We want users to be able to enter data in this field, so we’ll leave this option unchecked.
-
Click the OK button to place the new field on the form.
-
Repeat steps 2 and 3 to add the Travel Cost and Location fields.
Tip Use the X and Y offset, width, and height settings when you want to place fields precisely so that a custom form resembles other custom forms in the same set. You can open any custom form in the Editor, double-click on a control, and see its offset and size properties.
Figure 25.12 shows the Travel Information custom form with these three fields added, but this form needs more customization. We’ll now add text to label the fields.
| Note | Although you can create a drop-down list to modify a custom field on an existing form, you cannot create a drop-down list box to add to a custom form. |
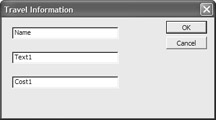
Figure 25.12: The Travel Information form with fields added
Adding Text to a Custom Form
You add text to a form to identify the fields and controls on the form, to describe the actions a user can take, or to provide additional information that is not obvious from the data fields. We will add a text box to describe what information should be entered on the Travel Information form as well as labels for the two custom fields.
To add text to a custom form, follow these steps:
-
In the Custom Form Editor, select Item Ø Text. A text box appears on the Travel Information form. Double-click on the text box to display the Item Information dialog box, shown in Figure 25.13.
-
In the Item Information dialog box, enter the following information:
Text Type in the text you want displayed in your form.
X and Y Select the horizontal and vertical offsets from the upper left corner of the new form, or leave the defaults and move the text box in the Editor.
Width and Height Specify the width and height (in pixels) of the text box you are adding to the form, or leave the defaults and adjust the field after it has been created.
-
Click OK to close the Item Information dialog box.
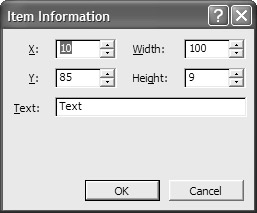
Figure 25.13: Use the Item Information dialog box to input custom form text.Tip To resize or move a control, select it; then point to the center of the control, and drag the control to move it, or drag one of the handles to resize the control.
We followed the preceding instructions to create three text boxes. One contains instructions for users, one is the label for the custom field Location, and the last is the label for the custom field Travel Cost. Figure 25.14 shows the Travel Information form with the three text boxes added, and the following position and size adjustments:
-
The two field labels have been moved to be next to their respective fields.
-
The instruction box has been resized so that all the information is visible.
-
Text1 and Cost1 have been moved to the right.
-
The Task Name field has been expanded so long task names will display fully.
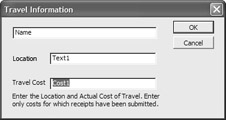
Figure 25.14: The nearly final Travel Information custom form
Adding a Group Box to a Custom Form
Group boxes are used to create sections in a custom form. Related information can be visually differentiated and complex forms seem simpler when fields are placed in logical group boxes.
To group items on our Travel Information custom form, follow these steps:
-
In the Custom Form Editor, select Item Ø Group Box. A group box appears on the Travel Information form. Double-click on the group box, and the Item Information dialog box for group boxes is displayed. This is the same as the Item Information dialog box for text.
-
In the Item Information dialog box, enter the following information:
Text Type in the name of your group box.
X and Y Select the horizontal and vertical offsets from the upper left corner of the new form. You can simply move the group box, rather than entering values for X and Y.
Width and Height Specify the width and height (in pixels) of the group box you are adding to the form. This can also be adjusted by sizing the field after it has been created.
Figure 25.15 shows our custom form with the group box added to improve clarity.
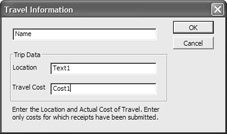
Figure 25.15: A group box separates the trip data from the rest of the fields.
Adding Buttons to a Custom Form
You can add only two buttons to a custom form: OK and Cancel. (This is because custom forms are built on a dialog box “chassis.”) To add a button in the Custom Form Editor, select Item Ø Button. Select the OK or Cancel button to place it on your custom form.
You can resize and move the OK and Cancel buttons after they have been created, but we don’t recommend this. These buttons are created in the standard size used in other Project forms, and placed in the location where users expect to find them. If you move the buttons, make sure that the OK button is to the left of the Cancel button in a horizontal layout, or above the Cancel button in a vertical layout. (This conforms to the Windows standard and will minimize user error.)
Change the Position of a Custom Form
You can set the size of your custom form when it opens, as well as its location in the current window. For example, if you will always be opening your custom form from the Gantt Chart view and don’t want to cover up the Task Names, you would move your dialog box toward the right side of the window. To change the position or size of your custom form when it opens, do the following:
-
From the Customize Forms dialog box (Tools Ø Customize Ø Forms), select your form and click Edit. The Custom Form Editor is displayed.
-
Select Edit Ø Select Dialog to select the whole form, or click on the background of the custom form.
-
Select Edit Ø Information or double-click on the form to display the Form Information dialog box.
-
Type in the X and Y coordinates for your form (1,1 is the upper left of your screen) and increase the value in either field to move the dialog box to the right (for X) or down (for Y) one pixel. Clicking Auto for X and Y will center your dialog box on the user’s screen. The X and Y coordinates will be automatically updated when you move your form around within the Custom Form Editor screen.
-
Type in the Width and Height of your custom form. Changes to the size of the form using the mouse automatically update these fields.
-
Choose File Ø Save to save your form.
-
Choose File Ø Exit to close the editor and return to Project.
Note To copy a custom form to another project, use Project’s Organizer utility (Tools Ø Organizer). Organizer is discussed in depth in Chapter 23.
|
|
EAN: 2147483647
Pages: 241