Adding Macros to Menus and Toolbars
|
|
At the beginning of this chapter, we noted three reasons to create macros. When you create macros for the third reason—to make Project easier for a novice to use—you should also think about customizing Project’s toolbars. Rather than giving your administrative assistant a list of reports with instructions, you can create a report menu or toolbar that contains all the operations necessary to create and print the reports he’ll be distributing.
In the next few pages, we’ll create a custom menu for the external reports we distribute monthly to various stakeholders. These reports include the following:
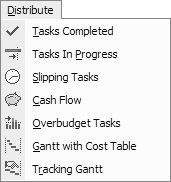
Tasks in Progress
Tasks Completed
Slipping Tasks
Cash Flow
Overbudget Tasks
Gantt Chart with Cost Table
Tracking Gantt
Step 1: Create the Reports and Record the Macros
Before we can customize the menu bar, we need to record macros that create these reports and views. Jot down your list of periodic reports, and create your macros so you can add them to the command bar. If you use the same group of reports in all your projects, you should create global macros. If the reporting requirements vary with each of your projects, you may want to create local macros, or a core set of global macros for the reports and views printed in most projects.
When you print a view or report, focus shifts from Project into the Print Preview window. This window, you may notice, doesn’t have a Project menu or any toolbars, so you can’t access the Stop Recording button. It doesn’t matter whether or not you print the preview; the Macro Recorder pauses when you reach the Print Preview window, and doesn’t start again until after you close the Reports dialog box.
This means that if you set a print range or number of copies, the Macro Recorder won’t catch it.
To stop recording, you have to close the Preview window and then close the Reports dialog box (if you were printing a report rather than a view). You then choose Tools Ø Macro Ø Stop Recorder, which means you record the macro without actually printing the document. When you run the macro, it will finish executing with the report displayed in the Print Preview window. The user will then have to click the Print button man ually to print the report.
When you record the macros to print views, you have to tell the macro which view you want to display even if it’s already displayed on your screen. (It may not be displayed on the next user’s screen.) This means choosing the view from the View menu, even if it is already displayed. Return to the View menu, and choose the Table. Double-click the right edge of each column to adjust the column width to best fit, even if the col umns are already adjusted. Move the split bar into the last column you want to display and then double-click the split bar to adjust the split. When the macro runs, it will select the view and table, and adjust the columns before opening the Print Preview window.
Step 2: Plan Your Custom Menu
Adding macros to a menu or toolbar isn’t substantially different from the menu/toolbar customization discussed in Chapter 23. Right-click on any toolbar, and choose Customize from the shortcut menu; or choose View Ø Toolbars Ø Customize (or Tools Ø Customize Ø Toolbars) to open the Customize dialog box. Before you start dragging and dropping, however, you need to decide where your macros should appear on the toolbar or menu bar. There are a few possibilities, including the following:
Add buttons to the Standard or Formatting toolbars Since the Standard and Formatting toolbars are always there at the top of your Project window, they’re an easy target—especially if you only have one or two new buttons. If you have a lot of macro buttons, however, you might not want to clutter these important toolbars. (You also have the issue of whether other users will expect to find custom buttons on the default toolbars.) For most installations, this is probably the least viable option.
Create a custom toolbar Good custom toolbars are a lot of work. We have to use text on the buttons, or spend days creating icons that are meaningful enough to serve as the primary means of identifying the action that will occur when the user clicks the button. Another approach is to have our assistant memorize the frowning face icon as the Overbudget Tasks, and the little telephone as the Tasks in Progress; but the goal is to make the interface friendlier for our assistant, not introduce new memorization tasks. The Save button looks like a floppy disk. The Print button has a printer on it. What icon will deliver that level of meaning for the Tracking Gantt? How will it differ from the Gantt Chart with Cost Table? For these reasons alone, putting macro operations on a toolbar is problematic.
Add items to an existing menu If we need to display text for our users, we may as well use menu bars rather than toolbars. For example, we could either add the individual macros to the Macros menu (Tools Ø Macros), or create a menu item on the Macros menu called Reports (Tools Ø Macros Ø Reports) and then add the macros to what would be a sub-sub-submenu. Both these options assume, however, that our administrative assistant knows or cares that this functionality is provided by macros. Right now, we’d like to keep him away from the other macros options, not draw him towards them. There’s no obvious or logical choice of menu on which to locate these macros, with the possible exception of the View menu. The problem with the View menu is that it already has Reports, Gantt Chart, and Tracking Gantt on the menu, which will cause confusion. Fortunately, we’re not constrained by the existing options on the menu bar, which leads to our next option.
Create a new pull-down menu on the menu bar; each macro will be a separate menu command on the menu The best option in our current example is to create a new pull-down menu that contains all the macro operations our assistant will be using. For creating a new main menu item, there are a couple of standards to bear in mind. In Windows applications, choices on the menu bar are one-word choices. The fact that lots of program menus look similar to this isn’t coincidence—it’s part of the design standard that programs have to meet to have the Windows seal on their software box. We probably won’t be applying for Microsoft approval, but it’s good to follow the standards anyway because users know how to interact with programs that conform to these standards. Applications that demonstrate disregard for standards give even novice users the impression that they were created by people who weren’t paying attention.
Now that we know how we want to present our macros (on a new pull-down menu), we need to figure out where to place this new menu on the menu bar. You can add a new menu option almost anywhere, but keep these Windows conventions in mind: In any Windows application, the leftmost menu choice is always File (if it appears on the menu), and the choices at the right are always Window and Help. Our new menu can go somewhere between these items.
In addition, it’s important that a term should appear only once in the entire menu system, including all the various submenus. This means we should avoid naming our menu Reports because Reports already appears as an item on Project’s View menu. We’ll name our menu item Distribute, and place it between Project and Collaborate on the menu bar.
Step 3: Create the Custom Menu
Now that the planning is out of the way, let’s create the new menu.
From the Customize dialog box, select the Commands tab, as shown in Figure 24.4. Scroll down the categories list, and choose the New Menu option; a New Menu command appears in the Commands list.
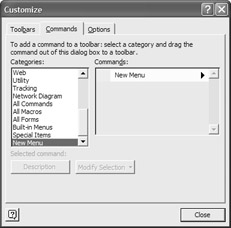
Figure 24.4: Create a custom menu in the Customize dialog box.
Drag the New Menu item from the Commands list, out of the Customize dialog box, and drop it in place (between Project and Collaborate) on the menu bar. The new drop-down menu, still labeled New Menu, now appears on the menu bar:
![]()
| Note | Keep the Customize dialog box open during this entire procedure. If you accidentally close the dialog box, reopen it to proceed. |
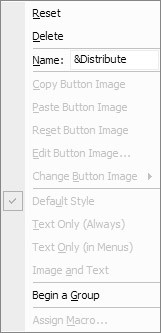
Right-click on the New Menu item in the menu bar. When the pop-up menu appears, place your cursor in the Name field and then enter a new name for the new menu. Type an ampersand (&) in front of the letter that serves as the shortcut key for the command. For our example, we’ll enter &Distribute; we chose D for the shortcut key because it isn’t used anywhere else on this level of the menu. (This means we can use the Alt+D shortcut to open this menu, just as you can use Alt+F to open the File menu, or Alt+E to open the Edit menu.)
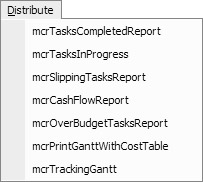
Now we’ll add macros to our new Distribute menu. Go back to the Customize dialog box, and select All Macros from the Categories list. This displays all of Project’s global macros and all the local macros for this project in the Commands list.
Next, you need to populate the new menu with your custom macros. Drag the first macro you want to place on the menu from the Commands list, out of the Customize dialog box, and onto the top of the Distribute menu. Pause while the Distribute menu opens and then drop the command onto the menu. Continue dragging and dropping macros until they’re all on the menu:
You now need to assign each macro a more user-friendly name. Right-click on the first menu item to open the shortcut menu. Change the name from the macro name to the name you’ll want the user to see. Use the ampersand to create a shortcut key for the user. Repeat for all the macros on the Distribute menu.
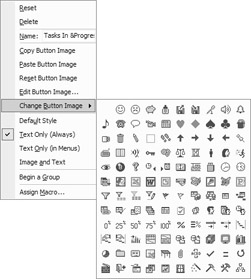
Commands on the highest level of the menu, the menu bar, are represented by text only. Commands on the drop-down menus can have text and buttons. If you’re ever going to put these macros on a toolbar, you can start training users in advance by assigning icons and text to the menu commands. To display an image, right-click on the menu command to open the shortcut menu, and choose Change Button Image. Project automatically changes the display setting on the shortcut menu to Image and Text.
Change the name, display, and button image settings for the remaining menu items. Drag and drop menu items to rearrange them, if you want. When you are finished, click Close to close the Customize dialog box. Here’s what our finished Distribute menu looks like:
|
|
EAN: 2147483647
Pages: 241