Setting Project Options
|
|
Microsoft Project’s overall application appearance and behavior are controlled by various configuration options. Most of Project’s options are organized into categories and can be found in Project’s Options dialog box. You open this dialog box by choosing Tools Ø Options.
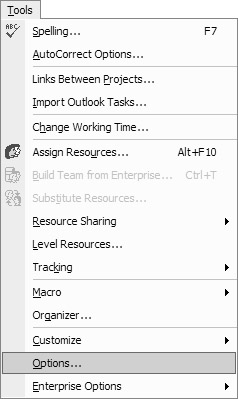
| Note | Options for some of Project Professional’s enterprise features are found by selecting Tools Ø Enterprise Options. These options are discussed in Chapter 21. |
Types of Options
Options in Microsoft Project can be global or project-specific. Global settings pertain to projects that have already been created, the current project, and any new projects that you create. Project-specific settings pertain only to the current project.
Figure 23.1 shows three examples of project-specific settings on the View tab of the Options dialog box—the sections titled Cross Project Linking Options, Currency Options, and Outline Options. You can see the project name Decentralization Project 7 listed next to each of these options. This makes it easy to identify those options that are project-specific. If there is no project name next to the option, you can assume that the setting applies to all projects, and is a default or global setting.
Some options give you the choice to apply them to the current project, or apply them globally to all projects. Anywhere you see the Set As Default button on the Options dialog box, you have this choice. The Set As Default button applies only to the specific settings in close proximity to and generally directly above or to the right of the button—all the settings on a tab are not necessarily affected.
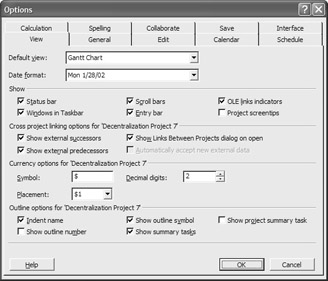
Figure 23.1: The View tab of the Options dialog box
View Options
The View tab, shown in Figure 23.1, allows you to specify the Default view—the view that appears when you open a project.
You can also specify the date format you want to use in your projects. Choose from the available options in the Date Format drop-down list. Depending on the nature of the majority of your projects, you can select a date setting that also includes the time.
The View tab also enables you to specify additional settings such as the number of decimal places you want to display for currency and what symbol, if any, you would like to use for currency.
| Tip | You can get a quick definition of each option in the Options dialog box by clicking the question mark button in the upper right corner of the dialog box’s title bar. After clicking the question mark button, the mouse pointer turns to a question mark. Move the question mark to the particular field and then click to display the pop-up help. |
The outline options at the bottom of the View tab, shown in Figure 23.1, relate to the open project and designate how you want the outlining features to function. Some of these options may be dimmed, depending on which view you are in. To access all the options, you must be in a task view such as Gantt Chart view. With these options, you can choose to indent subtasks, show an outline number, and show an outline symbol next to each task. If you want to hide summary tasks so only tasks that require action are displayed, clear the Show Summary Tasks check box.
If you want to display a project summary task, click the Project Summary Task check box. This feature is most commonly used in master projects, but it can also be used to roll up an entire project into one task.
| Tip | You can change the name of a project summary task and enter other information about the task by double-clicking the task, and editing the data in the Summary Task Information dialog box. |
General Options
The General tab of the Options dialog box, shown in Figure 23.2, is where you set general options for the Microsoft Project software and some options specific to the open project.
The first section allows you to determine whether you want the Task pane to display on startup or the last open file to open automatically the next time you start Project (Open Last File On Startup). It also allows you to set your Recently Used File List (shown on Project’s File menu) to whatever number of entries between 0 and 9 you want to see.
Make sure your name is listed in the User Name text box because this field is used to identify who the project author is and who last saved the project—both properties that are invaluable when working on a team project.
The Microsoft Project Planning Wizard is a help system that notifies you when your project is developing conflicts in scheduling or other errors that could affect the accuracy of the project. You can turn off the Planning Wizard, or reduce the amount of advice it gives you by clearing any of the four Planning Wizard check boxes.
The General Options at the bottom of the General tab relate specifically to the currently active project—in this case, Decentralization Project 7. The Automatically Add New Resources and Tasks check box is enabled by default, allowing you to add resources to the pool and tasks to the project implicitly. For example, you can create a new resource simply by assigning the resource to a task. When the check box is disabled, you’re prompted to confirm the addition of each resource assigned that doesn’t already exist in the resource. This way, you don’t accidentally create resources by misspelling the name of an existing resource.
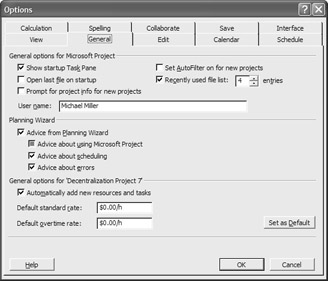
Figure 23.2: The General tab of the Options dialog box
You can also set a Default Standard Rate and a Default Overtime Rate for resources you add to the project. This is a timesaver if you use a lot of resources that share the same rate. Be sure to click the Set as Default button if you want these rates to appear in all the projects you create.
| Note | The Default Standard Rate and Default Overtime Rate fields do not affect resources already included in the project; only the new ones you add. |
Edit Options
The Edit tab, shown in Figure 23.3, contains universal editing options that determine how you can edit and view information on your projects. As explained for the View tab, remember that the settings displaying the open project’s name apply only to that project.
Table 23.1 describes the universal editing options available on the Edit tab.
| Option | Description |
| Allow Cell Drag And Drop | When selected, this option enables you to point to the border of a selected cell and move it to another cell by dragging. |
| Move Selection After Enter | When this option is selected, pressing the Enter key moves the cell pointer down one row. |
| Ask To Update Automatic Links | When this option is selected, Project displays a message asking whether you want Project to update links to OLE objects whose source has changed, rather than updating these links automatically. |
| Edit Directly In Cell | When selected, this option enables you to edit directly in a cell by selecting a cell and then clicking in the cellor by selecting the cell and then pressing the F2 key. (This feature is turned on by default; turn it off by clearing this check box.) |
The Edit tab also includes, somewhat in contradiction with its name, viewing and hyperlink options. The View Options section enables you to set how you want to display the various time measurements; pull down each list and choose from (for example) m, min, or minute when minutes are displayed. The Hyperlink Appearance section lets you define the hyperlink and followed hyperlink color, as well as determine whether you want hyperlinks underlined in your Project documents.
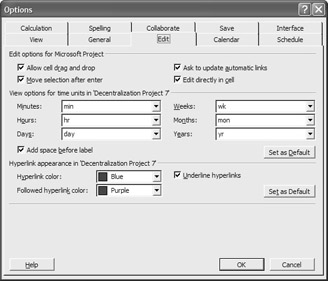
Figure 23.3: The Edit tab of the Options dialog box
Calendar Option
The Calendar tab contains critical settings that determine how Project interprets the days and weeks of the current project. These settings should be set according to your organization’s working environment. Figure 23.4 displays the default calendar settings that are used unless you manually change them.
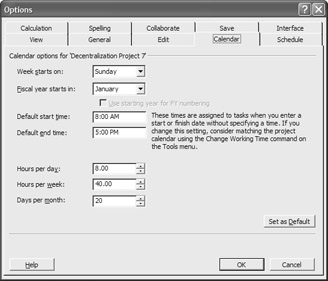
Figure 23.4: The Calendar tab of the Options dialog box
The first settings on the Calendar tab let you define what day your week starts and what month your fiscal year starts. These selections affect displays and reports that have to do with weekly, annual, and quarterly amounts.
The default start and end times should be set the same as the start and end time hours in the Standard Project calendar (Tools Ø Change Working Time). These settings are used in several places and should be set based on the working hours of your organization.
Microsoft Project calculates project schedules by reducing all time parameters, such as hours per day and hours per week, to minutes. These time fields need to be set up correctly to ensure that task durations, amount of work, and resource units required are calculated correctly.
The Days per Month field defines the number of days included in a working month. The default month is 20 days because that’s the typical number of working days per month (four five-day weeks). This feature helps to define task durations that span over a month or more.
| Warning | The Calendar settings do not automatically apply to all projects, and therefore must be set each time a project is created—unless you click the Set as Default button to establish them as the default setting for all projects. For more about the Calendar options, see “Defining the Project Calendar” in Chapter 6. |
| Note | Some settings that have to do with dates and times are set through the Windows Control Panel—for example, the time format and date separator. Refer to your Microsoft Windows documentation for more information on these settings. |
Schedule Options
The Schedule tab of the Options dialog box, shown in Figure 23.5, is where you find options related to how Microsoft Project schedules task durations. The general schedule options at the top of the tab, which pertain to all your projects, include settings for identifying whether you want Project to provide messages about scheduling conflicts, and how you want to show assignments: as a percentage, or as a decimal figure.
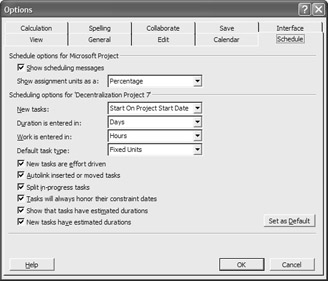
Figure 23.5: The Schedule tab of the Options dialog box
The next section of the dialog box pertains to various scheduling options for the current project. You have the option here to determine how you want all New Tasks to be scheduled. The available options are as follows:
-
Start on Project Start Date
-
Start on Current Date (useful if you are adding new tasks after the actual project start date)
By default, Project enters Duration in days and Work in hours. You can change either of these settings to Minutes, Hours, Days, Weeks, and Months to affect how Project interprets an entry when you do not specify a unit of time. For example, in Figure 23.5, the Duration is set to Days. If you enter a task and then enter a 2 in the Duration column, Project automatically sets the duration to 2 Days, based on this setting.
The check boxes at the bottom of the Schedule tab clarify how you want other scheduling issues handled. Table 23.2 describes these options.
| Option | Description |
|---|---|
| New Tasks Are Effort Driven | Tasks are defined as effort-driven unless you change the setting for a specific task. |
| Autolink Inserted Or Moved Tasks | Automatically creates links when you move, delete, or insert tasks. |
| Split In-Progress Tasks | Allows you to split tasks even if they are already in progress. |
| Tasks Will Always Honor Their Constraint Dates | If a constraint is placed on a task, the constraint takes precedence over other scheduling changes. |
| Show That Tasks Have Estimated Durations | Task durations followed by a question mark are designated as estimated. |
| New Tasks Have Estimated Durations | All new tasks are given an estimated duration of one day (unless you’ve changed the Duration Is Entered In default). |
Calculation Options
The Calculation tab, shown in Figure 23.6, determines various calculation settings, including whether you want Project to calculate the Project schedule and costs automatically, or whether you want to prompt it to calculate them. This option is helpful when you are working with very large projects, and the project is running slowly because of the calculations involved. You must remember to come back to this tab, however, and click the Calculate Now button to have Project calculate the project.
Other settings on the Calculation tab include options related to how you want Project to calculate the schedule and costs in the open project. You may want to uncheck the Actual Costs Are Always Calculated By Microsoft Project option if want to be able to enter your own total cost figures, rather than have Project calculate them.
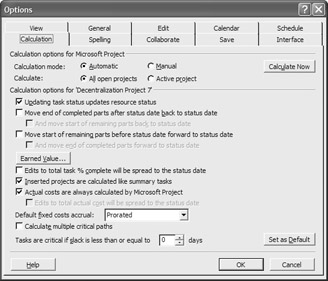
Figure 23.6: The Calculation tab in the Options dialog box
Spelling Options
Microsoft Project uses the same Spelling tools found in other Microsoft Office products, including the AutoCorrect features that automatically fix commonly misspelled and mistyped words. To see a complete list of AutoCorrect options, close the Options dialog box and then choose Tools Ø AutoCorrect Options.
On the Spelling tab of the Options dialog box, shown in Figure 23.7, you can choose which fields contain data that you want Project to check when you run the Spelling feature from the toolbar. You may find it useful to turn spell-check off for fields that have names in them, such as Name-Resource and Code-Resource, because names often come up as spelling errors. To turn off a particular field, select the Yes cell and then click the drop-down list to choose No.
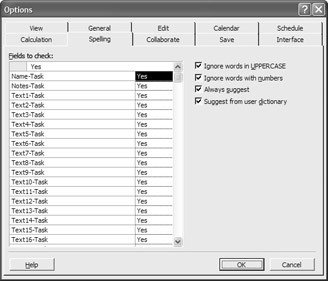
Figure 23.7: The Spelling tab of the Options dialog box
Collaboration Options
When you are managing a project, you can use either e-mail or Microsoft Project Server to communicate with others on the project team. You set the default method of communication on the Collaborate tab of the Options dialog box, shown in Figure 23.8.
Server If you’re collaborating via Project Server, you also use this tab to enter server and account information for your Project Server connection. (See Chapter 20 for more information about Project Server configuration.)

Figure 23.8: The Collaborate tab of the Options dialog box
Save Options
The Save tab of the Options dialog box, shown in Figure 23.9, lets you determine how and where your Microsoft Project files are saved. This dialog box allows you to change the file locations and save Project files as the default .mpp format files, .mpt-format Project Template files, .mpd-format Project Database files, .mdb-format Microsoft Access Database files, ODBC database files, or Project 98 files.
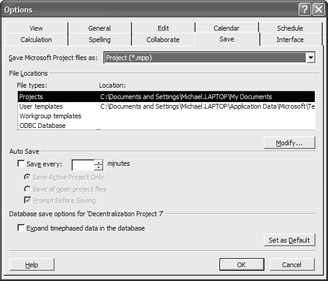
Figure 23.9: The Save tab of the Options dialog box
Project also lets you set a default save location for projects. Select Projects under File Types, and click the Modify button to set the desired location. You can also set AutoSave options so that Project saves the active project or all open projects for you automatically every so many minutes.
| Warning | Project’s AutoSave feature is not the same as the AutoRecover feature in Microsoft Word. Word’s AutoRecover recovers documents when the application terminates unexpectedly. Project’s AutoSave resaves the open project. |
Interface Options
The Interface tab of the Options dialog box, shown in Figure 23.10, lets you determine which of several screen elements to display when you launch Microsoft Project. You can opt to display or not display elements such as indicator icons, Option buttons, and the new Project 2002 Project Guide. You can even choose to display your own custom content within the Project Guide pane.
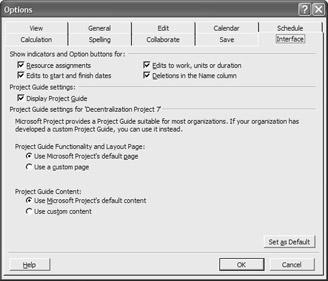
Figure 23.10: The Interface tab of the Options dialog box
|
|
EAN: 2147483647
Pages: 241