Managing Enterprise Resources
|
|
Server One of the most useful enterprise capabilities of Project Professional is the way it manages resources from across the organization.
Pro When you use Project Standard (or Project Professional in standalone mode), all the resources are stored on a single computer. Those resources cannot be shared with other computers or users, nor can that computer share resources stored elsewhere in the enterprise. If you have a big project, and want to tap into resources in another department or location, your only recourse is to obtain information about those resources, non-digitally, and manually enter them into your project. That means that you really don’t have up-to-date information about those remote resources, nor is it easy for multiple project managers to schedule those resources on multiple projects.
Project Professional, used in conjunction with Project Server, changes all that. Now all the resources in an organization can be stored in a central repository (called the enterprise resource pool), which can be accessed by various project managers across the enterprise. Because the resources are available to all, they can be assigned to multiple tasks in multiple projects (in multiple departments in multiple locations), with progress and availability tracked and managed in real time. If you need a level-three Visual Basic programmer for two days of work next week, just access the resource pool to access all the level-three Visual Basic programmers to find out who’s available. Make the task assignments from your own PC, and the changes will be automatically registered and visible to all the other project managers in your organization.
A resource becomes an enterprise resource after it is added via the Import Resources Wizard, discussed in the “Importing Resources from Another Project” section later in this chapter. Unless a resource has been designated an enterprise resource, it won’t be available to all enterprise projects, and can’t be viewed by other project managers.
Read on to learn more about enterprise resources, and how to manage them from Project Professional.
Working with the Enterprise Resource Pool
Enterprise resources come from all across your organization. To manage these resources, you need to create an enterprise resource pool.
You first learned about resource pools in Chapter 9. Recall that we defined a resource pool as a master list of resources that is shared among multiple projects in an organization; however, the shared resource pool you created back in Chapter 9 contained only those resources entered into a single PC. An enterprise resource pool contains all the resources in all the PCs connected to Project Server, as well as resources that are not enterprise resources. When you use the enterprise resource pool, you can easily share resources among several projects, identify conflicts between assignments in different projects, and see how a resource’s time is used in multiple projects.
Unlike local resource pools, which must be created manually from a blank project file, the enterprise resource pool is created automatically when Project Server is installed. Each project that uses resources from the enterprise resource pool is called a sharer file.
To find resources in the enterprise resource pool and add them to a sharer file, you use the Build Team from Enterprise tool. (See “Adding Enterprise Resources to a Project” later in this chapter for more information.) When you assign resources from the enterprise resource pool in a sharer file, all information about the task assignment (assignment units, work, and so on) are saved in the sharer file. This information is then duplicated in the enterprise resource pool so that other sharer files can see the status of any given enterprise resource.
| Note | When you’re logged on to Project Server, you can’t use any non-enterprise resource pools; only the enterprise resource pool is available for use. If you want to access non-enterprise resource pools, restart Project Professional without logging on to Project Server. |
Adding Resources to the Enterprise Resource Pool
Adding new enterprise resources to the enterprise resource pool is as easy as adding resources to any individual project. Follow these steps:
-
From within Project Professional, select Tools Ø Enterprise Options Ø Open Enterprise Resource Pool.
-
When the Open Enterprise Resources dialog box appears, as shown in Figure 21.16, click the Open/Add button without selecting any resources.

Figure 21.16: Add new resources to the enterprise resource pool. -
The enterprise resource pool project opens with Resource Sheet view displayed. Enter new resources into the Resource Sheet.
-
Select File Ø Save to save the new resources into the enterprise resource pool; then close the resource pool project.
Warning If you have not filled in all required fields for the new resource, you’ll be prompted to enter this information before the file can be saved.
Importing Resources from Another Project
If you have resources stored within an existing standalone or enterprise project, you can easily import those resources into your enterprise resource pool. The new Import Resources Wizard facilitates this process; follow these steps:
-
Without opening a project within Project Professional, select Tools Ø Enterprise Options Ø Import Resources to Enterprise. This launches the Import Resources Wizard, as shown in Figure 21.17. Click the Next button to continue.
-
When the Open from Microsoft Project Server dialog box appears, select the project that contains the resources you want to import; then click Open. (If you want to import from a non-enterprise project, click the Open from File button to use the regular Open dialog box.)
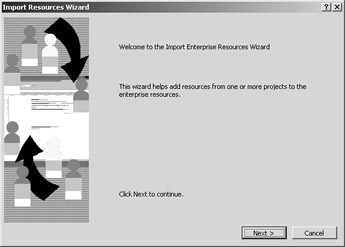
Figure 21.17: Use the Import Resources Wizard to add existing resources to the enterprise resource pool. -
When the Map Resource Fields screen appears (shown in Figure 21.18), you can elect to import custom field definitions and values. Click within a From field to select a field from the pull-down menu; click within the To field to select which field to map that field to a custom field in the enterprise global template. Put a check mark in the Map box next to each custom field you want to use; then click Next when ready to proceed.

Figure 21.18: Include custom fields in your imported resource. -
The next screen, shown in Figure 21.19. lists all the resources in the selected file. If there is a check mark in the X column, the resource has been approved for importing. If there is not a check mark, there is something that is keeping the resource from being imported. The Error column should display an error message to help clarify the problem. (For example, Figure 21.19 includes several resources that do not have valid Windows accounts; you can’t import a resource with this kind of error.) Click Next to continue the import process, or select a resource and then click the Resource Information button to try and fix the error in the Resource Information dialog box.
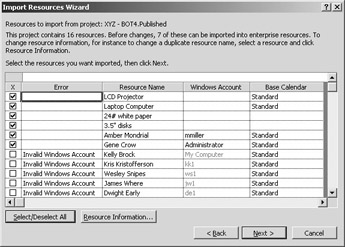
Figure 21.19: Include custom fields in your imported resource. -
The wizard now displays an Import Complete screen. Click Import More Resources if you have more resources to import; click Finish to exit the wizard.
Modifying Enterprise Resources
Before you can change any information about an enterprise resource, you have to check out the resource for editing. Follow these steps to check out and modify an enterprise resource:
-
From within Project Professional, select Tools Ø Enterprise Options Ø Open Enterprise Resource Pool.
-
A list of enterprise resources appears in the Select list when the Open Enterprise Resources dialog box appears (see Figure 21.16). (You can alphabetize this list by clicking the Resource Name column header.)
-
Check the check box next to the resource (or resources) you want to check out for editing.
-
Select the Read/Write to Check Out option.
-
Click the Open/Add button.
-
The Checked-out Enterprise Resources project opens in Resource Sheet view, with the selected resource(s) displayed.
-
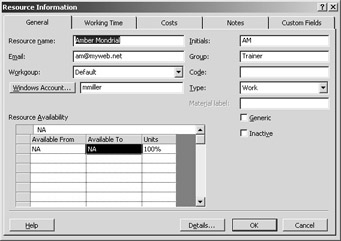
Double-click the resource to display the Resource Information dialog box and then make the desired changes. Click OK to return to the Resource Sheet.
-
Select File Ø Save to save your changes into the enterprise resource pool; then select File Ø Close to close the resource pool, and check in the selected resource(s).
Note Any given resource can only be checked out by one person at a time.
Deleting an Enterprise Resource
To delete a resource from the enterprise resource pool, follow these steps:
-
From within Project Professional, select Tools Ø Enterprise Options Ø Open Enterprise Resource Pool.
-
When the Open Enterprise Resources dialog box appears, select the resource you want to delete.
-
Press the Del key on your keyboard.
-
Click Cancel to close the dialog box.
Applying Outline Codes and Custom Fields
Earlier in this chapter you learned about enterprise custom fields and outline codes. After you’ve created or assigned new resources to the enterprise resource pool, you need to assign custom fields and outline codes to these enterprise resources. Follow these steps:
-
From within Project Professional, select Tools Ø Enterprise Options Ø Open Enterprise Resource Pool to open the Open Enterprise Resources dialog box.
-
Click the Select/Deselect All button to choose all the resources in the resource pool.
-
Click the Open/Add button to open the selected enterprise resources in the Checked-out Enterprise Resources project.
-
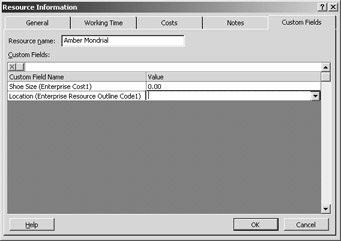
Double-click a resource name to open the Resource Information dialog box, and select the Custom Fields tab.
-
For each entry in the Custom Field Name column, select or enter a value in the Value column; then click OK to close the Resource Information dialog box.
-
Repeat steps 5 and 6 for each enterprise resource.
-
Click OK to close the Resource Information dialog box.
-
Select File Ø Save to save your changes into the enterprise resource pool; then select File Ø Close to close the resource pool and check in the selected resource(s).
Adding Enterprise Resources to a Project
After you’ve populated the enterprise resource pool with enterprise resources, you can tap into that pool to assign resources for all your enterprise projects. The easiest way to add enterprise resources involves the new Build Team from Enterprise operation, which walks you step-by-step through the process.
-
From within your new project, select Tools Ø Build Team from Enterprise to display the Build Team dialog box, shown in Figure 21.20. (This dialog box is also displayed when you select From Microsoft Project Server in the Assign Resources dialog box, as discussed in Chapter 10.)
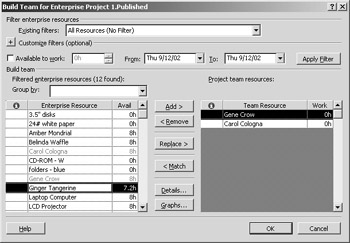
Figure 21.20: Use Build Team from Enterprise to add enterprise resources to your project.Tip If there are more than a thousand resources in your resource pool, Project displays a dialog box that lets you prefilter the list of enterprise resources. Select a skill, area, or other code that you want to use as a filter and then click OK.
-
To filter the list of enterprise resources, pull down the Existing Filters list and then select a filter. The list of filtered resources is displayed in the Enterprise Resource column; resources already in your project team are displayed in the Team Resource column.
-
You can further refine the type of resource you’re looking for by specifying those who are available to work a specific number of hours for a particular time/date range. Select the Available to Work option, enter or select the number of hours desired, and select a From and To date.
-
To group the available resources outline or RBS codes, pull down the Group By list and then select a grouping criteria.
-
To view a graph of a specific enterprise resource’s availability, select the resource in the Enterprise Resource column; then click the Graphs button.
-
When you find a resource you want to add to your project, select that resource in the Enterprise Resource column, and click the Add button. The new resource now appears in your Team Resource list.
-
Repeat this procedure to add other resources to your project; then click OK when done.
Tip You can display a list of resources that match the skills and other attributes of an existing team member. Just select the desirable team member in the Team Resource list, and click the Match button.
While you’re in the Build Team dialog box, you can apply other filters to winnow down the list of available enterprise resources—including both built-in filters or your own custom filters.
To use one of Project’s built-in filters, pull down the Existing Filters list and then make a selection. To create your own custom filter, click the + button next to the Customize Filters option to expand the Build Team dialog box, like this:
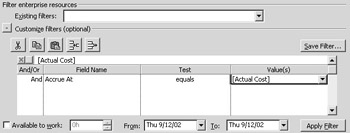
You can now enter information and operators into the And/Or, Field Name, Test, and Values fields. Your filter can include multiple conditions, entered into separate rows in the table. When you’ve completed construction of your filter, click the Apply Filter to filter the Enterprise Resource list according to your custom criteria.
Working with Generic and Actual Resources
Microsoft Project 2002 Professional, in conjunction with Project Server, introduces a new type of resource for you to use when planning your projects. This new resource is called a generic resource, and functions as a placeholder until you can assign an actual resource to a task. You use generic resources to specify the skill required for an assignment before you know which actual resources are available. Project Professional works with generic resources as if they were work resources, so you can plan your project without making specific task assignments. Later, when you know which actual resources are available, you can use resource substitution to replace a generic resource with an actual resource.
You enter generic resources into a project the same way you enter a normal work resource. You can also add generic resources to the enterprise resource pool using the Import Resources Wizard.
Create a New Generic Resource
Creating a new generic resource is similar to creating a normal work resource, which you learned to do in Chapter 9. You have to make one minor addition, as detailed in the following steps:
-
From within your project switch to Resource Sheet view (View Ø Resource Sheet) with the Entry table displayed (View Ø Table Ø Entry).
-
Enter a name for the generic resource in the Resource Name field.
-
Double-click the new resource to display the Resource Information dialog box, shown in Figure 21.21.
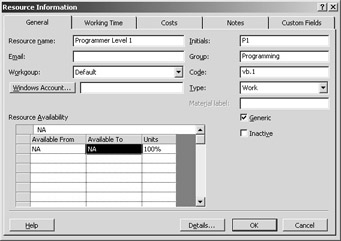
Figure 21.21: Creating a new generic resource. -
Select the General tab.
-
Check the Generic option.
-
Enter additional information about the new resource, as desired.
-
Click OK when done.
You can now use the Import Resource Wizard to import the new generic resource into the enterprise resource pool, as described earlier in this chapter.
| Warning | Generic resources must be imported into the enterprise resource pool to be available to other projects. |
Add a Generic Resource to Your Project
To add a generic resource to your current project, follow these steps:
-
From within your new project, select Tools Ø Build Team from Enterprise to display the Build Team from Enterprise dialog box.
-
Click the + button next to the Customize Filters option; this expands the dialog to display the Customize Filters table.
-
In the Customize Filters table, pull down the first cell in the Field Name column and then select Generic.
-
Pull down the Test column, and select Equals.
-
Enter Yes into the Values column.

-
Click the Apply Filter button.
-
Use the other controls in the Build Team dialog box to further refine the generic resources listed, if you want.
-
Select the generic resource you want to add from the Enterprise Resource column, and click the Add button. The new generic resource now appears in your Team Resource list.
When you add a generic resource to your project, a new ghosted icon, similar to the one shown here, appears in the Indicators column of the Resource Sheet view.
![]()
Replace a Generic Resource with an Actual Resource
After you’ve created your new project, you’ll want to replace your generic (placeholder) resources with actual resources from the enterprise resource pool. To do this, use the new Resource Substitution Wizard to find actual resources that match the skills defined by the generic resources—and the availability dictated by your project schedule.
Follow these steps:
-
From within your project, select Tools Ø Substitute Resources to open the Resource Substitution Wizard, as shown in Figure 21.22. Click Next to proceed.
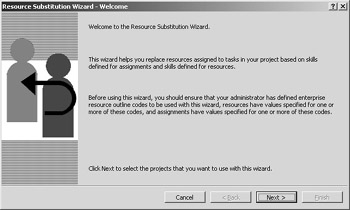
Figure 21.22: Use the Resource Substitution Wizard to replace generic resources with actual resources. -
When the Choose Projects screen appears, select those projects in which you want to substitute resources. Click Next to proceed.
-
When the Choose Resources screen appears, as shown in Figure 21.23, choose to include work resources that are In the Selected Projects, At or Below the Following Level in the Resource Breakdown Structure, or Specified Below. If you choose the second option, select an RBS level from the pull-down list. Click Next to proceed.
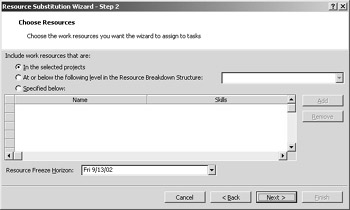
Figure 21.23: Select which types of resources to use for the substitution. -
When the Choose Related Projects screen appears, select any other projects you want to consider when substituting resources; then click Next.
-
When the Choose Scheduling Options screen appears, click in the Options column next to each listed project and then select either Use Resources in Project (to limit the choices to resources already contained in the selected project) or Use Resources in Pool (to search for resources from within the entire enterprise resource pool). Click Next to proceed.

-
The wizard now displays a summary Substitute Resources screen. If the configuration is acceptable, click the Run button to proceed.
-
The wizard now searches for resources that match your requirements. Click Next to proceed.
-
Recommended substitutions are displayed on the Review Results screen, shown in Figure 21.24. Click Next to proceed.
-
The Choose Update Options screen now appears. You can elect to update the project(s) with the results of the wizard, or save the results of the wizard as a report. Make your choice, and click Next.
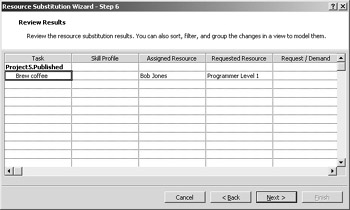
Figure 21.24: The results of the resource substitution process. -
The wizard now updates your project (or creates a report), and displays the Finish screen. Click the Finish button to close the wizard.
|
|
EAN: 2147483647
Pages: 241