Existing DNS Zones
This section of the BIND main page displays a list of all existing DNS zones. There are four types of zones (actually there are five, but the hint needs little configuration and is usually set up only once), master, slave, stub, and forward. And each of these types may then be either a forward zone (meaning it maps names to addresses) or a reverse zone (maps addresses to names). Each of the four types has a specific purpose, depending on your name server’s relationship to the data it presents to clients.
Zone Types
The following are the types of DNS zone:
master
The server has the master copy of the zone data, and will provide authoritative answers for it.
slave
A slave zone is a copy of a master zone. Each slave zone will have a list of masters that it may query to receive updates to its copy of the zone. A slave may, optionally, keep a copy of the zone saved on disk to speed startups. A single master server can have any number of slaves in order to distribute load.
stub
A stub zone is much like a slave zone, and behaves similarly, however, it only replicates the NS records of a master zone rather than the whole zone.
forward
A forward zone directs all queries in the zone to other servers. In this way it can act as a caching DNS server for a network, or provide Internet DNS services to a network behind a firewall that limits outside DNS queries (obviously the forwarding DNS server must have DNS access to the Internet!). Note that this is similar to the global forwarding facility, but allows per-zone selection of forwarders.
Creating a New Zone
To create a new zone, click on one of the zone creation links in the Existing DNS Zones section of the screen. Each zone type will present you with the various fields necessary for Webmin to generate the new zone file for a zone of the selected type. The fields present differ for each zone type, except slave and stub, so we’ll document each in turn.
Creating a Forward Master Zone
A master zone is one that contains the authoritative and complete data for a DNS zone, and therefore has the most configurable options (Figure 8-6). When creating any type of zone, it is necessary to create at least two zone database files, one for forward mappings and one for reverse mappings. This is to provide both name to address translation, as well as address to name translation. Luckily, once you’ve created a forward and reverse master zone, Webmin can automatically add the correct reverse records for each host you add to your master zone.
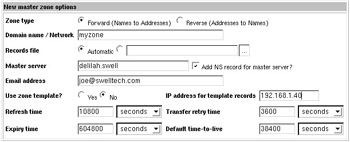
Figure 8-6: Creating a new master zone
The options when creating zones are pretty straightforward, but I’ll discuss them briefly, as well as give an example of creating a new master forward and master reverse zone database.
Zone type
The zone type is either Forward or Reverse, as discussed earlier. In the example shown, I’m creating a new forward zone.
Domain name/Network
This option will be either the domain name of the zone in the case of a forward zone or the network in the case of a reverse zone. Here, I’m creating a zone named myzone. Note that in my case, my domain is for a local network and will not be able to be resolved from the Internet at large (which requires registration in one of the top-level domains, such as .com, .org, or .net). Registration of a domain zone and obtaining addresses and other related tasks are well beyond the scope of this book, but the steps for creating Internet domains are precisely the same.
Records file
This option allows you to choose the name and location of the db file while you would like your zone information stored. Webmin will automatically create a correctly named file in the system default location for you if you leave this option set to Automatic. Unless you have good reason for breaking convention it is recommended that you leave this as it is.
Master server
Here you select the name of the master server for this domain. Because we are creating a master zone, this should be the host name of the server that will be the master for this file; in my example, I’ve selected the host name delilah.swell, a host on my local (non-Internet) domain swell. The sub-option Add NS record for master server? when checked, will add a name server record in this zone for this name server. It’s usually good to leave this checked and let Webmin handle one more of the many minor details it will handle if you let it.
Email address
This should be the email address for the maintainer of this domain. In the case of Internet resolvable domains, this will be the person contacted in the event of problems with your DNS server(s).
Use zone template?
If you created a zone template in your Global Server Options:Zone Defaults you can include that template information here. This can include any number of automatically generated records of several types (host address, mail server, name server, name alias, and host information). If you chose From form as a source for one of your host addresses, then you can enter that information in the IP address for template records field. Using the template facility in Webmin can prove a very powerful tool for administrators who manage a large number of zones that have the same name servers and mail servers. Creating a new domain can be done almost automatically in this way.
Refresh time
This is the same as the option of the same name in Global Server Options:Zone Defaults, though it will only apply to this zone. This option will override the global zone default. The same applies to Transfer retry time, Expiry time, and Default time-to-live.
Clicking Create takes you to the primary page for this new zone. We’ll come back to these options after discussing the creation of a reverse master zone, as it makes good sense to create your reverse zone for this domain before adding any records to the zone. In this way, Webmin can keep the two files in sync for you automatically.
Creating a Reverse Master Zone
After creating a forward master zone, you may then want to return to the main BIND module page and create another master zone (Figure 8-7). This time, you will choose to create a reverse zone, in order to provide mapping from IP addresses to names.
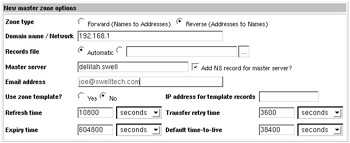
Figure 8-7: Creating a reverse master zone
| Note | Reverse address resolution is somewhat different than forward resolution. With forward zones, there can be any number of addresses associated with a single IP, whereas there should only be one reverse record for a given IP. Thus if you are hosting many virtual services on a single IP, they can have their own domain name, but the IP can only map back to one of them in the event of a reverse lookup. Also, unless you own your own network IP block, or are using a private netblock, your name server will not necessarily be authoritative for your range of IP addresses. Reverse lookups are not frequently used, and when they are, it is usually only to confirm that an IP does resolve to some legitimate network. |
Here, you’ll see that creating a reverse master zone is exactly like creating a forward master zone. In this case, I’ve chosen a zone type of Reverse, as this zone will map addresses to names. The only other difference between this and the previous example, is that I’ve entered the network address, 172.16.1, instead of the domain name. After creating this, I’m taken to the primary page for the new zone. We will rarely edit the reverse master zone records directly, as it is easier and safer to allow Webmin to do it for us. So let’s return to the primary BIND module page and then edit our new myzone master zone.
Adding Records to a Master Zone
Assuming you successfully created a Forward Master Zone, it will now appear in the Existing DNS Zones section of your main BIND page. Clicking it takes you to a page that allows adding records of all types, as well as a few general zone options at the bottom of the page (Figure 8-8). The options at the bottom of the page are the same as those documented in the Global Zone Options sections earlier, except they only affect the one zone you are editing, so these options will not be covered here.
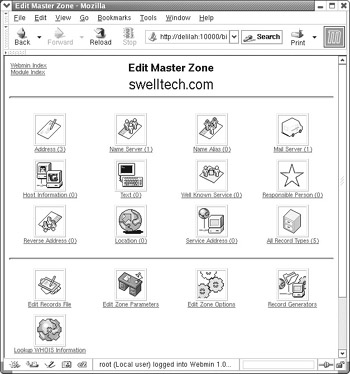
Figure 8-8: Edit Master Zone
Address
An address record allows you to enter the host name, the time to live, and the address for a host. Every host on your network should have an Address Record (Figure 8-9). In the example, note that I’ve entered the fully qualified host name, and ended with a period. I’ve also chosen to have Webmin update the reverse master zone with this address, as well. This option creates an A record.
Name Server
If you have another name server that is responsible for another subdomain (such as joeszone.myzone.), you can add it here. You can also add other name servers for this domain, including slaves and redundant masters. This option creates an NS record.
Name Alias
Name aliases provide a means to name a host more than one name. For example, if you wanted your mail server (real name mail.myzone.) to also be addressable by the name smtp.myzone., you could create an alias for it here, and both names would resolve to the same machine. Also, it allows you to create shortcuts for your users. If for example, you wanted users to be able to simply enter news to reach a news server, even though your news server is actually in another domain. This option creates a CNAME record.
Mail Server
Every mail server in your domain should have an entry here. On this page, the Name field should contain the name of the domain, and the Mail Server field should contain the name of the mail server. When creating a mail server record, you are given an extra option that is not present in any of the other records, called Priority. The Priority of a mail server is a relative value to indicate which mail server has precedence. The lower the value, the higher its precedence. Every mail record must have a Priority. In the event that the server with the highest precedence is down, mail servers can then deliver mail to the next server on the list. This option creates an MX record.
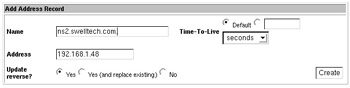
Figure 8-9: Adding an address record
Host Information
This record type allows you to identify the type of host that is referenced by an address record. Here, you enter the name of the host and the Hardware type and Operating System type. These types are entirely optional, but if you do enter them, you should be aware of the security implications (identifying your hardware and OS is the first step a cracker takes in identifying ways to crack your system). Also, there are several rules documented in RFC 1700 [http://www.ietf.org/rfc/rfc1700.txt?number=1700] regarding how one should identify hardware and OS. However, these rules are not at all strictly enforced and it is usually quite safe to use this record for internal record keeping purposes (i.e., instead of keeping a notebook or separate database of all of your hosts and what OS and version they run). This option creates a HINFO record.
Text Record
Here you can enter any arbitrary text string up to about 2K. You can use this for notes regarding the host, perhaps the location or primary user of the host, as well as for other notes that can be referenced by other records, for example, in a Responsible Person record. This option creates a TXT record.
Well Known Service
The Well Known Service record type allows you to configure what types of services a particular host provides. So, for example, you could advertise that the host myhost.myzone. can provide telnet, ftp, and smtp services. The services are identified by the same name as is found in the services file. This option creates a WKS record. More on Well Known Services can be found in section 3.4.2 of RFC 1035 [http://www.ietf.org/rfc/rfc1035.txt?number=1035]. WKS records are optional, and are not in very common usage, nor is it supported by all domain name servers.
Responsible Person
Here you define the person who is responsible for a given host or domain. The Name field is for the host name or the domain name, ending in a period if an absolute name. You can also enter the email address for the responsible person. The Text Record field can contain the name of a previously configured Text record. For example, if I were maintaining a domain and wanted people to be able to locate me in the event of a problem, I could create a text record named joe containing my cell phone number. Then for each host and subzone I manage, I could create a Responsible Person record that contains not only my email address, but also refers to the joe Text record. This option creates an RP record.
| Tip | When entering an email address in the Responsible Person section, Webmin will automatically convert it to the dot-separated format required by BIND. You should enter email addresses in their real world form, i.e., joe@swelltech.com. |
Location
The Location record is a rather new and experimental record type that allows one to include precise (on a global scale, anyway) information about each host and network in your zone. The location is defined in latitude, longitude, and altitude. The current Webmin version does not distinguish the separate parts of this information, so you must enter it yourself in the correct format. RFC 1876 [http://www.ietf.org/rfc/rfc1876.txt?number=1876] provides a more complete description of the Location record. One good resource to help you understand and use the LOC record, provided by one of the co-creators of the LOC specification, is DNS LOC: Geo-enabling the Domain Name System [http://www.ckdhr.com/dns-loc/]. There you can find links to sites that will provide the coordinates for your location for free. There is also a link to AirNav, which will provide altitude information for public landing sites (airports) in your area. This isn’t as precise as a GPS system, but it’s better than nothing and a lot more information than most DNS servers are configured to provide.
Edit Records File
This option merely provides a simple text editor window that contains the complete db file for your zone. This allows you to edit it manually; however, this is not recommended unless you are familiar with the BIND configuration file grammar as it is not checked by Webmin for correctness.
Creating a Slave or Stub Zone
Slave and Stub zones are created in exactly the same way, and are quite similar in some ways though their purposes are very different (Figure 8-10). Slave zones keep a complete copy in memory, and sometimes also on disk, of a zone that it receives via a zone transfer from a master zone. A slave zone can answer any queries for a zone, and as long as network connectivity remains intact between the master and slave and the servers are configured correctly, it will stay in sync with the master server. A stub zone also syncs to a master server; however it only keeps NS and SOA record information from the master server. This allows BIND to keep up with delegation information automatically.
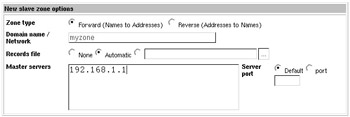
Figure 8-10: Creating a Slave Zone
Creating a slave is extremely simple. The only information required is the domain name or the network (as was used in the master zone earlier), and the addresses of one or more master name servers. As with master zones, you configure both a forward and reverse zone type for each zone. This server can then be used by clients just as the master zone is used. In fact, whether it is a slave or master is entirely transparent to the user.
Creating a Forward Zone
A forward zone is simpler still. It’s only possible configuration options are whether it is a forward (name to address) or reverse (address to name) zone type, the name or network of the domain, and the master servers to forward requests to. A forward zone is just specific instructions for BIND that it should forward requests for a specific zone to one or more specific name servers. BIND does not perform zone transfers with a forward zone, as it does in the case of slave and stub zones.
EAN: 2147483647
Pages: 142