Site Administration
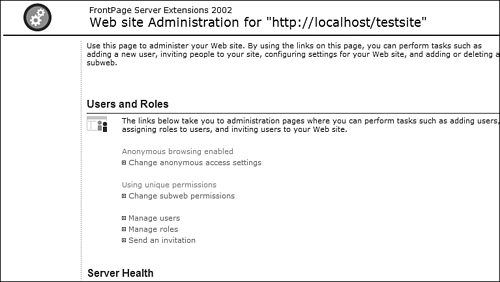
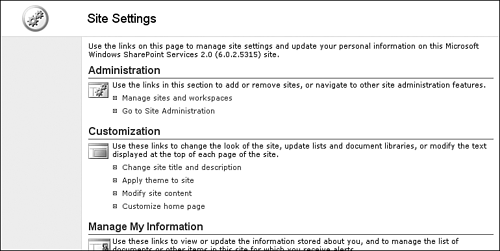
| Site administration is for configuration of one particular Web site. Using site administration, you can configure what users have access to your Web site and specify the type of information logged about who is visiting your Web site, what pages they are viewing, and so on. To administer the security of a FrontPage Web site, you use the Microsoft SharePoint Administrator (see Figure 17.7) if you are using the FrontPage 2002 Server Extensions or the SharePoint Central Administration (see Figure 17.8) if you are using Windows SharePoint Services. Both are located in Administrative Tools, but you can also access them by opening the Web site in FrontPage and then selecting Tools, Server, Administration Home after opening the Web site in FrontPage. Figure 17.7. Site Administration for a FrontPage Server Extensions 2002 Web site.
Figure 17.8. Site Settings for a Windows SharePoint Services Web site.
When using a FrontPage Server Extensions 2002 Web site, setting up permissions for your Web site changes the file and folder permissions on the operating system itself according to predefined roles. When using a Windows SharePoint Services site, all the content is stored in a Microsoft SQL Server database, so the usual rules don't apply. In this section, we will cover only the permissions for a FrontPage Server Extensions 2002 Web site.
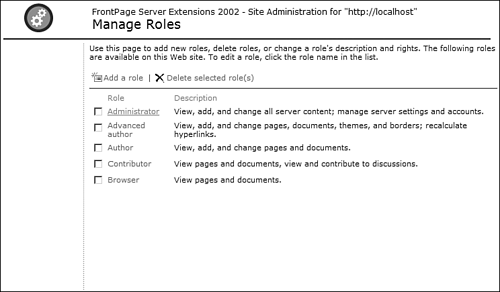
Roles and Rights An OverviewFive built-in roles are available to you on a FrontPage Server Extensions Web site. A role is a FrontPage group that has certain rights to a Web site. These rights can range from being able to simply browse the site to being able to administer and change permissions on the Web site. The roles that are provided by default and their default rights are as follows:
TIP A server administrator can configure the FrontPage Server Extensions so that they don't use roles to implement security. When roles are turned off, the Server Extensions will only allow the Browser, Author, and Administrator roles. NOTE For more information on Windows users and groups and Windows administration, read Windows 2000 User Management from Que Publishing. The twelve rights that can be granted to members of a particular role are as follows:
NOTE For more information on FrontPage Server Extensions, see the SharePoint Team Services Administrator's Guide available at http://fpserk.frontpagelink.com. A user can be a member of more than one role and her rights are cumulative. You can very easily change the default rights assigned to a role, as you will see later, and you can also create your own roles and change the list of rights that are available for users of your Web site. All of this will be discussed in detail as you progress through the chapter. Creating Users and RolesTo access the Site Administration page open your root Web site in FrontPage (that is, http://localhost) and select Tools, Server, Administration Home. You should now see the Site Administration page as shown previously in Figure 17.7.
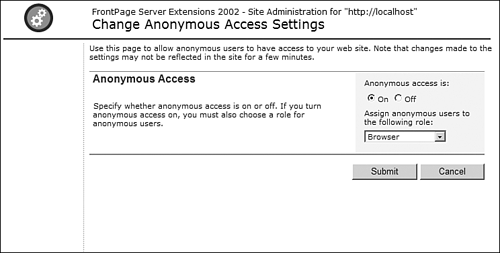
Changing Anonymous AccessThe first link in Users and Roles is the Change Anonymous Access Settings link. (If this is not your first link, make sure that you opened the root Web site and not a subsite.) Most Web sites allow for anonymous browsing, which means that you don't have to enter a username and password in order to browse the Web site. You can change whether your Web site allows anonymous access using the Change Anonymous Access Settings link. Click the Change Anonymous Access Settings link to display the Change Anonymous Access Settings page as seen in Figure 17.9. From here, you can choose whether anonymous browsing is enabled and what role is used for anonymous browsers. In almost all cases, you will want to use the Browser role for anonymous browsing because it gives the least amount of permissions to people. If you turn off anonymous access, your site will not be accessible unless users are authenticated either by entering a valid username and password, or by having a valid user credential passed automatically from a Windows login. Figure 17.9. The Change Anonymous Access Settings page allows you to prevent unauthorized users from browsing your site.
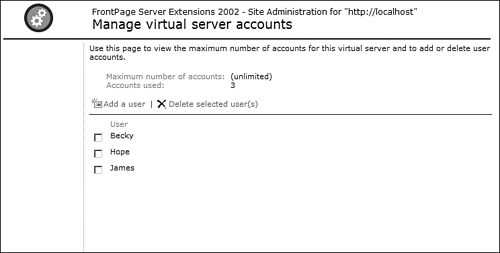
NOTE If you want to create a Web site where people can sign up for access and receive a password, using Web site permissions is not your best option. Instead, you can use ASP or ASP.NET to authenticate users against a database. Doing so will require skills in ASP or ASP.NET. NOTE For more information on Anonymous access and other authentication methods of Internet Information Services, read Internet Information Services Administration from Que Publishing. Adding and Deleting AccountsThe next link is the Click Here to Add or Delete Accounts link, along with an informational message indicating how many accounts you've created and how many are allowed. (If this is not your second link, make sure that you opened the root Web site and not a subsite.) By default, the FrontPage Server Extensions allow an unlimited number of user accounts, but the Web site can be configured so that the number of accounts for the site are limited to a specific number.
When you click the Click Here to Add or Delete Accounts link, you are taken to the Manage Virtual Server Accounts page (see Figure 17.10), where you can see the accounts that you have created, add new accounts, and delete existing accounts. Accounts added here are Windows accounts that can then be added to roles so that they can access your Web site. Figure 17.10. Creating new accounts for access to your site is done on the Manage Virtual Server Accounts page.
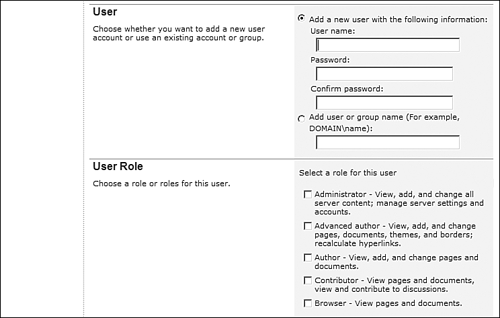
Managing UsersThe next link in Users and Roles is Manage Users. Using this link, you can add new users to your Web site or make existing users a member of a role. FrontPage grants access by checking the user's group membership in Windows. The FrontPage Server Extensions create Windows groups on the Web server to manage access to the Web site. Each group maps directly to a particular role. The groups for the default roles are as follows:
The number (#) signs in each group are replaced with a unique number for the site. The FrontPage Server Extensions create a group for each Web site with unique permissions on the Web server. However, the group is only created once a user is assigned to that role. If all members of a particular role are removed, the group representing that role is not deleted. It is maintained so that it can be used if a user is added to the role at a later date. NOTE A server administrator can configure the Server Extensions so that machine groups are not created to implement security. In those cases, the Server Extensions will set each user's permissions individually. To assign a user to a particular role
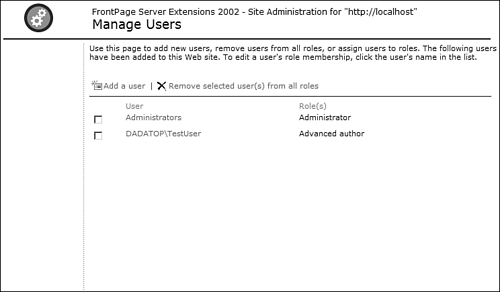
Your new user should now appear in the Manage Users page as shown in Figure 17.12. In this example, the account appears as DADATOP\TestUser. DADATOP is the name of the machine or domain, and TestUser is the name of the user. Figure 17.12. The TestUser user has been added to the Advanced Author role.
Managing RolesThe Site Administration page also provides access to manage the roles in your Web site. Using the Manage Roles page, you can select which rights are available to a particular role. To add or remove rights from a particular role
FrontPage stores your role configuration inside a file called roles.ini, which is located in C:\Documents and Settings\All Users\Application Data\Microsoft\Web Server Extensions\50\W3SVC1 on the Web server. The roles.ini file is used to reapply permissions when you run the Server Health function and choose to tighten security. Therefore, if you manually alter any permissions in your FrontPage content area, the Server Extensions will change them back to what they were prior to your modifications as soon as you check server health.
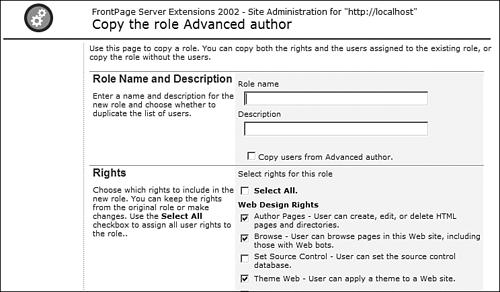
CAUTION Don't ever try to manually edit the roles.ini file. If you do, you can prevent your Web site from working correctly. NOTE If you're an ASP.NET developer, don't ever allow FrontPage to tighten security on your Web content. Doing so will remove the Windows account used to run ASP.NET from the permissions and will prevent your ASP.NET files from running. To remove one or more roles, place a check in the box next to the roles you want to delete and then click the Delete Selected Role(s) link. You can also create new roles by either copying and modifying an existing role, or creating a new role from scratch. Suppose that you want to give certain people only Author access to your Web site, but you also want them to have the ability to create new sites. In that case, you can create a new role that will have all the same rights as the Author role, but will also have the right to create new sites. After you've created the role, anyone you assign to it will have the same rights as someone in the Author role, but they will have the additional right of being able to create new sites. To copy an existing role, click the name of the role and then click the Copy Role button. You will be taken to the page>>Copy the Role <Role> page (see Figure 17.14), where a copy of the role is displayed and ready for editing. Enter a new role name and a description before creating your new role. If you want the users of the existing role to be copied to the new role, check the Copy Users from <Role> check box prior to creating the new role. Figure 17.14. Copying roles makes creating new roles based on existing roles easy.
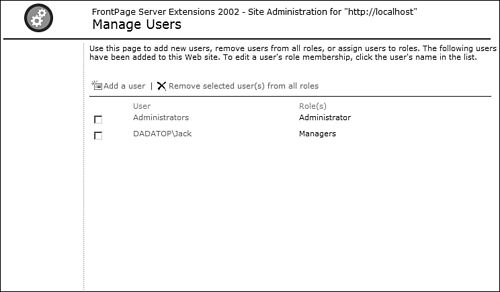
If you choose to create a new role from scratch, click the Add a Role link on the Manage Roles page. Enter a name and description for your new role and select the rights you want to assign to the role. If you select a right that requires another right, the required right will be selected automatically. Once you have created your new role, you can assign users to that role using the Manage Users link, as seen in Figure 17.15. Figure 17.15. Jack is being added to the Managers role a new role that was just created.
NOTE When you add a new role, the Server Extensions create a new group in Windows for that new role. Sending InvitationsThe final link in the Users and Roles section of Site Administration is the Send an Invitation link. Using this link, you can send a personalized invitation to anyone to whom you have given access to your site. The process is a three-step wizard.
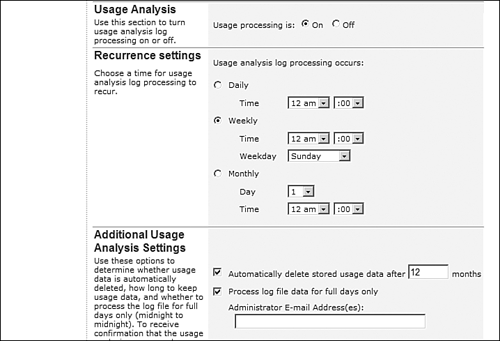
The Server Extensions will send an email out to your invitees with the URL to your site, the customized greeting you entered, and a brief description of their access level. If you get an error telling you that you must set up email before sending an invitation, see "Unable to Send Invitations" in the "Troubleshooting" section of this chapter. Configuring Usage Analysis SettingsThe next section in Site Administration is the Configure Usage Analysis Settings section. This section is used to configure the usage analysis for the Web site. Usage analysis provides you with details on how many hits a Web site has gotten, what browsers are being used to access it, the most popular page in the site, and so on. By checking the Process Log File Data for Full Days Only check box, you can ensure that you are getting accurate data based on full days of hit analysis. As seen in Figure 17.16, you can configure usage analysis to run daily, weekly, or monthly. You can also configure the Server Extensions so that they delete old usage analysis data after a specific amount of time. The default is 12 months. Figure 17.16. Usage Analysis data is collected at regular intervals according to the schedule you set.
TIP Usage analysis data can end up using substantial disk space, so you will want to keep a close eye on how much space is being used by your data and make a determination as to how long you want to keep it before it's deleted. The usage analysis settings also allow you to configure an email address that will receive a confirmation email as soon as usage analysis data has been successfully collected.
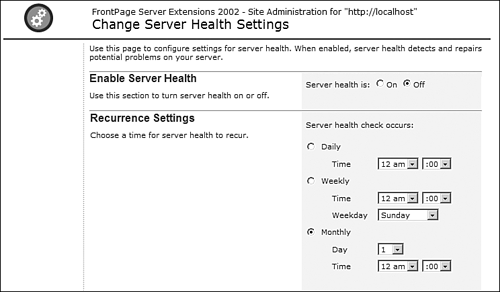
Managing Server HealthThe Server Health section of Site Administration provides access to all the functions you need to keep your site running at full speed. The first item in this section is a label that indicates whether Server Health is on. This setting refers to the scheduling of the Check Server Health function. NOTE You don't have to schedule the Check Server Health function to run at regular intervals. However, if you have other FrontPage users editing content on your Web server, it's not a bad idea. For example, if someone were to use FTP to upload content to a Server Extensions site, forms and other Server Extensions components might be broken. By running a regular Check Server Health function, you can head off problems caused by poor authoring practices. Click the Change Server Health Settings link to access the Change Server Health Settings page as seen in Figure 17.17. From here, you can turn Server Health on and then configure how often it runs. Unfortunately, there isn't an option to email an administrator if an uncorrectable error is encountered, but a regular check of server health is beneficial to head off such problems before they start. Figure 17.17. The Change Server Health Settings page helps keep your Web site running at top efficiency.
What Happens When You Check Server HealthIf you click the Check Server Health link, you can see just what is checked and repaired when the Check Server Health function is run.
Recalculating the Web SiteThe last item in the Server Health section is the Recalculate the Web item. This item performs the same function as the Recalculate Hyperlinks function in FrontPage. To many FrontPage users, this function is a mystery. The Recalculate the Web function performs a whole series of checks against the Web site and corrects many possible problems. It checks the .cnf files for the Web site to make sure that there aren't any configuration problems, and it reconnects all FrontPage forms and browse-time Web components to the Server Extensions. If one or more of your FrontPage components is displaying the component name inside of square brackets (that is, [FrontPage Save Results Component]), a good first troubleshooting step is to Recalculate the Web site. That will often correct the problem. Configuring Version ControlThe Configure Version Control link takes you to the Configure Version Control page, where you can configure the source control system for your Web site. A source control system provides developers with the ability to check out files and to maintain a database of previous versions so that they can roll back to a previous version if they need to. FrontPage has a built-in source control system that is a fairly lightweight solution and not really a good choice for a serious developer's shop. For a more robust solution, Server Extensions will also integrate with Microsoft Visual SourceSafe (VSS). If VSS is available and configured correctly, the Configure Version Control page will have the option to use an external source control system. That external system is VSS.
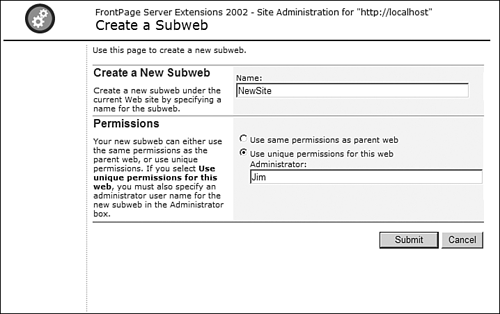
Managing Subsites The Subwebs SectionThe Subwebs section of Site Administration provides you with the tools necessary to create new subsites, merge subsites (convert a subsite into a folder), and delete subsites. You can also access the Site Administration page of any of your subsites by clicking on the subsite name. TIP Beginning with FrontPage 2003, Microsoft refers to Web sites created under the root Web site as subsites. Because Microsoft is no longer releasing new versions of the Server Extensions, the terminology inside the Server Extensions dialog boxes has not changed, which can be confusing. Just remember that subwebs and subsites are the same thing. To create a new subsite, click the Create a Subweb link to display the Create a Subweb page, as seen in Figure 17.18. Enter the name for the new subsite and select whether the new subsite should inherit the permissions from its parent or use unique permissions. If you choose the option to use unique permissions, you must also specify the username for an Administrator for the new subsite. Figure 17.18. The Create a Subweb page provides the tools necessary to create new FrontPage subsites.
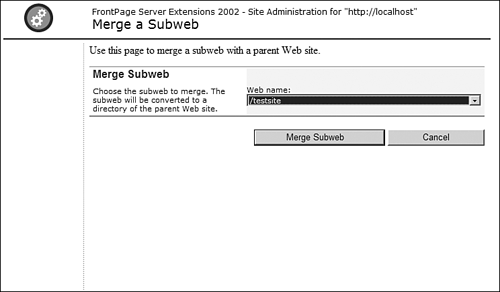
NOTE FrontPage users will find it more convenient to create new subsites inside FrontPage itself. The Subwebs Section of Site Administration is typically used by server administrators who do not have access to a copy of FrontPage. To convert an existing subsite into a folder, click the Merge a Subweb link to display the Merge a Subweb page as seen in Figure 17.19. Select the subsite from the Web Name dropdown and click the Merge Subweb button to convert it to a folder. Figure 17.19. The Merge a Subweb page converts a subsite to a regular folder.
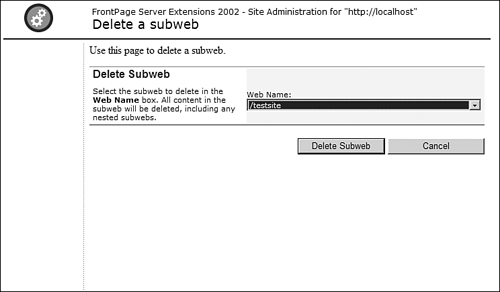
To delete a subsite, click the Delete a Subweb link to display the Delete a Subweb page as shown in Figure 17.20. Select the subsite from the Web Name dropdown and then click the Delete Subweb button. The subsite and any child subsites will be permanently deleted. Remember, there is no Recycle Bin in FrontPage, so once you delete the subsite, there is no way to retrieve it. Figure 17.20. Delete a subsite from the Delete a Subweb page.
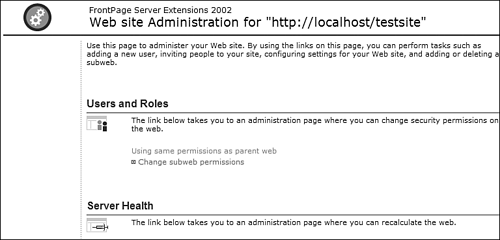
The Subwebs section also contains a list of all subsites of the current Web site. By clicking the name of the subsite, you are taken to the Site Administration page for that subsite. As shown in Figure 17.21, the Site Administration page for a subsite does not contain all the same options available to you on the root Web site's Site Administration page. Instead, you have the following tools available on a subsite's Site Administration page:
Figure 17.21. The Site Administration page for a subsite contains fewer options than the root Web's Site Administration page.
|
EAN: 2147483647
Pages: 443
 For details on how to open the Web site in FrontPage,