Section 9.2. Using the Glossaries
9.2. Using the GlossariesOnce you've created your glossary, it's time to start adding words and definitions. Even if you want to have a student-built glossary, it's a good idea to seed it with a couple of definitions so students have a model to work from. The main view of the glossary can be a bit confusing at first, as you can see from Figure 9-2. Under the main Moodle navigation bar, you'll find the glossary name. Directly below the name, you'll see the glossary description. Almost lost beneath the description, you'll see the search bar. If you select the full-text option, you and your students can use this to search for glossary terms or definitions. Figure 9-2. Main glossary page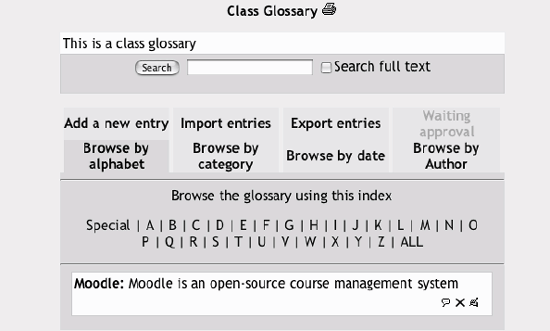 9.2.1. Adding EntriesBelow the search bar are eight tabs detailing the glossary functions:
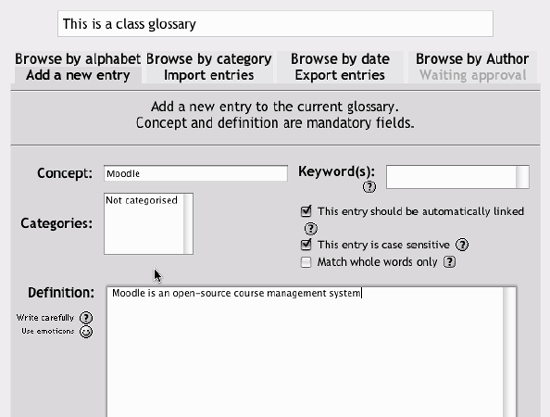
Once you've oriented yourself to the page, you can add an entry to the glossary. To add a glossary entry:
9.2.2. Glossary CategoriesYou can create categories to help organize your glossary entries. If you've enabled autolinking, the category names can be linked along with individual entries. To create a glossary category:
If you autolink the category name, any occurrence of those words will be linked. When a student clicks on the link, she will be taken to the "Browse by category" page of the glossary. 9.2.3. AutolinkingOnce you've added an entry to the glossary and enabled autolinking, any instance of a glossary term anywhere in Moodle will have a link to its definition. For example, if you create an entry for the word "Moodle" in the glossary, whenever someone uses the word in a forum, assignment, HTML , or text page, or even in a description field, it will be clickable, as shown in Figure 9-4. Figure 9-4. An autolinked word in a forum Once you click on the word, a new window with the glossary entry will pop-up. 9.2.4. Importing and Exporting GlossariesAs you build your glossaries, you may want to share them between classes or with other instructors. Fortunately, there's a way to export and import specific glossaries without needing to share the entire course structure. Exporting your glossary is easy. When you click the "Export entries" tab, the system automatically generates a file you can save to your computer. At the bottom of the export entries screen, you'll see a link labeled "Exported file" (see Figure 9-5). You'll need to right-click or Control-click on the link and save the file to your desktop. Otherwise, your browser may display the raw XML file, which isn't a pretty sight at all. Figure 9-5. Export glossary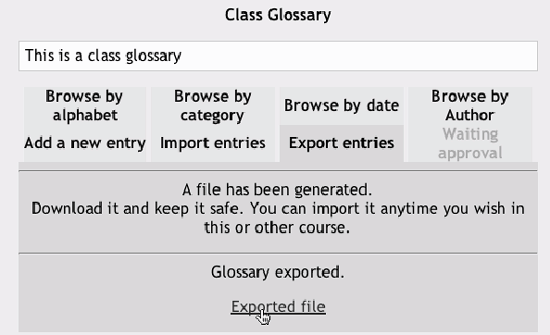 Once you've saved the file to your desktop, you can import it using the "Import entries" tab. To import glossary definitions into your class:
9.2.5. Commenting on EntriesIf you enabled comments on the glossary entries, users can annotate the definitions in the word list. When you look at a word in the glossary list, you'll see a little cartoon speech balloon in the lower righthand corner of the definition block, as shown in Figure 9-6. Figure 9-6. Glossary comment link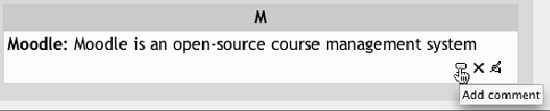 When you click on the balloon, you'll be taken to the comment entry page. From here, you can add a comment to the definition and then click Save Changes. Once you've saved your comment, Moodle will display all of the comments for the term. When you return to the main glossary page, you'll see a new message next to the speech balloon telling you how many comments there are for the entry. 9.2.6. Printing a GlossaryThere is also an easy tool for printing a glossary. At the top of the glossary list, you'll see a little printer icon. If you click the icon, Moodle will open a new browser window and present all the words and definitions in a printer-friendly format. To print the glossary:
|
EAN: 2147483647
Pages: 113