Section 9.1. Creating Glossaries
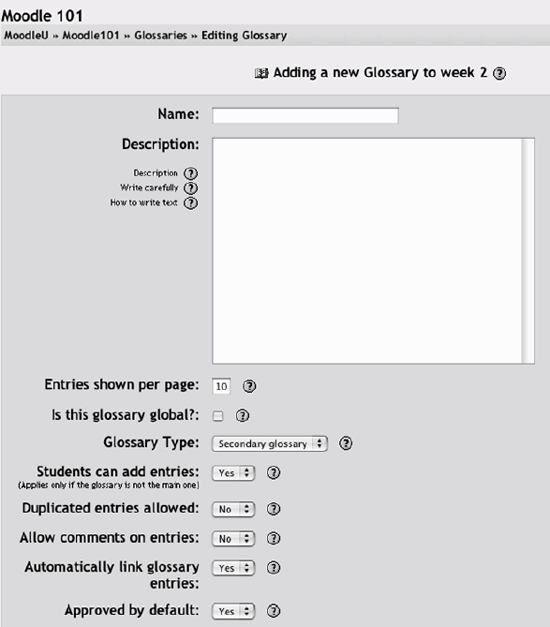

9.1. Creating Glossaries

Each Moodle course has its own set of glossaries. The main glossary is editable only by teachers. The secondary glossaries can be configured to allow student entries and comments.

You can create the link to your glossaries anywhere in your course sections. I recommend adding the main glossary to the general section at the top of your course section list. Secondary glossaries can be added to the topic or week where they are relevant, or in a general glossaries section.

To create a glossary:

  1. Click Turn Editing Mode On.

  2. Select Glossary from the Add Activity menu in the appropriate topic or week section.

  3. In the Editing Glossary page, shown in Figure 9-1, give your new glossary a descriptive name.

  4. Write a description of the glossary and give directions to your students in the Description area.

  5. Select the options you want to use:


    Entries shown per page

    This sets the number of words and definitions your students will see when they view the glossary list.


    Is this glossary global?

    System administrators can make a global glossary accessible to all courses.


    Glossary Type

    You have two options here. The main glossary is editable only by teachers, and you can have only one per course. A secondary glossary can be imported into the main, and you can have multiple secondary glossaries.


    Students can add entries

    This applies only to secondary glossaries. This option gives students the ability to add and edit glossary entries.


    Duplicated entries allowed

    This allows the entry of more than one definition for a given word.


    Allow comments on entries

    Students and teachers can leave comments on glossary definitions. The comments are available through a link at the bottom of the definition.


    Automatically link glossary entries

    Moodle has a text-filter feature that automatically creates a link from a word in the course to its glossary definition. Linked words are highlighted.

    Figure 9-1. New glossary page


    Approved by default

    If students are allowed to add entries, you can allow entries to be automatically approved and added to the glossary, or they can require your approval.


    Display format

    You can select how the glossary appears when students list the entries. There are a number of different choices:


    Show 'Special' link

    When users browse the glossary, they can select the first character of a word from a list. The Special link displays special characters such as @, #, $, etc.


    Show alphabet

    You can use this option to display the alphabet for easier glossary browsing.


    Show 'All' link

    If you want students to see all of the glossary entries at once, set this to Yes.


    Allow entries to be rated

    You can grade entries yourself or allow students to grade entries as well. Select "Only teachers" or "Everyone" from the users menu. Then select a grading scale. You can also restrict when entries can be graded to a specific date range.

  6. Click Save Changes at the bottom of the screen. Your glossary name will now appear in the course section menu.

There are a lot of options to choose from in the glossary setup. They open up some interesting possibilities that we'll explore later in the chapter. For now, let's take a look at how to add glossary entries and use some of the more advanced features.


Warning: The automatic link feature will work only if your system administrator has enabled it in the Filters configuration area of the Administration panel. Autolinking can be very processor-intensive, so if it doesn't seem to be working for you, your sys admin may have turned it off to speed up the system.


Using Moodle
Using Moodle: Teaching with the Popular Open Source Course Management System
ISBN: 059652918X
EAN: 2147483647
Year: 2004
Pages: 113

flylib.com © 2008-2017.
If you may any questions please contact us: flylib@qtcs.net