Section 3.3. Managing and Updating Your Content
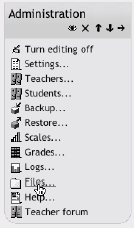
3.3. Managing and Updating Your ContentUploading content is only half the battle of content management in Moodle. You'll need to ensure your uploaded content is current, and you'll occasionally want to replace or delete files. Fortunately, Moodle has some useful features to help you manage your content once it's on the server. 3.3.1. File Area ToolsOnce you've uploaded your files, they are stored in the Files area. When you create a link to a file, you store the file in the Files area and create a link for your students to access it. To access the Files area, click the Files link in the Administration block, as shown in Figure 3-10. Figure 3-10. Files link in the Administration area Each uploaded file and file folder has a checkbox beside it. You can select one or more files and then move or archive them using the tools in the dropdown menu on the lower-left side of the file list. By default, it reads "With chosen files...." If you click on the menu, you'll see three things you can do with your chosen files:
Figure 3-11. Zip file options 3.3.2. Tracking VersionsOne of the biggest challenges you will face in keeping your content organized is dealing with versioning. As the semester progresses, you may have multiple versions of your syllabus which reflect changes to the calendar. Or you may have multiple versions of a presentation that has evolved over the years. There are a couple of strategies you can use to track versions and ensure that your students are accessing the correct version. The easiest way is to develop a naming scheme for your files. While many people will attach a version number, I recommend using a date stamp. A date stamp lets people know just how recent the version is, and you don't have to track the current version number. To add a date stamp, simply add the date you saved the version to the end of the filename name. For example, the first version of a syllabus for your fall course may be called Syllabus_8_30.rtf. Later in the semester, you may post a revised version named Syllabus_9_21.rtf. Date versioning helps you keep track of the version on the server and the latest version on your computer. There are also a number of tools in Moodle to help you deal with versioning. I recommend creating a folder in your course to archive older versions of documents. To create an archive folder:
Later, you can use the File tools to move old versions of a file into the archives area, which will enable you to keep a record of older versions while keeping only the latest version in the active area. |
EAN: 2147483647
Pages: 113