Color Separations and Ink Manager


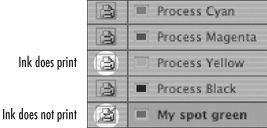
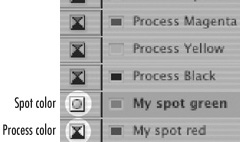
The Inks area of the Output category also lets you control how the inks are separated and printed.

To set the inks to be printed:

  • Click the printer icon next to the name of each color. Each click changes how the ink will print as follows :

    The printer icon next to an ink color indicates whether that ink will print or not.

    • If the icon is visible, the color will print.

    • If there is a slash through the icon, the color will not print.

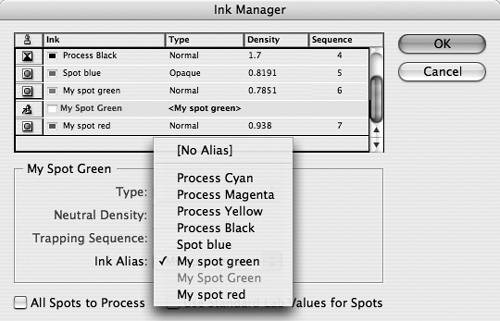
Sometimes you find yourself with a document that contains spot colors that should be process colors. The Ink Manager lets you convert the spot colors to process inks.

To convert spot colors to process:

1.

Open the Ink Manager by clicking the Ink Manager button in the Output area of the Print dialog box .

The Ink Manager dialog box gives you control over how inks are separated or printed.

Tip

You can also open the Ink Manager from the Swatches palette menu or the Separations Preview palette menu.

2.

Click the color icon next to the name of each color. Each click changes how the ink will print as follows :

Click the color icons in the Ink Manager to convert spot colors to process.

  • A CMYK symbol indicates that the color will separate as a process color.

  • A spot color symbol indicates that the color will separate on its own plate.

3.

Click the All Spots to Process option to convert all spot colors to process.

4.

If desired, check Use Standard Lab Values for Spots. This converts the spot colors to process using their built-in Lab color values.

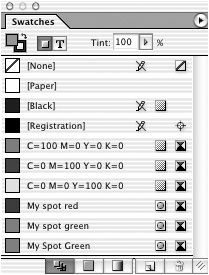
When you import artwork that contains spot colors, those spot colors are added to the document and the Swatches palette. There are no problems if the imported colors are named exactly the same as existing colors. But if the name of the imported color differs from the color you have defined, you can wind up with two separate color plates instead of one . Thankfully, InDesign lets you map one color to be an alias of another.

An example of how names typed in different cases can create too many spot colors in a document.

To map one color to be the alias of another:

1.

Select the color you want to change in the Ink Manager.

2.

Use the Ink Alias menu to choose a different color to map to the selected one . The color is listed in the Ink Manager as mapped to the other color .

Use the Ink Alias menu to have one color map to a different one.

An example of how one color is used as the alias for another.

Tip

You can map the selected color to a spot or process color.

Tip

Colors that are mapped to another color are not listed in the Inks area of the Output category. They are also not listed in the Separations Preview palette.


InDesign CS2 for Macintosh and Windows(c) Visual QuickStart Guide
InDesign CS4 for Macintosh and Windows: Visual QuickStart Guide
ISBN: 0321573579
EAN: 2147483647
Year: 2006
Pages: 309
Authors: Sandee Cohen

flylib.com © 2008-2017.
If you may any questions please contact us: flylib@qtcs.net