Printing in the CS2 Applications
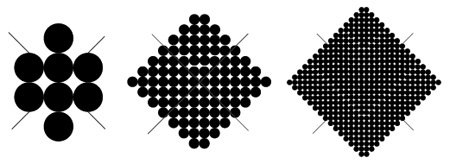
| After you have used the preflighting features in the Adobe Creative Suite 2 applications, the second part of the road to getting good print output is to choose the correct print settings. Sometimes, you'll do this yourself when you print a file to the printer in your workplace. Other times, you'll pass on your file to a print service provider. We'll talk about both of these options in this section. (The topic of color management, including how to use the Color Management Print feature, is covered in Chapter 10, "Colors and Color Management.") Printing BasicsYou have several choices for how to output your computer-created file to paper. Before learning about these choices, you need to understand some essential concepts: the difference between halftone and continuous tone output; between a PostScript and non-PostScript printer; and between composite and separated output. Halftones and Continuous ToneSome printing devices work in a binary way: When they image, they produce either black or white, on or off. This is true when you're printing to a laser printer, inkjet printer, high-resolution imagesetter or platesetter, or to a printing press. For example, on a printing press, there's no such thing as continuously varying amounts of ink: There's either ink, or no ink on paper. These binary devices usually combine the grid of printer dots with which they image into larger "spots" called halftone dots. Laser printers work with larger printer pixels, and imagesetters and platesetters work with smaller printer pixels; thus, laser printers have coarser halftone dots (Figure 16-20, left) than do high-resolution printing devices (Figure 16-20, middle and right). We discuss printer and halftone resolution in "Pixel Essentials" in Chapter 4, "Pixels and Raster File Formats." Halftone devices use patterns of halftone spots (called screens) that fool the eye into seeing them as continuous tones when they're really not. (Inkjet printers don't use halftone dots, but use small, diffuse spots that can appear continuous.) Figure 16-20. Laser printers (left) have larger, coarser printer pixels; imagesetters and platesetters (middle and right) have smaller, finer printer pixels. Each creates halftone spots that simulate shades of gray or color. Continuous-tone printers, on the other hand, really can vary the color or gray value of each printer (or monitor) pixel. Examples of continuous-tone devices include your computer's monitor and film recorders, which work with beams of electrons or light; and dye-sublimation printers, which can vary the amount of ink to build a color when printing. PostScript and Non-PostScript PrintersPostScript printers include a PostScript RIP (raster image processor) that can interpret commands in the PostScript language. (We explain more about PostScript in "Working with PostScript and PDF Files" in Chapter 14, "Creating and Using PDF Files.") PostScript printers are designed to output high-resolution placed images reliably, and to render fonts accurately at the printer's resolutionand thus are optimized for typical InDesign and Illustrator output. Color PostScript printers (including imagesetters and platesetters) use CMYK as their native color space. Non-PostScript printers are optimized more for printing raster images than type or vector graphics. The inkjet printers that now flood the printer market use RGB as their native color space. Still, the CS2 applicationsespecially InDesign, which can even rasterize placed EPS filesgenerally do a good job outputting to inkjet printers,. When a non-PostScript printer is selected, some InDesign and Illustrator Print commands are grayed outfor example, printing separations. In some cases, you may get better results from a non-PostScript printer by exporting a PDF file and printing from Acrobat 7.0 Professional. Composite and Separated OutputThe third issue when printing from the CS2 applications is whether the output is composite or color-separated. Continuous-tone printers, inkjet printers, and color laser printers produce composite output, where all the colors are applied together to produce a single image on paper. Other workflows that produce composite output include creating PDF files (which we discuss in Chapter 14, "Creating and Using PDF Files,") and outputting to some high-end workflow systems that take composite color data and use their own methods to output color separations. Color-separated output refers to using an application like InDesign, Illustrator, or Acrobat to produce color separationsone for each color plate. These separations are output as separate files for a platesetter (which produces plates for a printing press) or an imagesetter (which uses film as an intermediate step before producing plates). To produce color-separated output, either place pre-separated CMYK images in your InDesign and Illustrator layouts, or place RGB images and use the CS2 color-management features to convert them to CMYK. Printing from InDesignWhether you're outputting halftone or continuous-tone documents, or composite or color-separated plates, InDesign is the premiere application for printing to either PostScript or non-PostScript devices because of its wide range of options. To set printing options in InDesign, choose File > Print or press Command/Ctrl-P. The Print dialog box opens, displaying the General panel (Figure 16-21). The numerous controls are arranged on eight panels. Figure 16-21. General panel of the InDesign Print dialog box on the Macintosh. Printer- and driver-specific options differ somewhat in Windows.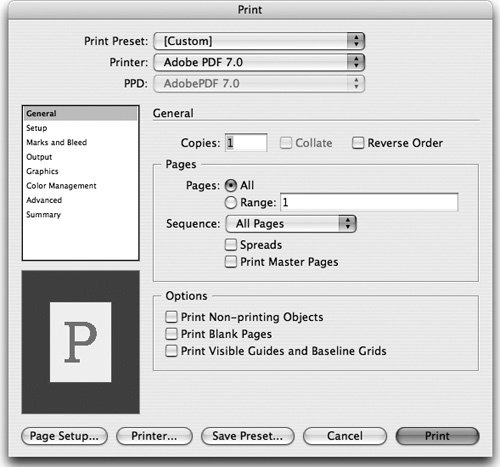 Tip: Move Through the Print Panels The quick way to move through the many print panels in InDesign is with the keyboard: Down Arrow moves to the next panel, and Up Arrow moves to the previous panel. Many printing controls (especially on the Output, Graphics, Color Management, and Advanced panels) are available only when a PostScript printer is selected. Setting Common Printing ControlsSome of the printer controls can be viewed from all the printer panels. These include setting the printer and PostScript Printer Description (PPD) file, creating a PostScript file, setting printer-specific controls, and previewing output. Here are the common controls:
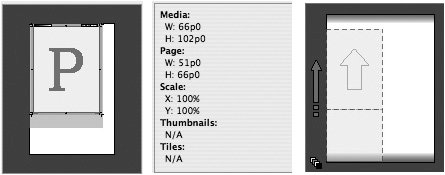
To preview the printer settings, use the interactive preview proxy in the lower left corner of the Print dialog box. For example, the preview will update if you change the page size or orientation, or add printer's marks (Figure 16-22). Click the preview proxy to toggle it between three views: Initially, the standard view shows the relationship between the print settings and the current media (paper) size. Click the proxy, and it shows this information as text. Click again, and it displays cut sheet view, showing the relationship between the selected media size and the film or plate material used by the printing device. For an imagesetter or platesetter, this reflects the position of the media size on the film or plate material, including Offset, Gap, and Transverse settings. A small icon also indicates the color mode of the output. Figure 16-22. Clicking the Preview Proxy in the Print dialog box toggles between standard view (left), text view (middle), and cut sheet view (right). Icon at lower left of cut sheet view shows output color mode. Setting General InDesign Print OptionsThe General panel contains the most commonly used commands for printing. Following are the most common options you can set up:
Setting Paper SizeUse the Setup panel (Figure 16-23) in the Print dialog box to set paper size. Figure 16-23. Setup panel of the InDesign Print dialog box. You have three choices for paper size, depending on your Printer menu selection:
High-resolution platesetters and imagesetters can output pages of any size that can fit onto their roll-fed media. Thus, their PPDs allow creating custom paper sizes. Choose Custom from the Paper Size menu, and enter any Width or Height value you wish that fits on the paper. However, there's a much easier and smarter way! Use the InDesign default "Auto" for both Width and Height; InDesign then automatically calculates the minimum paper size needed to output the current page with all marks and bleeds. (You can also choose Custom when you choose Adobe PDF 7.0 as your printer.) Scaling Pages and Printing ThumbnailsThe Setup panel in the Print dialog box allows scaling and positioning pages, printing thumbnails, and tiling documents. Set page scaling from 1% to 1000%. Usually you would scale printing proportionally; however, unchecking Constrain Proportions can be useful for a specialized printing process like flexography. (Flexography is used to print on irregular surfaces such as pressure-sensitive label paper, plastic films, and packaging.) You can also choose Scale To Fit, and options for page positioning. You can print several scaled-down pages called thumbnails on a single sheet of paper by turning on the Thumbnails option. You can also tile the documentprint an oversize page in sections on a smaller media size. Adding Printer's Marks and BleedUse the Marks And Bleed panel (Figure 16-24) of the Print dialog box to specify which printer's marks should appear around the printed page, as well as how big the bleed area should be. InDesign lets you individually choose which printer's marks are included, as well as their weight and offset values. Customize your bleed settings in this panel, or define them in File > Document Setup to use those values in this panel. You can also choose to print a slug area, usually used for approval forms or instructions to a printer Figure 16-24. Marks and Bleed panel of the InDesign Print dialog box.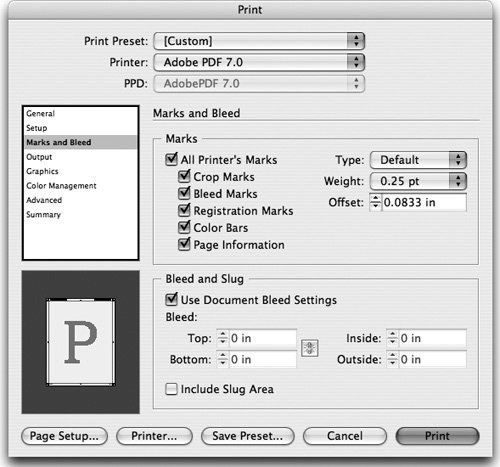 Setting Output OptionsDetermine how color in the document is sent to the printer using the Output panel in the Print dialog box. This panel contains some of the more complex InDesign printing controls, most of which are available only when a PostScript printer is chosen (Figure 16-25). Figure 16-25. Output panel of the InDesign Print dialog box showing Composite CMYK selected (left) and Separations selected (right).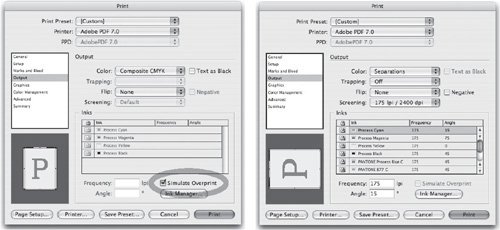 Consider the kind of output you are expecting from your printer. Are you producing a composite color proof, a grayscale print, or do you want each color in the document to be printed on a separate printing plate? Choose the following options from the Color menu:
When you choose Separations or In-RIP Separations (Figure 16-25, right), you have several other choices available:
Choose from these additional options in the Output panel:
InDesign Ink ManagerThe Ink Manager lets you control which color plates are produced when you print color separations. You may have applied many colors in your InDesign document (and imported more colors in placed graphics). If the colors are (perhaps accidentally) spot colors, many more plates may output than you expected. To display the Ink Manager dialog box, in the Output panel of the Print dialog box, click the Ink Manager button (Figure 16-26). (You can also access the Ink Manager from the InDesign Swatches and Separation Preview palette menus.) The Ink Manager lets you choose whether an individual spot color prints on its own plate or is converted to a process color. To convert all spot colors, check All Spots To Process. To convert an individual ink, click the column to the left of the ink name. Figure 16-26. The Ink Manager lets you change the inks output from a file without changing the file itself.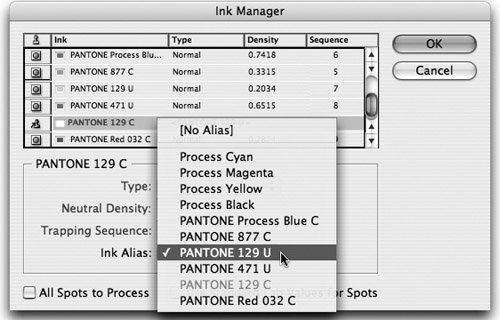 Even more powerfully, you can use the Ink Manager to alias one spot color to another. An all-too-familiar scenario for an output provider is that the client has applied two or more different names for the same spot color. If not corrected, these will output on separate plates. Figure 16-26 shows two versions of PANTONE 129 in the ink listone ending with "C," the other with "U." (These stand for the Pantone Coated and Uncoated libraries, respectively.) To alias one to the other, the PANTONE 129 C was selected and PANTONE 129 U was chosen from the Ink Alias menu. This changes the output of the inks without having to manually edit the file to fix the problem! Controlling Graphics OutputUse the Graphics panel of the Print dialog box to control how graphics are output. The Send Data menu in the Images section determines how the data in linked graphics is sent to the printer:
Downloading FontsYou can choose how fonts are sent to the printer using the Graphics panel of the Print dialog box:
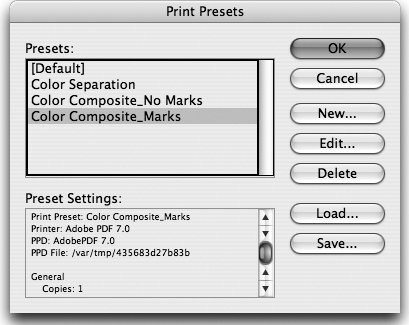
The Download PPD Fonts checkbox forces all the document's fonts to download, even if the PPD says they reside in the printer. Controlling Transparent OutputUse the Advanced panel (Figure 16-27) of the Print dialog box to choose the Transparency Flattener preset described in the preceding section, "Flattener Presets." Here also you can choose to ignore any custom Spread Overrides for transparency flattening set in the InDesign Pages palette. Figure 16-27. Advanced Panel of the InDesign Print dialog box.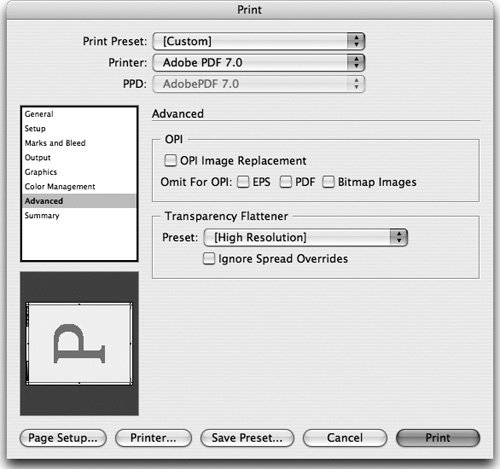 Summarizing SettingsThe Summary Panel of the Print dialog box displays a report of the settings you've made in all the panels of the Print dialog box. The option to save this summary may be useful for troubleshooting, or as a record of the settings used if you need to output the file again. Creating Print PresetsAs we have described in other parts of this book, all of the CS2 applications can save common settingscalled presetsthat can be called up quickly. Print presets make it easy to reduce errors in a high-production, time-constrained environment. InDesign lets you create print presets that save almost all of the choices you make in the InDesign Print dialog box. We find it easiest to create print presets in the Print dialog box. Open the Print dialog box for a typical print. Make all the choices necessary in each of the panels, and then click the Save Preset button at the bottom of the dialog box. The preset name will now appear in the Print Preset menu at the top of the dialog box. That's all there is to it. If you have a lot of different devices that you print to, you may prefer to choose File > Print Presets > Define. This displays the Print Presets dialog box (Figure 16-28), which lists the Default preset (the settings which appear by default in the Print dialog box) as well as any other print presets you've created. Click the New button to create a new preset. Select a preset, and click the Edit button to edit a preset; click the Delete button to delete a preset. You can also use the Load and Save buttons to exchange print presets between workstations. Figure 16-28. InDesign Print Presets dialog box. Printing from IllustratorIn the last two versions of Illustrator, the Print dialog box has been significantly improved: It has borrowed much of the look and many features from the superior printing interface in InDesign. To open the Illustrator Print dialog box, choose File > Print or press Command/Ctrl-P (Figure 16-29). Figure 16-29. General panel of Illustrator Print dialog box.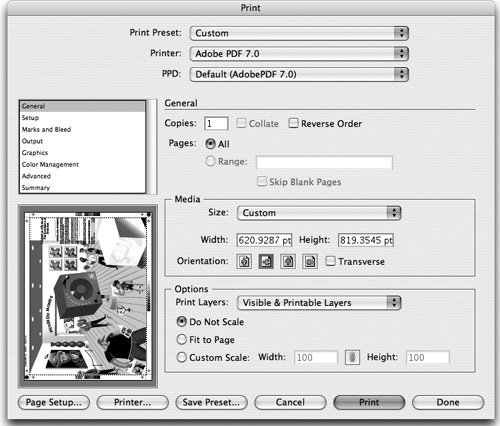 Comparing the Illustrator and InDesign Print InterfaceIllustrator print features no longer are a poor second cousin to InDesign. In earlier versions of Illustrator, many print controls were missing, and many people tended to place Illustrator files in page-layout applications like InDesign simply to print them. With the improvements to the Print dialog box, this shouldn't be necessary any more. The layout of the Illustrator Print dialog box is quite similar to that of InDesign. You can choose a name on the left to display a panel of choices. The most important settings are always visible as you make choices from the Print panels. Like InDesign, the Print Preset, Printer, and PPD menus are on top, and a preview of the current settings is on the bottom left. You can choose a printer or print to a PostScript file in exactly the same way as we described for InDesign in "Setting General InDesign Print Options." However, Illustrator doesn't replicate all the print features available in InDesign; for example, Illustrator has no Ink Manager option. Since so many features are the same, we'll focus mostly on the differences in the following sections. Setting General Illustrator Print OptionsUnlike InDesign (which uses the Setup panel), in Illustrator you choose Media Size and Orientation options on the General panel. You also have options to choose to print visible layers, visible and printable layers (when both the Show and Print options are selected in Layer Options on the Layers palette), or all layers. You can use scaling choices to fit oversized artwork onto a single sheet of media. Setting Print Bounding Box and Tiling OptionsUse the Setup panel to define the Illustrator printing bounding box. Also use this panel to set tiling options, including tile overlap. Setting Flatness Values for CurvesUse the Graphics panel (Figure 16-30) of the Print dialog box to set the Flatness option and control how closely an output device will approximate curves. A lower setting (toward Quality) creates more, smaller straight line segments, more closely approximating the curve. A higher setting (toward Speed) results in longer and fewer line segments, producing a less accurate curve but a faster print time. The Automatic option chooses an appropriate flatness value based on the printer PPD. Figure 16-30. Graphics panel of the Illustrator Print dialog box.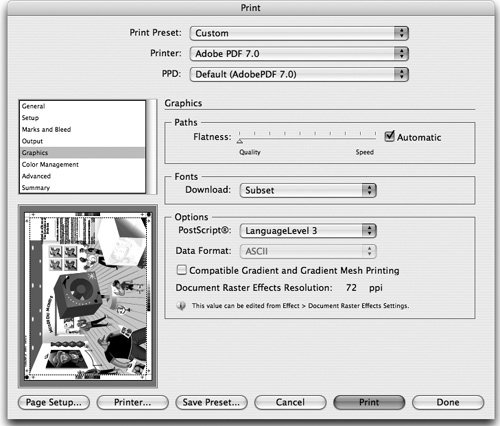 Controlling OverprintingTo control overprinting in Illustrator, use the Advanced panel of the Print dialog box. You can choose between Preserve (which retains overprinting, and is the default for separations), Simulate (which works similarly to the Simulate Overprint feature described in the sidebar "Transparency and the White Box Effect"), or Discard (which discards any Overprint Fill or Overprint Stroke attributes). Choosing a Transparency Flattener PresetUse the Advanced panel of the Illustrator Print dialog box to choose a Transparency Flattener preset. Summarizing SettingsIllustrator Summary panel features are very similar to those in InDesign, with the addition of some useful printing warnings, such as when transparency needs to be flattened or the Document Raster Effects setting is at screen resolution (which we discuss in the "Applying Filters and Effects" section of Chapter 4, "Pixels and Raster File Formats"). Print PresetsPrint presets can be created in Illustrator, in an almost identical way to InDesign, by clicking Save Preset in the Print dialog box. You can also control print presets by choosing Edit > Print Presets to open the Print Presets dialog box. Printing from PhotoshopIn days past, it was rare to print directly out of Photoshop. Images were inevitably placed into a page-layout application for printing. But with the proliferation of inkjet printers throughout the graphics industry, this has certainly changed. Printing choices in Photoshop are much simpler than those of InDesign and Illustrator. Using the Print With Preview CommandThe Print With Preview dialog box is always our choice when we need to print directly from Photoshop (Figure 16-31). It provides some nice options for printing an image that go beyond the capabilities of the operating system's Print dialog box. Figure 16-31. Print With Preview dialog box in Photoshop.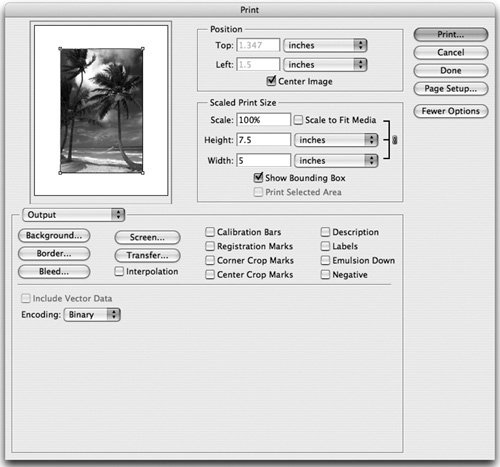 The controls at the top of the dialog box are always available, and they let you position and scale your image on the available paper size. (Click the Page Setup button to choose a paper size from the operating system dialog box.) In the Scaled Print Size section, you can enter a scaling percentage or set Height and Width values. You can also choose the Scale To Fit Media option. For the most control when scaling an image, make choices here rather than in the operating system's Page Setup dialog box. You can even print a selected area. In your image, use the Rectangular Marquee tool to select an area. When you enter the Print With Preview dialog box, the Print Selected Area option is available. Choosing Output OptionsTo access Output options available in Photoshop, click the More Options button in the Print With Preview dialog box to display the bottom portion of the dialog box. There are two toggleable panels here: We'll discuss a few of the Output options (the other panel is Color Management, which we discuss in Chapter 10, "Colors and Color Management"):
Working with a Print Service ProviderYou work with a print service provider when you need output from printing devices that you don't have in your own workgroup or organization. Usually this is to produce high-resolution output in preparation for commercial printing. Sometimes the relationship between creative professionals and their print service providers is not the best. This can result from differing experiences and expectations: A creative professional may have worked with a print service provider who used obsolete RIPs and software, or whose knowledge was out of date. A print service provider may have received files that were poorly prepared, with missing fonts and graphics, or transparency features that seemed impossible to print. The intention of the first part of this chapter was to provide enough knowledge in how to pre-flight your files to make them ready to print. Here we'll talk about the other side of the equation: Making sure that the print service provider is ready to handle your files in a reasonable manner so that you'll get the output you expect. Warning Signs When Working with a Print Service ProviderNot all print service providers follow an up-to-date workflow. Out of choice or financial constraints, some providers hold back on upgrading their RIPs or purchasing software, thus jeopardizing the quality of their service and their success at outputting files. Files created in InDesigna truly modern page-layout applicationare particularly impacted when processed in an outmoded workflow. Here are some warning signs that print service providers may not be up to snuff:
Finding a Print Service ProviderSometimes you don't have a choice over who will do your printing. In that case, look for the warning signs we just mentioned, and ask lots of questions of those who will print your file. Sometimes a print service provider simply needs to be educated: The provider may have had bad experiences printing directly-exported PDF files from InDesign, for example, because earlier versions of InDesign encoded fonts in a way that caused errors on their RIPs. This problem is now solved, as we discuss in the sidebar "Good News About Embedded Fonts and Older Raster Image Processors," in Chapter 14, "Creating and Using PDF Files." You might refer them to Adobe service provider programs, described later in the section. Other times, it may cause less aggravation if you look for a print service provider who is more prepared to handle your CS2 files. Adobe offers a service called the Adobe Partner Finder for creative professionals who are looking for printers that support Adobe software (Figure 16-32). You can search for print service providers in your area who are ready to handle CS2 files. Printers can register to be listed in the online searchable database for free. To use the Partner Finder, go to www.adobe.com/sp-partnerfinder. Figure 16-32. Adobe Partner Finder service for finding a print service provider who handles CS2 files.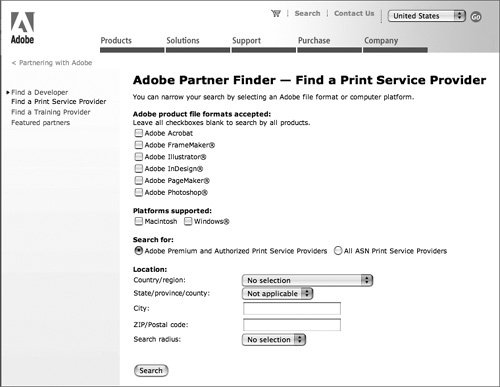 Adobe Service Provider ProgramTo make it easier for your print service provider to get up to speed on the knowledge they need to output your CS2 files, and to make sure they have the latest software, Adobe has established the Adobe Solutions Network (ASN) Print Service Provider Program. It now offers three levels of service provider support:
Print service providers can learn more about these programs by going to http://partners.adobe.com and clicking on the Print Service Providers link. Advice for Print Service ProvidersAnd for all you print service providers reading along out there, some friendly advice from the trenches:
|
EAN: 2147483647
Pages: 192