| Test Objective Covered: Install and test NCS on a two-node cluster.
It's time for action! After you have designed your cluster architecture via a Fiber or SCSI Channel and set up and configured your SAN, it's time to install and test NCS on all your cluster nodes. The process of installing Novell Cluster Services involves four steps: NCS System Requirements Before installing NCS, your system must meet a minimum set of hardware, software, and shared disk system requirements. In summary, all your nodes must be running NetWare 6, NCS 1.6, and support at least one local disk device for volume SYS. In addition, the shared disk system must have at least 10MB of free disk space available for the SBD partition. NCS Installation The NCS installation program uses NetWare Deployment Manager. NWDEPLOY.EXE creates a cluster object in eDirectory and installs NCS 1.6 on all the servers in your cluster. Fortunately, NetWare 6 includes the NCS 1.6 software and licensing for a two-node cluster. NCS Configuration After you have created a new cluster and installed NCS 1.6, it's time for configuration. You will use ConsoleOne or NetWare Remote Manager to configure these four cluster objects: Cluster Admin, the Cluster object itself, Master IP Address Resource, and each cluster server node. NCS Testing and Monitoring Finally, with all the cluster nodes installed and configured correctly, you can shift your attention to NCS testing and monitoring. We will use ConsoleOne and/or NetWare Remote Manager to monitor a variety of cluster status views. In addition, NetWare 6 provides several server console commands for viewing the cluster status and managing your new cluster.
So, without any further ado, let's put all this great new cluster knowledge to the test and install Novell Cluster Services. Step 1: NCS System Requirements In Step 1 of NCS installation, you must gather all of your clustering hardware/software and build the basic system architecture. To achieve NetWare 6 high availability with NCS, your cluster hardware must meet the following minimum system requirements: Two (or more) NetWare 6 servers; NCS 1.6 supports up to 32 servers in a single cluster. At least 256MB of memory on all servers in the cluster (512MB is recommended for multiple application failover to the same server). One local disk device (not shared) for SYS: on each server. A Network Interface Card (NIC) in each server and appropriate cabling for LAN communications. An FC or SCSI adapter card in each server and appropriate cabling for SAN communications. If you are using a SCSI configuration, the external SCSI hard drive and each SCSI adapter card must have a unique SCSI ID.
In addition to the hardware requirements mentioned above, you must make sure that all your NCS nodes are running the following minimum software components: NetWare 6 must be running on each node in the cluster. In addition, all cluster servers must be in the same eDirectory tree. All servers in the cluster must be configured for IP and on the same IP subnet. Unfortunately, NCS is not IPX compatible. Additional IP addresses are required for the following cluster components: one for the cluster itself, one (or more) for each cluster resource, and one (or more) for each cluster-enabled volume. The IP address assigned to each cluster resource is a secondary IP address that NCS uses to find and migrate the resource from one node to another in the cluster.
In addition to minimum hardware and software requirements, NCS installation depends on the correct configuration of your shared disk system. The minimum requirements for your shared disk are At least 10MB of free disk space must be available on the shared disk for creating the SBD partition. NCS installation allocates one cylinder on one drive of the shares for this special cluster partition. If the drive where the cluster partition is to be created is larger than 10GB, you might need more than 10MB of free disk space to allocate an entire cylinder. The shared disk system must be recognized by all NetWare servers in your cluster. Prior to installation, verify this by entering LIST DEVICES on each server you will add to the cluster. If any drives in the shared disk system do not show up in the list, you cannot continue with NCS installation until the problem has been remedied. The disks contained in the shared disk system must be configured in a RAID 1 (mirroring) or RAID 5 configuration to add fault tolerance.
After your NCS system has been built according to these specifications, it's time to create a cluster. Now let's continue with Step 2: NCS Installation. TIP If the disks in your shared disk system are not configured for RAID 1 (mirroring) or RAID 5, a single disk error can cause a volume failure. Remember that NCS does not protect against such faults. NCS is a high-availability solution for protecting against server crashes, not shared disk crashes. This is why you should always employ extra care in building fault tolerance around your shared disk system.
Step 2: NCS Installation Now it's time to create our new NCS cluster. As you know, NCS 1.6 is integrated with NetWare 6. Once you have installed NetWare 6 on all your cluster nodes, you can cluster them together using the NCS installation program. This program, via NetWare Deployment Manager, creates a cluster object in eDirectory and installs NCS 1.6 on all servers in your cluster. In addition, the NCS installation program allows you to add servers to your cluster later or upgrade NCS software from a previous version. To install NCS 1.6 and create a new cluster, perform the following steps: Insert the NetWare 6 CD-ROM in a NetWare workstation and allow NetWare Deployment Manager to launch. (You can also access this tool by running NWDEPLOY.EXE from the Root of the CD-ROM.) Next, open the Post-Installation Tasks folder and select Install or Upgrade a Novell Cluster by double-clicking it. See Figure 7.6 for more information. Then when the Welcome screen appears, click Next to continue. Figure 7.6. Installing a Novell cluster in NetWare Deployment Manager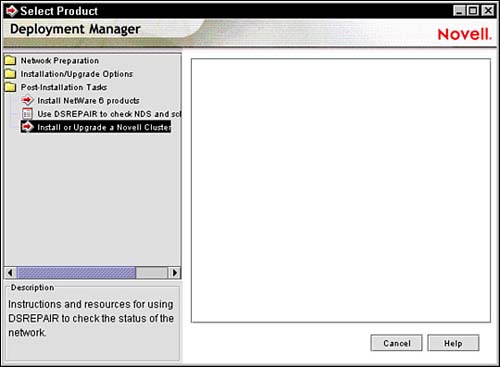
The NCS Action screen will appear, as shown in Figure 7.7. This screen allows you to choose one of three paths for NCS installation: create a new cluster, add a node to an existing cluster, or upgrade NCS software in an existing cluster. In addition, the Skip the File Copy option is useful if NCS files have already been copied to cluster nodes and you want to save time. For example, the NetWare 6 installation program already copies all NCS files to every NetWare 6 server. And because you have already installed NetWare 6 on all the nodes, you do not need to copy the NCS files again. To create a new cluster, select the Create New Cluster radio button and click Next. Figure 7.7. NCS Action screen in NetWare Deployment Manager.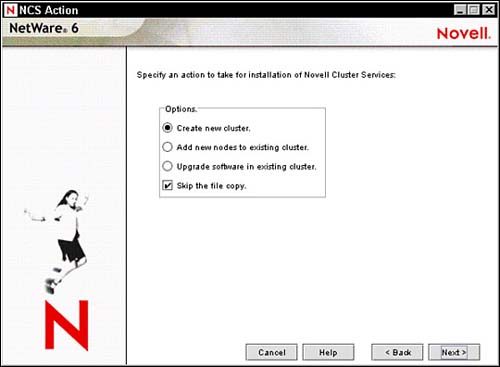
The NCS Cluster Selection screen will appear, as shown in Figure 7.8. Enter the name for the cluster object you are creating and specify the eDirectory tree and context where you want it created. Remember that eDirectory uses the cluster object to track configuration settings for nodes and cluster resources. Typically, you should identify the host container object within the cluster name. In our example, we are using WHITE_Cluster. Click Next to continue. Figure 7.8. NCS Cluster Selection screen in NetWare Deployment Manager.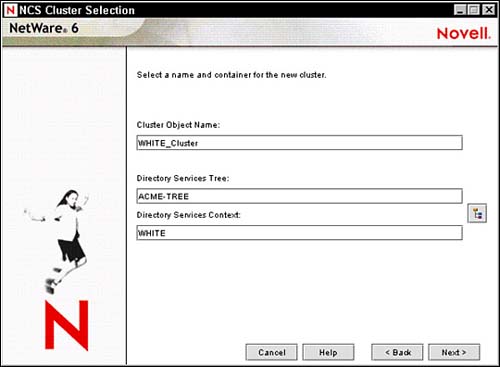
The NCS Cluster Node Modification screen will appear, as shown in Figure 7.9. In this form, you will use the NetWare Server field to add nodes to your new cluster. First, select the Browse button on the right side of the field and find the server. Click Add to begin defining nodes for your new cluster. Notice that all the new cluster servers appear in the NetWare Servers in Cluster list. When you add a server to a new cluster, the NCS installation program detects the server name and IP address automatically. If your server has more than one IP address, you will be prompted to select the one you want to use. Finally, click Next to continue. Figure 7.9. NCS Cluster Node Modification screen in NetWare Deployment Manager.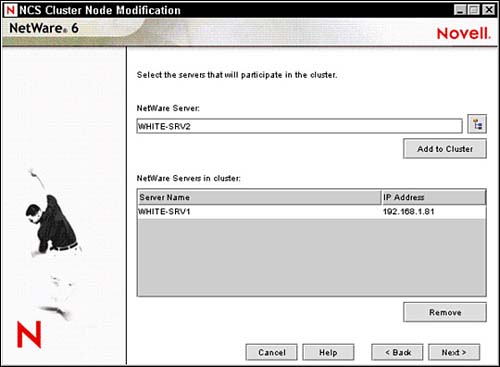
The Cluster IP Address Selection screen will appear, as shown in Figure 7.10. At this point, you must enter a unique IP address for the cluster. The cluster IP address is separate from any other IP address and is required for external programs to identify cluster status alerts. The cluster IP address is assigned to the Master node and remains with the Master node regardless of which server is assigned that special status. Once you have defined the cluster IP address, click Next to continue. Figure 7.10. Cluster IP Address Selection screen in NetWare Deployment Manager.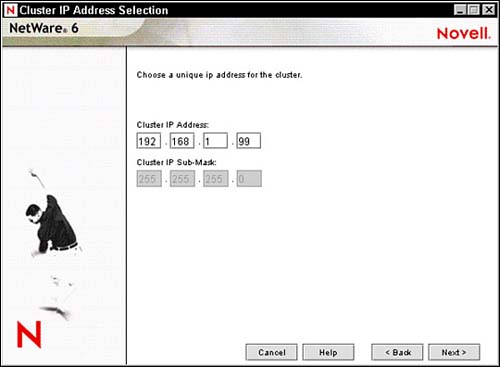
The NCS Shared Media Selection screen appears. In this screen, you specify whether your cluster has a shared disk system and, if it does, you select the drive where you want the special SBD partition created. You are also given the option of mirroring the partition for greater fault tolerance. When you are done, click Next to continue. The Start Clustering screen will appear, as shown in Figure 7.11. Now you can configure each node to start clustering automatically once installation is complete. Choose the Start Clustering radio button and click Next to continue. Figure 7.11. Starting clustering in NetWare Deployment Manager.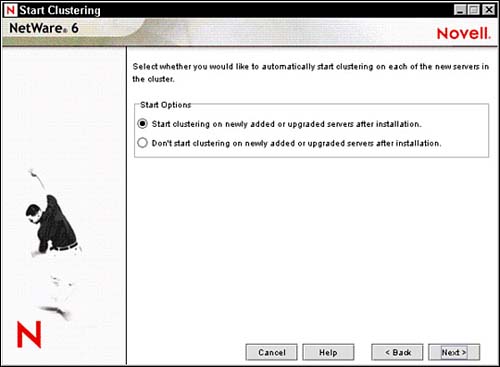
REAL WORLD If you choose not to start NCS software on each server after installation, you must manually load NCS and reboot the cluster servers to initiate NCS clustering. This is accomplished by entering the following command at the server console of each cluster server: LDNCS |
At this point in the installation, NetWare Deployment Manager may ask you for the location of the license files. This screen appears only if you are installing or creating a three-node or larger cluster. Because NetWare 6 includes a two-node cluster license by default, you will probably not see this screen. Additionally, you can install NCS without licenses and it will automatically activate two nodes. If you want to add more nodes later, you must manually install the licenses by using Novell iManager. Once the NCS installation program recognizes the license, the Summary screen will appear. Novell Cluster Services should be listed as the product to be installed. Begin the installation process by selecting Finish. The NCS installation program creates a cluster object in eDirectory and installs NCS 1.6 on all servers in your cluster. During installation several clustering NLMs are loaded on each server, including NISP.NLM, NCSPROXY.NLM, and SBDLIB.NLM. When installation is complete, the Cluster Membership Monitor is displayed on each server listing the node with an UP status.
Hooray! You have used NCS 1.6 to create a multinode cluster. Believe it or not, you're not done. Before you can claim that your network is highly available, you must configure your new NCS components and test them. Step 3: NCS Configuration When you install NCS 1.6, several cluster objects are created in eDirectory. During Step 3 of NCS installation, you must use ConsoleOne or NetWare Remote Manager to configure a variety of settings for each of these objects. Here is a preview of the three cluster objects we will be configuring in this section: Cluster Object The NCS Cluster object contains most of the critical properties for NCS operation. In addition, the Cluster object houses the Master IP address resource and cluster server nodes. This is the "Father" of NCS eDirectory integration. Master IP Address Resource Object The Master IP Address Resource object contains a variety of scripts and policies for node failover and failback. In addition, this object allows the cluster to advertise on the LAN as if it were a virtual server. Cluster Server Node Objects When you install NCS 1.6, a Cluster Server Node object is created for every server in your cluster. By using this object, you can view or edit the Cluster Server Node Number, IP address, and/or view the context of the host NetWare server.
In addition to these three paramount cluster objects, NCS creates an ADMIN object (such as ADMIN_WHITE-CLUSTER) for NCS configuration. This specialized ADMIN enables you to configure attributes, trustees, and rights for cluster objects. It also enables you to set policies and specific operational parameters. By default, the cluster ADMIN object is placed in the same eDirectory container as the Cluster object itself. Now let's take a closer look at NCS configuration by exploring the properties of the three Cluster objects listed above. Configuring the Cluster Object The Cluster object is the cornerstone of NCS and eDirectory integration. As such, it behaves as both a leaf and container object (check it out in Figure 7.12). As a leaf, the Cluster object includes five key properties for NCS operation. As a container, the Cluster object houses all of the cluster server node and cluster resource objects. Figure 7.12. The WHITE_Cluster object in eDirectory.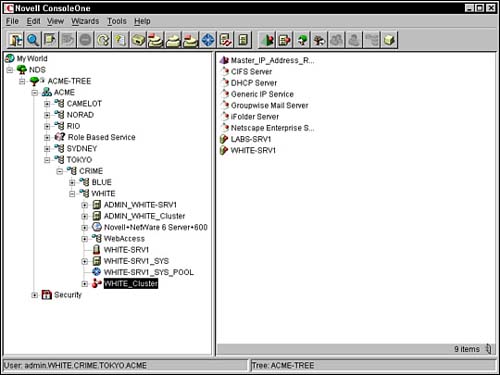
Following is a description of the five main configuration properties included in the NCS Cluster object: Timeout and Quorum Membership When you first start a cluster, NCS waits for a specific amount of time and for a specific number of nodes to join before it starts. The specific number of nodes is called a Quorum. You can configure the timeout and Quorum membership properties of a Cluster object by selecting the Quorum tab within the Properties option of ConsoleOne (see Figure 7.13). Quorum timeout is the amount of time NCS will wait for the number of servers to find in the Quorum Membership before the cluster starts. If the timeout period elapses before the Quorum Membership reaches its specified number, resources will begin running on the servers that are currently enabled in the cluster. Quorum Membership is a related property which defines the number of nodes that must be running in the cluster before resources start to load. You must set the Quorum Membership to a number greater than one so that all resources don't load on the first server brought up in the cluster. Figure 7.13. Configuring Timeout and Quorum Membership in ConsoleOne.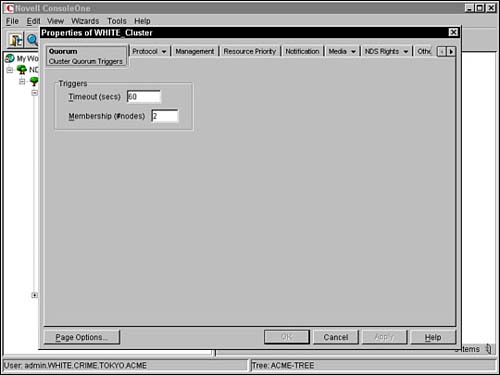
Cluster Protocol You can configure the Cluster Protocol properties of the Cluster object using the Protocol tab within the Properties Option of ConsoleOne. The resulting Cluster Protocol Settings form includes five parameters: Heartbeat defines the amount of time, in seconds, between LAN transmissions for all nodes. Tolerance defines the amount of time, in seconds, that the master node gives all other nodes in the cluster to signal that they are alive. Master Watchdog defines the amount of time, in seconds, between LAN transmissions from the master node to all other nodes in the cluster. Slave Watchdog defines the master node tolerance, in seconds, until all slave nodes in the cluster cast off the master. Max Retransmits defines the number of times the master node waits for a heartbeat from another node before casting it off from the cluster.
REAL WORLD You may want to increase the cluster protocol tolerance from its default value of eight seconds if there is significant traffic on the LAN and you want to ensure that the master node waits long enough before initiating the castoff process. On the other hand, you may want to decrease the cluster protocol tolerance value if you feel the master node is not responding quickly enough to meet the design specifications of the cluster. |
Cluster IP Address and Port You can configure the Cluster IP Address and Port properties of your Cluster object by using the Management tab within the Properties option of ConsoleOne. When you install NCS, you assign an IP address to the cluster. This address normally does not need to be changed, but it can be if necessary. In addition, the default Cluster Port Number is 7023. It is assigned when the cluster is created. You should only change the Cluster Port Number if there is a conflict with another resource on the server. Resource Priority You can configure the Resource Priority of a Cluster object using the Resource Priority tab within the Properties options of ConsoleOne. These settings control the order in which multiple resources start on a given node when failover or failback is initiated. The Resource Priority settings of your Cluster object are a critical component of the fan-out failover process. NCS 1.6 defines a default priority order for cluster resources based on preconfigured algorithms. Cluster E-mail Notification You can configure the Cluster e-mail notification properties of your Cluster object by using the Notification tab within the Properties option of ConsoleOne (refer to Figure 7.14). This feature enables you to keep yourself and other administrators informed when changes in a cluster status occur. You can enable or disable e-mail notification by using this form and you can specify up to eight administrator e-mail addresses for each Cluster object. In addition, the Notification tab allows you to select the type of cluster events you want administrators to receive, including: Receive Only Critical Events (only sends messages when nodes fail or resources are migrated), Verbose Messages (sends notification of all cluster state changes), and XML Messages (sends notification of all cluster state changes in XML format). Figure 7.14. Configuring Cluster e-mail notification in ConsoleOne.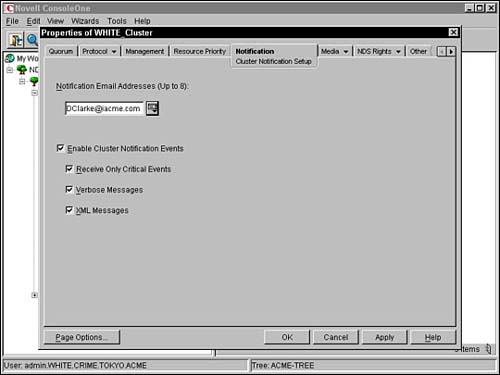
TIP In addition to Cluster IP Address resources and Server Node objects, the Cluster object contains cluster resource templates. These templates enable you to quickly create resources for a variety of services including DHCP, iFolder, and GroupWise.
Configuring the Master IP Address Resource Object The Master IP Address Resource object includes a number of configuration properties related to cluster scripts, failover and failback node settings, and critical cluster policies (refer to Figure 7.15). Figure 7.15. Configuring scripts for the Master IP Address Resource in ConsoleOne.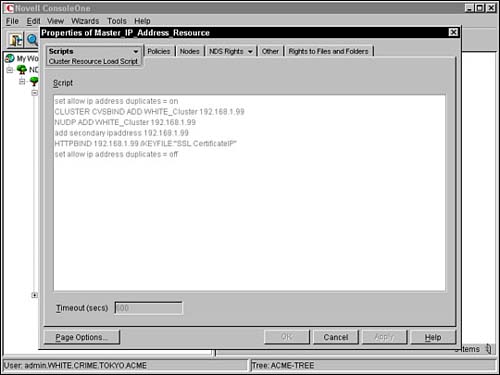
Even though the Master IP Address Resources object behaves just like any other Cluster object in eDirectory, it is special because the Master IP Address is automatically assigned to the master node. Therefore, many of the properties associated with this object in ConsoleOne can only be viewed, and not edited. Configuring Cluster Server Node Objects You can configure the properties of each Cluster Server Node object by using the Node tab within the Properties option of ConsoleOne. Each cluster node has a corresponding object in eDirectory with properties for the server node number, host IP address, and context information for the host NetWare server. That completes "Step 3: NCS Configuration." As you can see, most of your cluster configuration activities focus on the Cluster object itself. Once you properly configure this object in eDirectory, you're well on your way to a highly available network. Now, let's complete NCS installation with a quick test in step 4. Step 4: NCS Testing and Monitoring Before you can let users loose on your new highly available Novell cluster, you must test the new configuration. Fortunately, both ConsoleOne and NetWare Remote Manager provide special status screens for viewing cluster states. In addition, these Cluster Status Views allow you to migrate resources, check the events log, and print (or save) an HTML report. To display the Cluster State View screen in ConsoleOne, use the Cluster State View option under View (see Figure 7.16). At the top of the view, ConsoleOne displays the Cluster object name and Epoch Number. The Epoch Number indicates the number of times the cluster state has changed since it was created. In addition, an icon for each cluster server is displayed in the middle and all cluster resources are shown in a list at the bottom of the screen. Finally, gauges in the middle allow you to track the percentages of nodes and resources available. Figure 7.16. Cluster State View screen in ConsoleOne.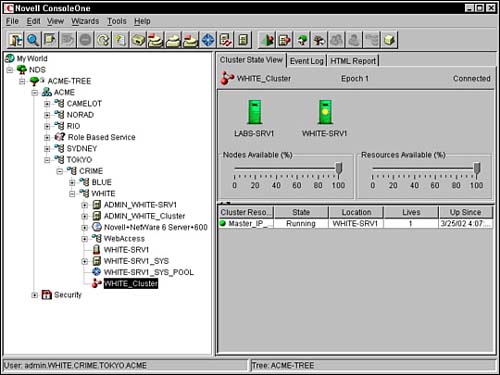
The cluster node and resource icons in Cluster State View display in different colors, depending on their operating state: Green When the icons are green, nodes and resources are in normal operating condition. Red When a node icon is red with a break in the icon, the node has failed. When a resource icon is red, the resource is waiting for administrator intervention. Gray When a node icon is gray with no break, it is not a member of the cluster (or its state is unknown). No Color (or Blank) When a resource icon is blank or has no color, it is unassigned, offline, changing state, or in the process of loading or unloading. Yellow The master node has a yellow ball in the middle of its icon.
TIP You can also test and monitor your new cluster via the Web by using NetWare Remote Manager. To get to the Cluster Status screen, simply click the Cluster Manager link within the Clustering section. The Cluster Status screen within NetWare Remote Manager operates almost identically to the Cluster State View screen in ConsoleOne.
In addition to colored icons, ConsoleOne provides a variety of resource states to help you monitor the health of your cluster resources. As you saw in Figure 7.16, the cluster state is displayed for each resource at the bottom of the view. Table 7.4 provides a detailed description of each state parameter offered in the Cluster State View of ConsoleOne. Table 7.4. Cluster States in the Cluster State View Screen of ConsoleOneCLUSTER STATE | DESCRIPTION | POSSIBLE ACTIONS |
|---|
Alert | Either the start, failover, or failback mode for the resource has been set to manual. This means the cluster resource is now waiting to start, failover, or failback on the specified server. | Select the Alert Status Indicator. Depending on the resource state, you are prompted to start, failover, or failback the resource. | Comatose | The resource is not running and requires administrator intervention. | Select Comatose Status Indicator and take the resource offline. Once the resource problems have been resolved, the resource can be returned to the Running state. | Unloading | The resource is unloading from the server it was running on. | Wait until the resource has been completely unloaded and reload it if necessary. | Running | The resource is in normal running operational mode. | Select the Running Status Indicator and choose to either migrate the resource to a different server or unload it. | Loading | The resource is loading on a host server. | Wait until the resource has been completely loaded and the current state switches to Running. Once the state is Running, you can choose either to migrate it or to unload it. | Unassigned | The resource has not been assigned to a valid cluster node and there isn't an assigned node available that the resource can be loaded on. | Select the Unassigned Status Indicator and, if desired, take the resource offline. This prevents it from running on any of its preferred nodes if they join the cluster. | NDS_Sync | The properties of the cluster resource have changed and they are being synchronized with eDirectory. | Allow the synchronization to complete before taking any further actions. | Offline | The resource has shut down or is in a dormant or inactive state. | Select the Offline Status Indicator and, if desired, click the Online button to load the resource on the best node possible. | Quorum Wait | The resource is waiting for a quorum to be established so it can begin loading. | Wait until a quorum of nodes is reached so the resources may automatically begin loading. |
In addition to the Cluster State View in ConsoleOne, you can use event logs and HTML reports to monitor the health of your new cluster. The Event Log tab displays a detailed history of your cluster sorted by time stamp. In addition, you can sort events by node, resource, or cluster event. Furthermore, you can reverse the sort order by pressing the Shift key while selecting a column heading. The Event Log is stored on the SBD cluster partition on the shared storage device which ensures that it is always available. In addition, you can select the HTML Report tab in ConsoleOne to display a more detailed report of the state of your cluster. You can save both the Event Log and HTML Report to a file for printing or viewing at a later date. Finally, NCS 1.6 supports a number of console commands for cluster testing, monitoring, and loading. Table 7.5 provides a detailed list of cluster-related console commands in NetWare 6. Table 7.5. NCS Testing and Monitoring at the Server ConsoleCONSOLE COMMAND | STATUS INFORMATION |
|---|
CLUSTER VIEW | This command displays the number of the current node (server), cluster Epoch Number, master node number, and a list of all nodes that are members of the cluster. | CLUSTER POOLS | This command lists all cluster pools and nodes assigned to each pool. | CLUSTER RESOURCES | This command lists all cluster resources and a status description of each, including the resource state, node assignment, and number of lives it has left. | CLUSTER STATS DISPLAY | This command lists the name of the host node, its node number, and heartbeat data. | CLUSTER STATS CLEAR | This command clears the status information from the screen. | CLUSTER STATUS {RESOURCE} | This command displays specific status information for the resource defined, including the resources assigned node, its current state, and the number of lives it has left. | SBD VIEW | This command displays status information for Split-Brain Detection, including heartbeat ID, node state, and the group Epoch Number stored in the SBD partition. | SBD VIEW ALL | This command displays specific information about all nodes in the SBD partition, including node state and Epoch Number. | LDNCS | This command loads NCS on a specific cluster node. | ULDNCS | This command unloads NCS on a specific cluster node. |
Congratulations! You have used NCS 1.6 to build a NetWare 6 high-availability solution. In this lesson, we learned how to install NCS 1.6 on a number of server nodes by using a simple four-step process. First, we built the hardware and software architecture with our eye with minimum hardware, software, and disk system requirements. In step 2, we created a cluster by installing NCS 1.6 on each server and adding a Cluster object to eDirectory. In step 3, we performed some NCS configuration tasks by using the new eDirectory objects. NCS configuration focused on three important tasks: configuring the Cluster object, configuring the Master IP Address Resource object, and configuring each of the Cluster Server Node objects. Finally, in step 4, we learned how to test and monitor the cluster state by using ConsoleOne, NetWare Remote Manager, and NCS-based console commands. Now let's complete our high-availability quest for five 9s by learning how to configure two network resource solutions: file access and services. |