| In the past, DNS was administered by building a large text database including all of a zone's resource records. This traditional master/slave approach had several disadvantages, the most significant being that all changes were made at the Master server (a single point of failure and performance bottleneck). Novell has solved many of these problems by integrating DNS into the eDirectory database. By shifting control away from the primary and secondary servers, Novell enables DNS changes to occur anywhere in the network through eDirectory. This removes the single point of DNS failure: the traditional Master server. Instead, zone data is stored within eDirectory and replicated just like any other data in the logical tree. To activate DNS Services on a Novell network, perform the following five configuration steps: -
Create a DNS Server Create a DNS server that can respond to DNS queries within a given DNS zone (primary or secondary). This is a separate logical entity from the standard NetWare Core Protocol (NCP) Server object and can be created within an Organization, Organizational Unit, Country, or Locality container. -
Configure a DNS Zone Configure a DNS Zone object to house all of the domain naming information contained within resource records. This is an eDirectory container that holds all the data for a single DNS zone. The DNS Zone object contains data that correlate to a variety of DNS-specific entities, including SOA, RRs, a list of all eDirectory-based servers that support the DNS zone, and associated server information. NOTE The hierarchy of DNS appears flat within the eDirectory tree. A Zone object and its children, for example, might display as peers within the eDirectory tree, even though they have a parent-child relationship in DNS.) Define Resource Records Define the RRs that will contain the actual IP naming data for a given DNS zone. These leaf objects are placed in RRSet containers automatically. DNS Resource Record Set objects contain all the resource records for a specific zone. The RRSet contains the following DNS information: DNS domain name, a DNS address class, and a TTL record. Finally, the DNS Resource Record object contains the record type and data of its host RR. Activate the DNS Server Activate the DNS server on the NetWare 6 console by typing NAMED. Configure DNS Workstations Configure distributed IP workstations so that they can resolve host names automatically using DNS.
TIP Carefully study the four DNS objects (DNS Server, DNS Zone, Resource Record, and Resource Record Set) and understand the purpose of each. Specifically, know that the DHCP Zone object contains Resource Record and Resource Record Set objects. Also, be aware that a DNS server can be a primary or secondary server.
In this section, we will be using iManager to accomplish these five DNS configuration steps. But first, we must establish a scope setting for this session so that iManager knows where to put the newly configured DNS objects. First, authenticate to iManager and select the Roles and Tasks icon in the Header frame. You are presented with four configuration links when you expand DNS Management in the Navigation frame (see Figure 4.14). Choose DNS/DHCP Scope Settings and input a context for the DNS/DHCP Locator and Administrative Scope (such as .WHITE.CRIME.TOKYO.ACME). Figure 4.14. Configuring DNS using iManager.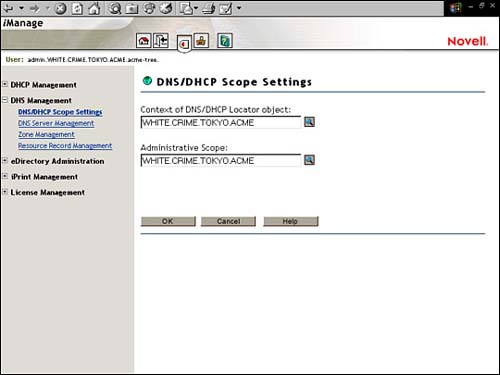
Create a DNS Server If you want a NetWare 6 server to obtain and update DNS data in the eDirectory tree, you must first create a corresponding DNS Server object. After you create the server, it can be designated to service primary or secondary zones. A designated server is a NetWare 6 server that is assigned to obtain and update DNS data from a DNS Zone object. Novell DNS Services supports two different types of designated DNS servers: Primary Designated Server If the DNS server services a primary zone, it performs the duties of a Master DNS server. As a result, the DNS server will be able to query eDirectory to resolve names into IP addresses, update the zone's serial number, and manage resource records. Secondary Designated Server If the DNS server services a secondary zone, it becomes a transition point between eDirectory and an external Primary name server. For example, you can improve name resolution performance by creating a DNS Zone object that acts as a secondary to an ISP's Master name server. You can also create a secondary designated server that receives zone transfers from the ISP Master name server and also places IP naming information in your eDirectory tree. These resource records would then be replicated throughout the network by eDirectory.
To create a DNS Server object, follow these instructions (see Figure 4.15): Authenticate to iManager, click on the Roles and Tasks icon, and expand DNS Management in the Navigation Frame. Select the DNS Server Management link. Make sure Create Server is selected, and then click OK. Click the Browse button to select a host NetWare Server object for DNS activity. In the NCP Server Name field, type a name for the new DNS Server object. The default DNS server name will be the same as the selected eDirectory Server object, except with the following prefix: DNS_. You can modify the name of the DNS Server object later. In the Domain Name field, type the name of the host domain for this DNS server. The domain may or may not already exist in your eDirectory tree. Click Create to complete the process.
Figure 4.15. Creating a DNS Server using iManager.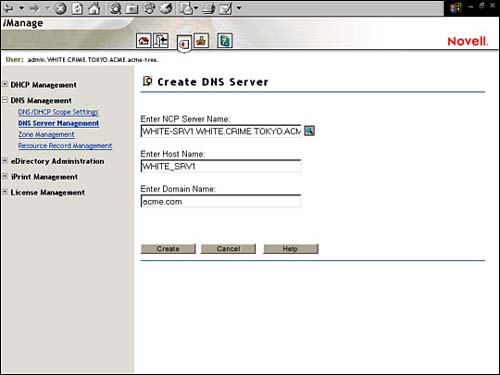
Configure a DNS Zone After you create a DNS Server object, you must assign it to a primary or secondary DNS zone. At that point, the server becomes a Primary or Secondary designated server. To create a DNS Zone object, click the Zone Management link in the Navigation frame of iManager. Next, make sure Create Zone is selected, and choose OK. After you do this, you'll be greeted with the Create Zone dialog box (as shown in Figure 4.16): Create New Zone At the top of the Create Zone dialog box, you'll be asked to choose from three different zone types: Standard, IN-ADDR.ARPA, or IP6.INT. Unless you have any special requirements, mark the Create New Zone radio button to define a Standard zone. (Note: You can only create one IP6.INT Zone object in a given eDirectory tree, so the Create IP6.INT box will only be displayed if an IP6.INT Zone object doesn't already exist. All IP Version 6 addresses must be grouped under this object.) Specify eDirectory Context Next, you must specify a valid eDirectory context for the DNS Zone object. This context should match the highest point in the zone's DNS Hierarchy. Enter Zone Domain Name This identifies the specific subdomain for your zone. This name will be used both inside and outside eDirectory for zone transfers. If you specify a secondary zone type, the domain name must match the name of the domain being replicated from the Primary name server. Select Zone Type All DNS Zone objects must be configured as either primary or secondary zones. By default, the Primary radio button is highlighted, and all DNS resource records are distributed through eDirectory. However, you also have the option of using an outside (non-eDirectory) Master server as your primary management point for DNS. If you retain the services of a non-eDirectory Master server, you must create a secondary DNS Zone object to interface with eDirectory. In this case, the Zone object name must follow the specifications put forth by the Master server. You will also need to provide the IP address of the Master server in the Create Zone window. This allows the Secondary Zone object to request updates from the non-eDirectory Master and to distribute them throughout the network. Enter Name Server IP Address A DNS server must be assigned to a Zone object during zone creation. It can either be an existing DNS Server object or one that will be created later. To assign a DNS server that is already defined in eDirectory, select it from the Assign Authoritative DNS Server list. If you haven't created a DNS Server object yet, provide the Host Name and Domain information in the fields provided. Then, when you create the designated DNS server, the Zone object will automatically find it. Finally, click Create to complete the process.
Figure 4.16. Creating a DNS Zone using iManager.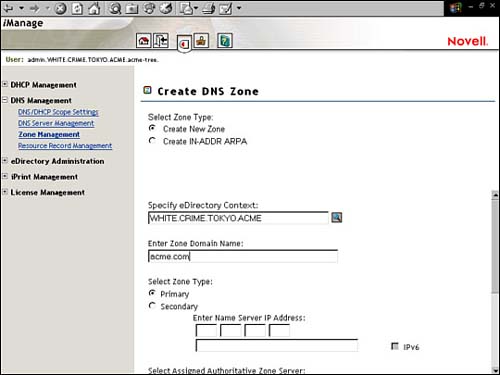
Define Resource Records RRs are eDirectory leaf objects that contain the IP-based host information maintained by DNS name servers. In short, these are the DNS database. Each DNS zone must contain several types of resource records for DNS to function properly. The most common resource record types are Name Server Record (NS) This RR replaces a domain name with a host name for a specific DNS server. The Zone object must contain "NS" records for each primary and secondary server in the zone. Canonical Name Record (CNAME) This RR maps alias names to DNS names. Address Record (A) This RR provides the IP address for the zone. Each IP host uses the "A" record to map host names to IP addresses. Mail eXchange Record (MX) This RR maps Simple Mail Transfer Protocol (SMTP) mail addresses to domain names. Pointer Record (PTR) This RR maps IP addresses to host names within an IN-ADDR.ARPA zone.
To create a DNS Resource Record object, click on the Resource Record Management link in the Navigation frame of iManager. Then make sure the Create Resource Record box is marked, and click OK. At this point, you'll be greeted with the Create Resource Record dialog box: Domain Name In the Domain Name field, type a unique name for this Resource Record object. Typically, the name should resemble the host object it is servicing and the host object's predetermined function. For example, an "A" record for your new DNS Server object should be named DNS-SRV1-A. Resource Record Type Then select a resource record type and provide the necessary configuration information. By default, iManager creates an A record. If you want a CNAME record, you can highlight that choice or mark the Others checkbox to create an RR from a large list of supported types. The configuration information required for each RR depends on the type you choose. Finally, click Create to build the RR eDirectory object.
After you have created a Resource Record object, it will be placed in a corresponding RRSet container. The RRSet object is created automatically for each unique DNS zone. The resource record is designated "Read Only," which means that you must delete the object and re-create it to make any modifications. Activate the DNS Server After you have created the DNS server and associated it with a new DNS zone, you must activate the DNS server. This is accomplished by typing the following command at the NetWare 6 server console: NAMED If you make any changes to your DNS Server object while NAMED.NLM is loaded, you'll need to unload and reload the module for your changes to take effect. Finally, you should consider placing the NAMED statement in your DNS server's AUTOEXEC.NCF file so it loads automatically when the server is started. TIP Study the steps for creating DNS Zone objects using iManager. Also, be able to specify all required Zone properties, such as the zone name, the domain name, the zone type, and the designated DNS server. Finally, remember how to activate the DNS server at the NetWare server console (that is, by typing NAMED).
Configure DNS Workstations After the DNS server is running, you must configure the workstations to use DNS for automatic name resolution. This is accomplished by customizing the TCP/IP Protocol property within Network Neighborhood on Windows 95/98 and Windows NT/2000 clients: Right-click the Network Neighborhood icon on a Windows 95/98 or Windows NT/2000 desktop. Next, select Properties from the pop-up menu that appears. The Network window should appear, with the Configuration tab activated. If this is a Windows 95/98 workstation, highlight the TCP/IP Protocol and click Properties. If this is a Windows NT/2000 workstation, right-click the Local Area Connection and select Properties. Then, you have to select the TCP/IP protocol and select Properties. The TCP/IP Properties window will appear with seven tabs. When you click the DNS Configuration tab, you'll be greeted with two radio buttons: Disable DNS and Enable DNS (as shown in Figure 4.17). Figure 4.17. The DNS Configuration tab in Windows Network Neighborhood.
To configure Windows-based DNS, first click the Enable DNS radio button. Next, provide a host and domain name for this client and build a DNS server search order. Finally, in the DNS Server Search Order field, enter the IP address of your DNS server and then click Add. To close the Network Neighborhood window and save your new settings, simply click OK a few times and reboot the workstation.
All finished! Your NetWare 6 Novell Clients are all ready to accept name resolution information from your new DNS Server and, more importantly, your life as an IP administrator is getting much easier. Now let's shift gears and install DHCP services for NetWare 6. |