Phase III: Installing the Server and Network
| Test Objective Covered:
Welcome to the Java portion of NetWare 6 installation! In Phase III, you will name the server, install the NetWare file system, and install network protocols. In this stage, you will leave the boring text-mode world and switch to a Java interface. Although a mouse is recommended, you can use keystrokes to navigate through Installation program screens, as shown in Table 1.1. Remember that the NumLock (number lock) key must be activated in order for cursor movements to be enabled on the keypad.
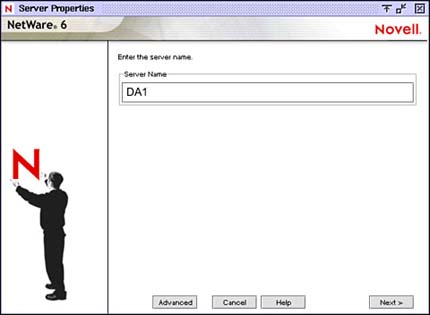
Step 10: Name the ServerAt this point, the Installation Wizard copies a number of files to the server hard drive (called the preparatory file copy process). A Java Virtual Machine (JVM) is created on the server and the GUI portion of the Installation Wizard is loaded. This step may take a while, so feel free to go have a cup of Java while you wait. When the Server Properties dialog box appears (see Figure 1.11), type the server name in the Server Name field. The name should consist of 2 to 47 characters (including letters, numbers, hyphens, and/or underscores but no spaces). The first character cannot be a period. Don't forget that each server in your eDirectory tree must have a unique name. The server name should also be different than the one that will be used for the eDirectory tree name later in the process. Figure 1.11. Step 10: Naming the server.
You'll notice this screen has an Advanced button, which allows you to modify your server's AUTOEXEC.BAT file, CONFIG.SYS file, your server ID number, and language information. On the language tab, you can set the following language parameters:
Step 11: Enable Cryptography (Conditional)Some technologies (such as SSL and certificate generation) require the use of cryptography. If the Encryption screen appears, as shown in Figure 1.12, insert the NetWare 6 License/Cryptography disk into the computer's disk drive. On the disk, browse to the License directory, select the .NFK file, and then click OK. Figure 1.12. Step 11: Enabling cryptography.
If the Encryption screen appears and you don't select an .NFK file, you won't be able to install NetWare 6! Step 12: Install the NetWare Server File SystemThe NetWare 6 file system consists of partitions, volumes, and free space. In step 9, you created a NetWare partition that contains the default SYS: volume. In this step, you are given the option of creating additional NetWare partitions and volumes by using available free space. For example, you can divide a large disk into two or more volumes, or distribute a single volume over more than one disk. You can create two different types of NetWare 6 volumes:
If a Configure File System dialog box appears (see Figure 1.13), review the information listed. To create an additional volume, choose one of the displayed Free Space icons and click Create. Figure 1.13. Step 12: Installing the NetWare server file system.
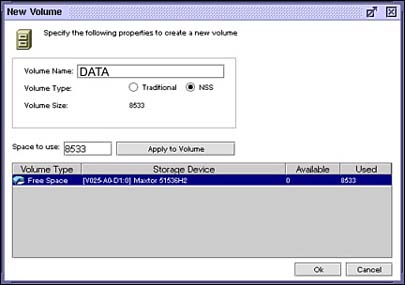
TIP Although an NSS SYS: volume is recommended for most server installations, you can create a traditional SYS: volume by pressing F5 during step 12. If all available space has been allocated to the SYS: volume, you will not be prompted for additional NetWare server file system information. If this is the case, skip to "Step 13: Install Network Protocols." If the New Volume dialog box appears (see Figure 1.14), type the name of the new volume in the Volume Name field, provide a size in the Space to Use field, and click Apply to Volume. When you are done, click OK. The Configure File System screen then reappears, listing the new volume. Repeat the process, as necessary, to create additional volumes. Figure 1.14. Creating a new volume.
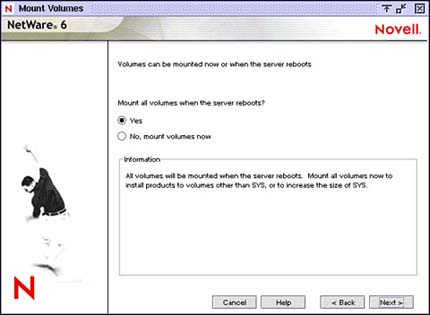
In addition, the size of an existing volume can be increased, but not decreased, using the Free Space option within the Configure File System screen. In the Space to Use field, enter the new size of the volume, select Apply to Volume, and click OK. To decrease the size of an existing volume, you must delete and re-create it. To delete a volume, highlight it in the Configure File System screen and choose Delete. TIP Volume names can consist of 2 to 15 characters. Valid characters include A through Z, 0 through 9, and !, -, @, #, $, %, &, (, and ). A volume name cannot begin with an underscore (_) or contain two or more consecutive underscores. If the Mount Volumes dialog box appears, indicate whether to mount all volumes when the server reboots at the end of the installation process or whether to mount all volumes now (as shown in Figure 1.15). The default choice (Yes) establishes that all volumes will be mounted when the server reboots. You would typically only need to mount all volumes now if you plan to install additional products and services (such as documentation) on volumes other than SYS:. Figure 1.15. Mounting server volumes.
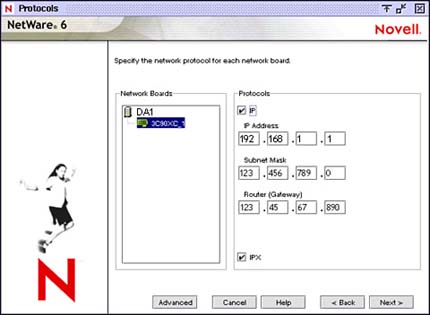
Step 13: Install Network ProtocolsAt this point, the Protocols dialog box appears, as shown in Figure 1.16. This screen asks you to specify the network protocol(s) that need to be bound to each server network interface card (NIC). Figure 1.16. Step 13: Installing network protocols.
NetWare 6 can be configured to process IP network packets and/or traditional IPX packets. If desired, both protocols can be assigned to a single network board. This allows the server to communicate using both IP and IPX. In fact, your NetWare 6 server can be configured in any of these ways:
IP OnlyThe IP protocol allows your network to communicate with other IP networks, including the Internet. To use IP, you will need to configure the following IP addresses:
The IP Only protocol configuration forces your NetWare 6 server and all its workstations to communicate using IP only. The IP protocol choice also causes the server to automatically bind the ETHERNET_II frame type to the corresponding internal NIC. IP with IPX Compatibility ModeWhen the IP protocol is selected, passive support for IPX is also provided. If an IPX request arrives at the server, NetWare 6 processes the request. This passive support for IPX is called Compatibility Mode and it must be activat ed manually to provide service for applications that require IPX. You can do so by typing LOAD SCMD at the server console and pressing Enter. TIP IP can be installed without IPX Compatibility mode enabled. If IPX Compatibility mode is disabled, the server processes IP packets only. Applications that require IPX will not function properly. You can also disable Compatibility mode by removing the LOAD SCMD command from the server's AUTOEXEC.NCF file. IPX OnlyYou can also configure your NetWare 6 server for IPX (Novell's traditional communications protocol) to facilitate legacy NetWare IPX applications. If IPX, but not IP, is installed on your server, it will actively process IPX packets and ignore packets using other protocols, such as IP. This is not a good idea because many new NetWare 6 network features require the more advanced IP protocol. During NetWare 6 installation, existing IPX frame types will be detected in one of the following configurations:
IP and IPXIf you have network clients or applications that require both IP and IPX, you can install multiple protocols simultaneously. Fortunately, both IP and IPX protocols can be bound to a single server NIC. In this configuration, the server processes IP requests using IP, and IPX requests using IPX. This solution is elegant in its simplicity! To configure the IP protocol, follow these simple steps:
To configure the IPX protocol, follow these simple steps:
You'll notice that there is an Advanced button on the Protocols installation form. This button allows you to configure a number of protocol-related parameters, such as IPX frame types, IPX Compatibility settings, and SNMP or SLP information. TIP To configure the IP protocol, you must be familiar with and know the IP address, the subnet address, and the router (gateway) address. The Installation utility uses default frame types of ETHERNET_802.2 (if no frame types are detected while installing IPX) and ETHERNET_II (for IP). This completes the middle four steps of NetWare 6 installation, and Phase III. Now, it's time to venture outside the cozy confines of our server and into the exciting world of Domain Name Services and eDirectory. |


EAN: 2147483647
Pages: 128