Project4.Toy Cars?
Project 4. Toy Cars?I think I'll end this chapter with something a little lighter. Read on to see what I have in mind. I had originally intended for this project to demonstrate how to take a toy car and make it barely fit into the driveway. A photo of a toy Hummer RC or Bigfoot-type of toy pickup truck would have done nicely. However, I was sitting in traffic recently when I spotted one of those new Smart cars. It was then that the idea struck me. I realized I could take a photo of a small, super-economical car and make it appear even smallersay, the size of a child's toy. As it happens, a neighbor has one of those new cars, so I grabbed a couple snaps of it while walking the pup (you really have to appreciate digital photography for that aspect of immediacy alone). The following project demonstrates what I did with that photo and one other. It just goes to show that simple can be goodsimple being a relative term, of course. A bizarre sense of humor probably doesn't hurt either.
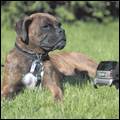
The photo of the car doesn't have to be exactly like my photo (see Figure 3.26), but you'll want to pay attention to the angle you're shooting at so you can find or create something appropriate with which to merge it. Also, pay attention to how the light hits the car in your photo; this will have an effect on what other photographs you can place the car with in terms of keeping the result believable. For example, the light on the car in Figure 3.26 is quite strong on the back of the car, but the side of the car is in shadow. This observation will help you create a better illusion. Figure 3.26. The car sans background. I agonized for a while thinking about how best to portray the car. Finally, I decided that the contents of the image would be most helpful in making the decision. Take a look at Figure 3.26 to see what I mean. Figure 3.26 shows the photo of the car post background-ectomy, meaning I've already removed the stuff from around the car. Notice the raggedness of the bottoms of the wheels. That's where the grass was when the car was parked. Given the raggedness around the bottoms of the wheels and the fact that the car was originally parked on (or near) grass, I decided that I could place the car in the grass next to my boxer puppy. The lighting is often one of the hardest things to match upalong with the color, which is, after all dependent on the light. The fact that the shot of the dog was from about the same angle, taken at around the same time of day, and with about the same weather should mean that the two images will work well together. Also, both image were shot from about their relative centers. That will help with the illusion. Figure 3.27 is the shot of the boxer puppy. Figure 3.27. Sugrrr the boxer.
Doing a Little YardworkThere is one more small detail that helps with the illusion, though. If you look closely at the photo of the dog, you'll see that there's a pretty small field of depth. Notice that I've placed the car, which is in focus, within that narrow band of grass that's in focus in the photo of the dog. If necessary, resize the car so that it fits within that bit of the grass.
This is one of those times when you'll want to zoom in ridiculously close. You also should select a small brush size and play with hardness settings until you can get the cloned grass to look right. After you've cloned some of the grass, you can clean it up with the Eraser tool. You can also copy and paste from the cloned layer into another layer to thicken your cloned grass. In fact, I used several layers to hold bits of the lawn. This made it fairly east to reposition the different bits so I could get the realistic look I was after.  The lighting and the color look good, but the car still looks like it was pasted into the photo of the dog, which of course it was. To help with that final problem, the Clone Brush can be used to clone some of the grass in front of car along the car's bottom.
Finishing UpAfter finishing up the grass implants, I thought the car still looked a little too real. I figured that a little softening might be just what the doctor ordered.
|
EAN: 2147483647
Pages: 109


