Project 1. Lilliputians, or This Is My "Little" Brother 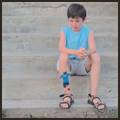 As the oldest brother in a family where my first three siblings were little brothers and the last two little sisters, I had my work cut out for me. My sisters were pretty good, but my little brothers could be a real pain. I dreamed up this particular project to teach them a lesson and to show them that I do still love them all. Because all my siblings are now adults, at least legally and chronologically, I enlisted the help of the two brothersyoung gentleman both, not to mention quite photogenicwho live next door to me. They graciously accepted the thankless (not to mention non-paying) job of modeling for this project. 1. | To get started, you can take a look at Figure 1.1 and plan your own shots according to what you see in that figure along with my explanations. Or, as with all the projects in this book, you can download the files (Younger Brother.tif and Older Brother.tif) from the companion website and work from them. Of course, after practicing with my photos, you should repeat the projects with your own photographs to gain more experience with Paint Shop Pro and digital darkroom techniques. There's a whole world out there waiting to be digitized.
Figure 1.1. Two photos of the young men next door. 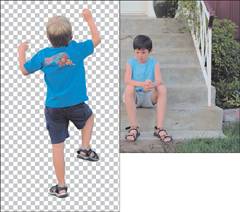
|
Removing the Background of the First Image One of the first things that usually has to take place in a compositing project is that the background of at least one of the images involved must be removed. Another way to look at it is that you need to isolate something in the foreground (a person, an object, and so on) of one image so you can easily (easy being a relative term) composite it with another image. 2. | You will need to remove the background from the photo of the younger brother. There are a number of ways you can do this, and how tough it will be really depends on the background and the foreground of the photograph. Because I shot the photo against the gray stairs on which you can see the older brother sitting in Figure 1.1, it was fairly easy to use the Magic Wand tool. To see how this can be done, along with other selection methods, turn to Appendix B,"Paint Shop Pro X in a Nutshell." Even if you're fairly comfortable with selection techniques, you might want to check out the appendix to see if you can add a couple of techniques to your arsenal.
| 3. | Make sure the image of the younger brother is active by clicking its title bar. Choose Selections, Select All to select the entire contents of the image. The selection will only contain the young man because the background has been removeda sort of background-ectomy, if you will. A little digital surgery, perhaps?
| 4. | Activate the other image of the older brother by clicking its title bar.
|
Pasting and Scaling the Little Brother into Place Now that you've isolated the young man, most of the work is done. However, we do need to paste him into the photo with his big brother and shrink him to Lilliputian size. 5. | Select Edit, Paste As New Layer. Doing so pastes the younger brother over the older brother, but into his own layer so you can manipulate the image as needed (see Figure 1.2).
Figure 1.2. Paste the younger brother's image into the photo of the older brother. 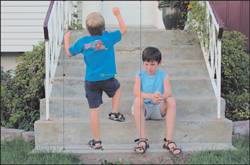
Note The dark, lined box you see around the pasted image is a bounding box. It has handles at each corner and in the middle of each of the four sides. These handles can be used to resize the image. They can also be used to rotate, shear, and add perspective to the image. For now, we'll just use them to resize the image. | 6. | If you don't see the bounding box and handles, select the Pick tool.
With the Pick tool selected, grab one of the corners of the box and drag it inward to shrink the image. By using a corner handle, the width-to-height ratio remains unchanged (see Figure 1.3).
Figure 1.3. This is my favorite part: shrink the little brother. 
| 7. | Select the Zoom tool and click and drag around the smaller brother (smaller brother…good one…) to zoom in so you can position him correctly.
You might have to resize the image and perhaps even rotate it a little depending on the images with which you're working. I moved the younger brother into place along the older brother's shin as if the young man was trying to climb his older brother's leg. With the image in place, I had to shrink it just a little more. I wanted the effect of the young man really climbing his brother.
Remember to zoom back out a little to see how things are lining up. This lets you get an idea of the big picture (see Figure 1.4).
Figure 1.4. Zoom out to get a better idea of whether every thing is lining up. 
I'm pretty happy with the results so far. The images are lined up well and the sizes are good. Only one thing left to do with this particular image: We need a shadow.
|
Adding a Shadow You can add a shadow in several ways. I'll cover a number of them throughout the various projects in the book. For now, though, we'll take the simpler route of using Paint Shop Pro's built-in Drop Shadow filter. 8. | Select the Zoom tool and zoom back in on the younger brother. Leave some room around him and his brother's leg so you'll be better able to judge the effect.
| 9. | Select Effects, 3D Effects, Drop Shadow to bring up the Drop Shadow dialog box (see Figure 1.5). You can control the direction of the shadow, its color, its opacity, and how soft or hard it is. I set the Offset to 11 for the vertical and 0 for the Horizontal in an attempt to match the existing shadows. I also set the Opacity to 40, the Blur to 4, and the Color to black. I made these judgments based on what I saw by previewing the image as I worked.
Figure 1.5. Adding a drop shadow effect helps add realism. 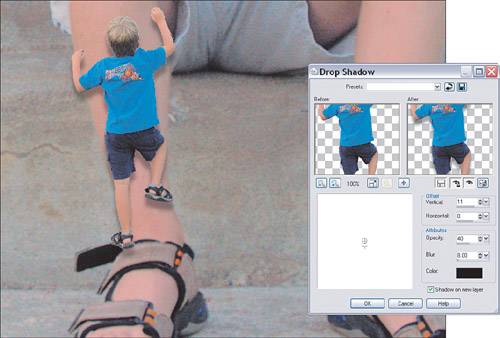
|
Making Any Final Adjustments I can see from zooming in to add the shadow that the younger brother needs a little nudge down and to the left. If you have a similar problem, do the following: 10. | Select the Pick tool and move the image into place. Zoom in and out a couple of times to see whether the illusion works. My final image is shown in Figure 1.6.
Figure 1.6. Ahhh, little brothers. 
|
|