| Let us move on to a simple example of a JavaServer Faces application. Our first example starts with a login screen, shown in Figure 1-3. Figure 1-3. A Login Screen 
Of course, in a real web application, this screen would be beautified by a skilled graphic artist. The file that describes the login screen is essentially an HTML file with a few additional tags see Listing 1-1. Its visual appearance can be easily improved by a graphic artist who need not have any programming skills. Listing 1-1. login/index.jsp 1. <html> 2. <%@ taglib uri="http://java.sun.com/jsf/core" prefix="f" %> 3. <%@ taglib uri="http://java.sun.com/jsf/html" prefix="h" %> 4. 5. <f:view> 6. <head> 7. <title>A Simple JavaServer Faces Application</title> 8. </head> 9. <body> 10. <h:form> 11. <h3>Please enter your name and password.</h3> 12. <table> 13. <tr> 14. <td>Name:</td> 15. <td> 16. <h:inputText value="#{user.name}"/> 17. </td> 18. </tr> 19. <tr> 20. <td>Password:</td> 21. <td> 22. <h:inputSecret value="#{user.password}"/> 23. </td> 24. </tr> 25. </table> 26. <p> 27. <h:commandButton value="Login" action="login"/> 28. </p> 29. </h:form> 30. </body> 31. </f:view> 32. </html>
We discuss the contents of this file in detail later in this chapter. For now, note the following points: A number of the tags are standard HTML tags: body, table, and so on. Some tags have prefixes, such as f:view and h:inputText. These are JSF tags. The two taglib declarations declare the JSF tag libraries. The h:inputText, h:inputSecret, and h:commandButton tags correspond to the text field, password field, and submit button in Figure 1-3. The input fields are linked to object properties. For example, the attribute value="#{user.name}" tells the JSF implementation to link the text field with the name property of a user object. We discuss this linkage in more detail later in this chapter.
When the user enters the name and password and clicks the login button, a welcome screen appears (see Figure 1-4). Figure 1-4. A Welcome Screen 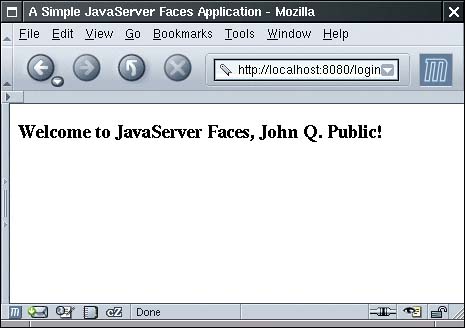
The welcome message contains the user name. The password is ignored for now. The purpose of this application is, of course, not to impress anyone, but merely to illustrate the various pieces that are necessary to produce a JSF application. Ingredients Our sample application consists of the following ingredients: Pages that define the login and welcome screens. We call them index.jsp and welcome.jsp. A bean that manages the user data (in our case, username and password). A bean is simply a Java class that exposes properties, usually by following a simple naming convention for the getter and setter methods. The code is in the file UserBean.java see Listing 1-2. Note that the class is contained inside the com.corejsf package. A configuration file for the application that lists bean resources and navigation rules. By default, this file is called faces-config.xml. Miscellaneous files that are needed to keep the servlet container happy: the web.xml file and an index.html file that redirects the user to the correct URL for the login page.
More advanced JSF applications have the same structure, but they can contain additional Java classes, such as event handlers, validators, and custom components. Listing 1-2. login/WEB-INF/classes/com/corejsf/UserBean.java 1. package com.corejsf; 2. 3. public class UserBean { 4. private String name; 5. private String password; 6. 7. // PROPERTY: name 8. public String getName() { return name; } 9. public void setName(String newValue) { name = newValue; } 10. 11. // PROPERTY: password 12. public String getPassword() { return password; } 13. public void setPassword(String newValue) { password = newValue; } 14. }
Directory Structure A JSF application is deployed as a WAR file: a zipped file with extension .war and a directory structure that follows a standardized layout: HTML and JSP files WEB-INF/ configuration files classes/ class files lib/ library files For example, the WAR file of our sample application has the directory structure shown in Figure 1-5. Note that the UserBean class is in the package com.corejsf. The META-INF directory is automatically produced by the JAR program when the WAR file is created. Figure 1-5. Directory Structure of the Sample WAR File 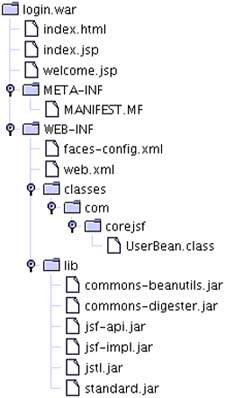
To minimize confusion, we package our application source in the exact same directory structure as a WAR file, except that the classes directory contains the source files (see Figure 1-6). Figure 1-6. Directory Structure of the Sample Application 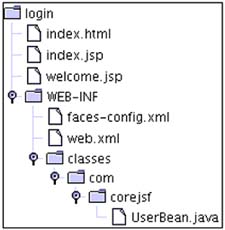
Build Instructions We now walk you through the steps required for building JSF applications with your bare hands. At the end of this chapter, we show you how to automate this process. Launch a command shell.
Change to the ch1/login/WEB-INF/classes directory inside corejsf-examples, the directory that contains the sample code for this book.
Run the command
javac com/corejsf/UserBean.java
(On Windows, use backslashes instead: javac com\corejsf\UserBean.java.)
Make a ch1/login/WEB-INF/lib directory. Into that directory, copy the following files:
jsf/lib/jsf-api.jar jsf/lib/jsf-impl.jar:jsf/lib/jsf-impl.jar tomcat/server/lib/commons-digester.jar tomcat/server/lib/commons-beanutils.jar tomcat/webapps/jsp-examples/WEB-INF/lib/jstl.jar tomcat/webapps/jsp-examples/WEB-INF/lib/standard.jar
Change to the ch1/login directory.
Run the command
jar cvf login.war.
(Note the period at the end of the command, indicating the current directory.)
Copy the login.war file to the directory tomcat/webapps.
Now point your browser to
http://localhost:8080/login
The application should start up at this point.
TIP  | If you are very impatient, you can use two shortcuts. Copy the six library JAR files into the tomcat/common/lib directory and restart the server. Then you don't have to place the libraries into the WEB-INF/lib directory of your applications. Moreover, you can bypass the WAR file simply copy the entire login directory (including its subdirectories) to the tomcat/webapps directory. Remember to compile the source files in the WEB-INF/classes directory. |
For more complex programs that reference the JSF libraries, the compilation step is more complex. Your class path must include the following JAR files:
tomcat/common/lib/servlet-api.jar tomcat/common/lib/jsp-api.jar jsf/lib/jsf-api.jar jsf/lib/jsf-impl.jar
A typical compilation command would look like this:
javac -classpath .:tomcat/common/lib/servlet-api.jar :tomcat/common/lib/jsp-api.jar:jsf/lib/jsf-api.jar com/corejsf/*.java
The entire command needs to be placed on a single line. (On Windows, use semicolons to separate the path elements.) |