Offsetting Layers and Time
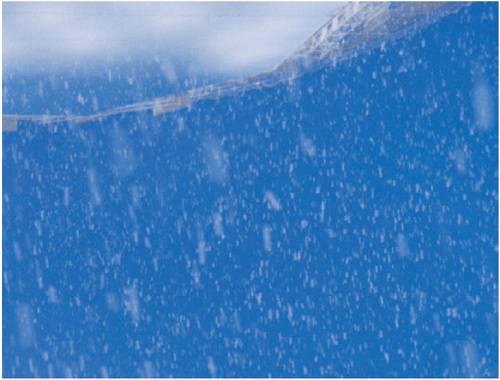
| Some of the coolest things you can do with expressions involve incrementing either layer index numbers (the number of the layer that you always see to the left of the source name) or time itself. Time in expressions is measured in whole seconds. Frames and fields are calculated as decimal fractions of seconds. Of course, if you're ever worried about calculating this, you can use fractions instead: in 24 fps footage, frame 65 would be time = 65/24 (or 2.7083 seconds). See how easy? A frame's index and time become especially useful when using conditionals. In the example expression, you will use index and time to average grain between several frames of a sequence. Although I'm still trying to keep this simple, this means moving beyond the one-liner expressions that can be applied and tweaked easily. Grain AveragingIn some cases, the normal methods of dealing with grain just don't do the trickeven methods as powerful as the Remove Grain effect (detailed in Chapter 9, "Virtual Cinematography"). The noise simply obscures too much of the frame. If the shot is locked off, there is an interesting alternative, one that came in handy for me on one shot in The Day After Tomorrow. This effects shot started with a plate that was taken on a huge blue-screen stage of actors trudging across a snowy plain. It was meant to be snowing fairly hard in the shot, and for whatever reason it was decided to use practical snow on set. Usually, as in Figure 10.16, this means little bits of plastic confetti or corn flakes painted white. With 20/20 hindsight, this was clearly the wrong decision, because we were adding computer-generated snow to all kinds of exterior shots, and furthermore, the way it was shot, the lighting grid was too far in shot so I had to mask out a big hole where the falling snow should have been. So, what was needed was to get rid of the plate snow altogether and start over. Happily it was a locked-off shot, so the following trick worked, and then I added a gentle camera push-in to the final composition. Figure 10.16. Artificial snow falls on a blue-screen stage.
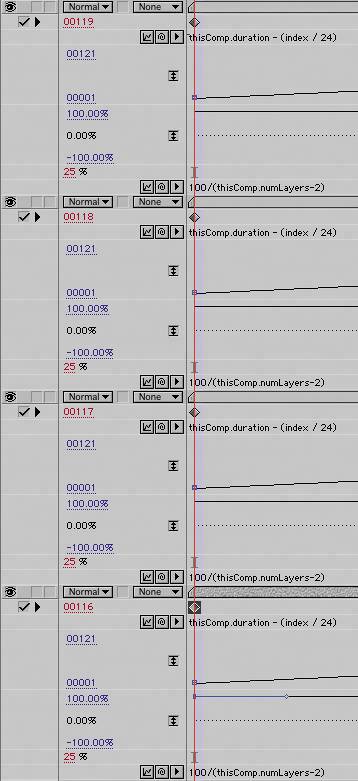
First I'll describe the solution so you understand it logically, then we'll look at the pair of expressions that accomplished this. First, I determined that the frames I wanted to average were the ones at the end of the shot, where I could easily eliminate the one moving element in the shot, some figures walking across the horizon. I did not know how many frames I would need to average, but I knew that if I took a series of different frames and set their Opacity so that collectively, it added up to 100%, I would get an average of all of them. On a given frame, a given snowflake would appear on a given pixel, but it would be missing from the other frames, and therefore would be averaged out. If I needed to average ten frames, then each would have Opacity at 10%, adding up to 100%. Without expressions, this process would be a real pain. Each added layer would have to be adjusted to the proper frame and would have necessitated adjusting the opacity of the other layers so that they all still added up to 100%. Instead, I was able to apply two expressions to one layer and simply duplicate that layer until I had enough iterations to accomplish the effect of averaging. First, I took care of the Opacity settings by applying 100/thisComp.numLayers to Opacity. This expression simply says, "Take 100, my target Opacity total, and divide it by the number of layers in this composition." The thisComp and numLayers keywords are found in the expressions menus, in case you're wondering where they came from. Truth be told, I had a couple of extra layers in my actual comp (for adjustment and rotoscoping), so I wrote the real expression with an offset to compensate: 100/(thisComp.numLayers-2) The parentheses are necessary to force the offset to occur before dividing the result into 100. Next, I wanted to average together the last few frames of the composition, but I wasn't certain how many. As the solution, I applied Time Remapping to which I added the expression thisComp.duration(index / 24) The duration of a composition is measured in seconds, and this was a 24 fps comp. By dividing the index number by the frame rate and subtracting that from the total number of seconds, I caused each successive frame in the timeline to increment backward one frame. With these two expressions applied, I was able to do the artistic work of choosing the optimal amount of frame averaging in real time, by duplicating (Ctrl+D/Cmd+D) and deleting the layer until I'd nailed it. In the end, it required fewer frames than expectedjust four, but in deciding to use that number I tried as many as ten, and handling these changes with expressions made it a breeze (Figure 10.17). Figure 10.17. With deepest apologies that I was not able to secure permission to break down this shot for you visually, here are the expressions that propagate and offset themselves automatically simply by duplicating any of the layers.
|
EAN: 2147483647
Pages: 156