Looping Animations
| Maybe the coolest feature unique to expressions (one that users often wish was built into the After Effects user interface) is the ability to loop a set of keyframes. It's so easy to learn and powerful, however, that once you understand it, you might even like it.
Much of the time, you just can replace your source expression text with one of the default loop expressions and be done. These are found in the Property submenu of the Expressions menu (Figure 10.9). Figure 10.9. Try not to be overwhelmed. The expressions menu is a well organized cheat sheet of After Effects keywords. Once you understand a little bit about how it's organized and where the most useful items are located, you can open this with confidence. The Property submenu, shown here, might be the one you visit most often because it contains several essential functions.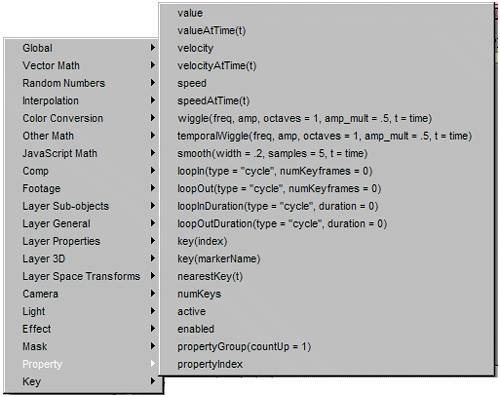 The loop effects have two arguments, the settings found in parentheses after the command. The first one is mandatory; you have to specify the type of loop you're requesting by choosing one of the three loop types. The second is optional and, in some cases, unavailable.
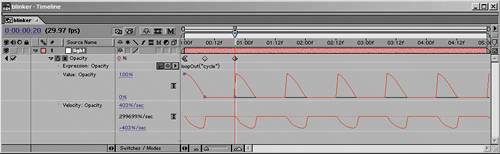
I'll start with a basic example and then detail out the various permutations, and then show you a specific problem that looping solves. I'll use the example of a blinking light that is animated via keyframes to its Opacity control. To blink, these keyframes, which turn it on and off, must repeat. Begin by creating one cycle of this animation, start to finish. For example, it could be a burst of light (100% Opacity) followed by a hold and a decay at or near the beginning of the composition or wherever you want it to begin (Figure 10.10). Figure 10.10. Opacity of this light decays over ten frames, with an ease added out of the first frame, followed by a hold between frame 10 and 20, at which point you are in need of a loop.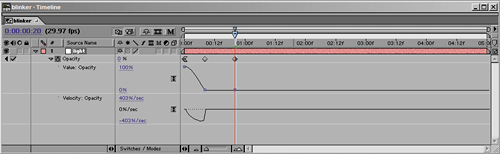 Now set an expression for Opacity, and with the default expression still highlighted, choose loopOut(type = "cycle", numKeyframes = 0) Press the Enter key or click outside the text area. Your keyframes now loop. Specifically, the loop acts as if the first keyframe followed one frame after the last keyframe; this is always how it works. So, if for timing purposes you want a pause at the end, you build that into your keyframe pattern. Figure 10.11 shows the animation with a hold at 0 Opacity added at the end. Figure 10.11. A loop has been added to the animation in Figure 10.10. The default expression (chosen from the menu in the instructions) would work, but unnecessary arguments have been removed here to shorten it (see the sidebar, "Extraneous Verbiage").
Before looking at the other loops available, check out the other arguments you can set for this expression. For example, numKeyframes specifies how many keyframes before the final one are used in the loop; set to the default of 0, it uses all keyframes. You can get rid of this argument altogether in such a case (see the sidebar, "Extraneous Verbiage"); in fact, the expression would work the same if it read loopOut("cycle"). Set numKeyframes to a value of 2 and it uses the last three keyframes for the loop, ignoring the first hold keyframe (Figure 10.12). Figure 10.12. The hold keyframe, added at the beginning, is ignored because of the numKeyframes = 2 argument, which limits the loop to the two keyframes preceding the final one (which, as you may have noticed, the loop ignores, using it only as a placeholder for the first keyframe of a new loop).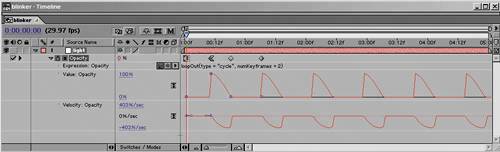 The more useful argument is probably the first one, because it changes the fundamental type of loop, and there are three possible arguments: loopOut("cycle") loopOut("pingpong") loopOut("continue") You've seen the results of cycle, and I will cover continue in the next section. The pingpong option is like cycle except that it alternates looping the keyframes forward, then backward, then forward to ping-pong them back and forth (Figure 10.13). Figure 10.13. The eminently useful pingpong loop is applied here.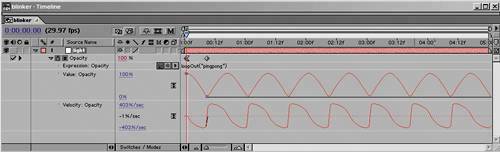
As for the other loop types available, loopIn("cycle") works identically to loopOut with one exception; the loop is created prior to the existing keyframes, rather than following. Both loopOutDuration() and loopInDuration() enable you to specify an interval, in seconds, between loops. For example, loopOutDuration("cycle", 2) cycles a loop every two seconds. |
EAN: 2147483647
Pages: 156