Paint and Cloning
| Paint is generally your last resort, and for a simple reason. Paint work is typically more painstaking and more likely to show flaws than approaches involving masks. Of course, there are exceptions. The ability to track clone brushes gives paint work a huge advantage over masks, which are not so easy to track. Other tasks are just plain tedious no matter how you look at them, but they are sometimes necessary or inevitable. Plate restoration and dust busting are entry-level jobs at many effects facilities; there's no way to get around them on shows whose shooting conditions and standards demand them. For effects work, you will use the paint controls in After Effects in two predominant ways:
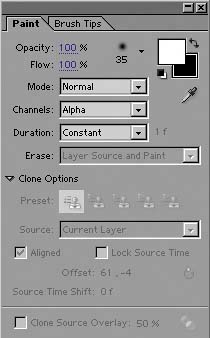
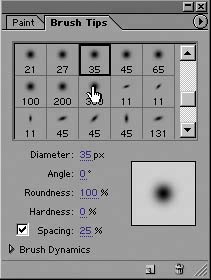
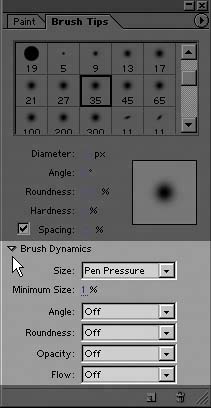
Assuming you're using the Professional version, you're lucky. Prior to version 6.0, paint was a convoluted, tacked-on afterthought in After Effects. It was available only via a licensed effect that was so counterintuitive that most users had to re-read the manual each (infrequent) time they used it. Now the brush tools are more robust and fully integrated with the application. Paint FundamentalsActivate any of the three brush-based tools in the Tools paletteBrush, Clone Stamp, or Eraserand the palette that contains the Paint and Brush Tips tabs automatically appears (Figures 7.19a, b, and c). Figure 7.19a, b, and c. Use the keyboard shortcut Ctrl+B (Cmd+B) to cycle through the three basic brush tools (7.19a) and open the Paint and Brush Tips tabs (7.19b and c).
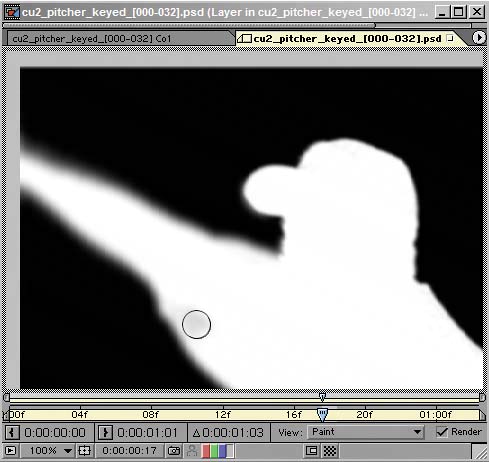
The After Effects tools are designed with a user interface and functionality patterned after the brushes in Photoshop, but there are a couple of important differences between After Effects brushes and those in Photoshop. After Effects offers fewer customizable options for its brushes (you can't, for example, create your own brush tips) and fewer UI shortcuts for editing brushes on the fly, so don't expect all those nifty tricks you've learned with keyboard shortcuts in Photoshop to work here. Also, After Effects brushes are vector based, while those in Photoshop are raster based. This is generally a good thing, as it makes all paint edits in After Effects editable after you've already drawn with them. Say that you have an alpha channel that needs some touching up (Figure 7.20). With the Brush tool active, go to the Paint palette and switch Channels to Alpha if it is not there already (this palette remembers the last mode you used); the foreground and background color swatches in the palette will switch to grayscale, and you can switch them to black and white by clicking the tiny black-over-white squares just below the swatches (Figure 7.21). To see what you are painting, switch the view to the Alpha Channel as well (Alt+4/Option+4). Figure 7.20. To touch up an alpha channel matte, select Alpha in the Channels drop-down menu (in the Paint palette) and then make the alpha channel visible (Alt/Option+4).
Figure 7.21. Ever wonder what those little squares are for? They reset the foreground and background colors. To swap white and black, just as in Photoshop, press the X key; this only works when the Paint palette is visible.
Here are the other things you need to know to make use of the paint tools:
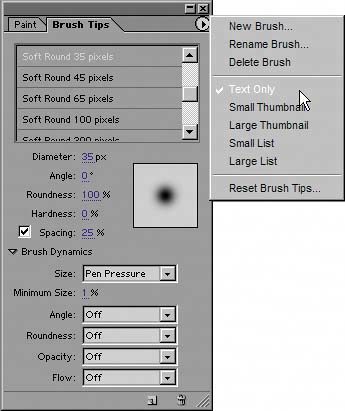
By default, the Duration setting in the Paint menu is set to Constant, which means that any paint stroke you create on this frame continues to the end of the layer. For cleaning up an alpha channel, this is typically not the setting you want, because you're presumably using paint only to catch stray holes in your matte here and there. The Single Frame setting confines your stroke to just the current frame on which you're painting, and the Custom setting allows you to enter the number of frames that the stroke will persist. The other option, Write On, records your stroke in real time, re-creating the motion when you replay the layer; this stylized option is for such motion graphics tricks as handwritten script, and it does not seem to have much of an application for effects work, unless, of course, your effect is re-creating a signature. You can access various display options available for brushes from the Brush Tips wing menu (Figure 7.23). Here you can add, rename, or delete brushes, as well. You can also do this using the small icons at the bottom of the palette and by double-clicking the brush in question. Figure 7.23. If you use brushes a lot, you may find it helpful to make your own and list them by name.
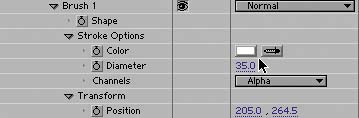
For an alpha channel, you typically work with the Brush tool in Single Frame mode, looking only at the alpha channel (Alt+4/Option+4) and progressing frame by frame through the shot (press Page Down). You can switch as needed between painting white into the foreground and black into the background; just use the X key to swap foreground/background colors with the Brush tool active. You may end up with dozens of paint strokes in your timeline, each of which contains numerous options that you can edit after the fact (Figure 7.24). If you simply want to select a stroke to edit, delete, or redo it, use your Selection tool (V) to directly select it in the Layer or Composition window rather than hunting it down in the Timeline window. You can drag it into place or delete it and start over. Figure 7.24. The real benefit of nondestructive vector paint strokes is how many properties each one contains that can be edited after the fact.
Cloning FundamentalsThe benefit of cloning is that you get all of the grain and other organic peculiarities that go along with using moving footage as a source. There are many cases in which it will be the quickest and most effective solution, particularly if you are cloning out a trackable area of the frame (more on this in the next section). Cloning in After Effects opens you to several possibilities beyond what would be possible with, say, the same tool in Photoshop. Not only can you clone pixels from a different region of the same frame, you can clone from a different frame of a different clip at a different point in time (Figure 7.25). In Commotion, the tool that could do this was christened the Superclone tool; the After Effects implementation is actually more straightforward in many cases:
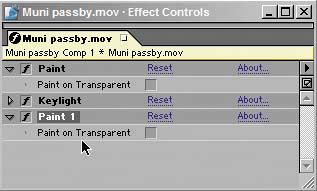
Figure 7.25. With Clone Source Overlay checked under Clone Options, you can see a preview of your clone source overlaid on the current frame. Click on the small spheres to the right of the check box, and the overlay is displayed in Difference mode, which makes for easy alignment of matching images. If initially this option doesn't seem to be taking effect, move your cursor into the frame of the Layer window to activate it.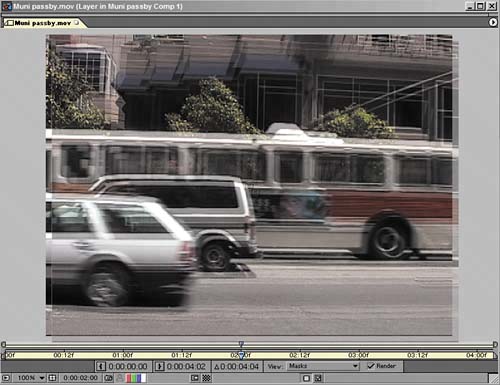 For the most part, cloning is just that straightforward, but of course, nothing about visual effects work is always straightforward. Tricks and GotchasSo, where can cloning trip you up? For example, say that offsetting the time or selecting a different layer causes the clone tool to attempt to sample beyond the last frame of the source clip. What happens? By default, After Effects automatically loops back to the first frame of the clip and keeps going. This is dangerous because you may not even have any idea it has occurred; it is an automatic, default setting. This is one of several situations where you can get into trouble because of a temporal mismatch. Not only might you not have enough source frames for the target layer, your layers might have different frame rates, or you might want to sample from just one or just a few frames from the source clip. You can take control of this process by editing the source clip. Time remapping is one potential way to solve these problems, allowing you to stretch a source clip or loop it the way you want to. If you want to sample only one or a few frames from the source, you can time remap it or you can do the even simpler thing: Shorten the layer to just the frame or frames you want to use as source, and take advantage of the automatic looping I referred to as "dangerous" a couple of paragraphs back. What if your source is a different scale from what it should be for the target? Shockingly, even though temporal edits, including time remapping, in the source show up directly in the target, other types of editseven simple translations or effectsdo not. As always, the solution is to pre-compose with any scaling, rotation, motion tracking, or effects that you want to clone embedded in the subcomposition. Finally, and perhaps even more shocking: Paint is an effect. Don't believe me? Apply a stroke or two and then take a peek in your Effects Control window. You'll see an effect called Paint with a single check box labeled Paint on Transparent, which causes only the strokes you've painted to show up for that layer. But there's an extra benefit to doing it this way: You can change the render order of your paint strokes relative to other effects. So, for example, you could do some cloning on your raw footage, then apply an image adjustment, and then add some other cloned strokes that are applied to the adjusted image, all on one layer, no need to precompose (Figure 7.26). To get the new paint strokes to appear in a new Paint effect instead of the previous one, however, you must actually apply the Paint effect before you start painting again. Figure 7.26. Paint strokes and effects are interleaved.
But this means that you could conceivably touch up a blue-screen background, then apply a keyer, and then apply a second instance of Paint to touch up the resulting alpha channel. Finally, to help you take control of this process of interleaving paint strokes and effects, note the View pull-down menu in the Layer window (Figure 7.27). It lists, in order, the paint and effects edits you've added to the layer. To see the layer with none of these applied, you can clear the Render box next to the pull-down, and to see a particular stage of the editafter the first paint strokes, but before the effects, sayyou can select a prior stage of the layer edits in the View menu, disabling the steps below it. These settings are for previewing only; they will not enable or disable the rendering of these items. Figure 7.27. The Layer window's View pull-down menu is a useful method for working with interleaved paint strokes and effects.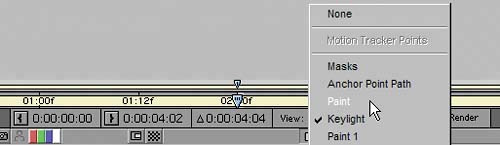 Tracking StrokesOne really cool thing about paint strokes is that they have their own editable properties. Not only can you change your mind about how they draw later on, which isn't useful as often as you might think, you can apply the motion tracker directly to a paint stroke. Cases come up all the time where artists can save themselves a ton of work by attaching paint strokes to motion-tracked objects. However, to do so requires use not only of the tracker, which is covered in the next chapter, but also of basic expressions. Thus this topic is fully covered in Chapter 10, "Expressions," as an excellent example of a simple use of expressions and offsets; look at that chapter if you are dealing with a case where tracking in a cloned paint stroke would help you. Wire RemovalWire removal and rig removal are two terms often bandied about in the visual effects industry. Generally speaking, wire removal means painting out a wire on a blue-screen shot, a wire usually used to suspend an actor in mid-air. Rig removal, meanwhile, is even less glamorous: It's just garbage masking any equipment that showed up in frame. Some rotoscoping applications have dedicated wire-removal tools, but in After Effects, you're on your own. However, wire removal need not be a painstaking process in After Effects simply because there's no dedicated tool for it. There are several approaches that could conceivably work; if the ends of the wire are trackable, you could track position and rotation and apply these to a null, which would be the parent of a masked element to replace the wire. More about tracking and applying tracks is found in the following chapter. Rig removal is often trackable, because rigs don't move. The key is to make a shape that mattes out the rig, then apply that as a track matte to the foreground footage and track the whole matte. Plate Restoration via CloningThis is as nitty-gritty as rotoscoping gets. For various reasons, even on the highest budget visual effects film, footage digitizes with flaws visible on a frame-by-frame basis: Dust and scratches made their way onto the pristine master sometime between when it was shot and when it was digitized. Most of these flaws, alas, will be corrected via frame-by-frame cloning, sometimes known as "dust busting." Large visual effects houses have teams dedicated to this work, a motley crew of mostly entry-level folks who strap on an iPod and lose themselves in the zen of cloning (or a good audio book). I mention this here not because it requires a different approach than what has been previously discussed, but only because neophytes do not always believe that such a job exists, let alone that it could be their entry level job at a major facility. One final note about this work: Despite its apparent tedium, it's not all done with a single approach. In some cases, cloning with an offset will work. In other cases, you're better off masking out a part of the source to reveal the footage you want to replace by placing that clean version behind it. Never treat any task as utterly mind-numbing, because you might be cheating your brain out of an opportunity to help you think of a better way. |

EAN: 2147483647
Pages: 156