Navigating Multiple Compositions
| When working with a complicated project, you can easily lose track of how things are organized. This section will show you
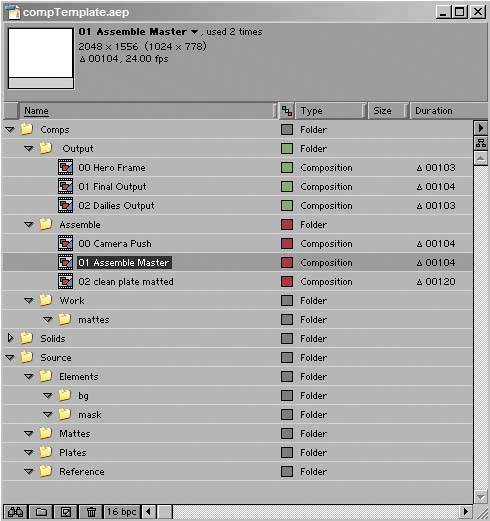
These tips have come in very handy when I've found myself working with artists who understood compositing quite well, but were nonetheless wrestling with tracking down and solving problems in After Effects. Project Template BenefitsIf you're working on your own, you're basically free to organize your projects however you like, just as if you live alone, you're free not to clean your apartment. Successful collaborative projects at studios, however, make use of project templates that specify where different types of items live in the Project window. Figure 4.1 shows a typical project template containing multiple compositions. It's a simplified version of a comp template used at The Orphanage for feature film work. Considering the days or even weeks that can be involved doing multiple takes of a visual effects shot, a template like this can be a lifesaver. Here are some of the template's useful attributes:
Figure 4.1. Here's a top-level look at the organization of an unpopulated composition template that could be used on a feature film effects shot. There are two basic categories of folders (Source and Comps), and numbered, pre-configured compositions listed in correct render order.
You can take this idea as far as you want. The basic concepts of a Master comp, source comps, and a render comp seems useful on just about any shot to which you will be devoting more than a couple of hours of work, but a template can include a lot more than that. The Orphanage designs a custom template AEP file for each film production, and the template alone can be 4 MB before any work has been added, including custom expressions, camera rigs, log/linear conversions, and recurring effects setups. Working with TabsBecause After Effects does not include a tree/node interface, it is incumbent upon you, the artist, to keep your windows organized in a way that makes sense to you. If you've ever found yourself hunting around for a particular comp's tab in the Timeline window, here are a couple of suggestions. First of all, you may have too many tabs open. It can be helpful to close the entire Timeline window and start over: Reopen your master composition. Alt/Option-double-click on the subcomp you want to work on, and if the specific composition you want is three or four layers deep, keep going until you've reached that one. Now your reopened tabs follow, right to left, the basic render order.
If you need to see two timelines at once, it is possible to drag a tab out of the Timeline window, effectively creating a second Timeline window. If, alternatively, you want to see only the results of work you're doing in a subcomp of the Master comp, remember that Alt/Option-clicking the box to close a Timeline tab leaves the Composition window open (and vice versa). Or, if it's only at preview time that you want to see the Master comp, remember the Always Preview This View toggle at the lower left of the Composition window.
Where Am I?We all lose our bearings sometimes. For that reason, context menu shortcuts in the Timeline window enable you to select a layer and reveal it, either in the Project window or in Project Flowchart view. Unfortunately, there is no context menu item to reveal the current comp in the Project window. But you can reveal any of its component layers. Although you can use the Project Flowchart view to map out an existing project, I find it more helpful to keep the Project window as clearly and hierarchically organized as is usefully possible, thereby continuing in the spirit of the templates. This might sound about as much fun as keeping your room clean, but if you think in terms of helping someone new to your project to understand it, you may find that you help yourself as well. For example, if you want to refer back to that project in a few months' time, you effectively are that other artist arriving at the project completely cold.
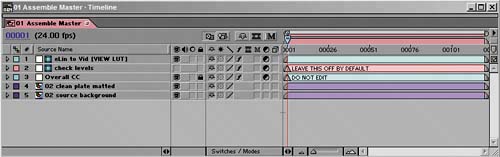
Descriptive NamesIt's rather obvious, but you can help yourself a lot by using descriptive names for your compositions. For example, if you want to keep track of composition order, you can number the master comp 00, the first nested comp 01, and so on, using descriptive names after the numbers, for example 00_master and so on. Some After Effects veterans joke that leaving the name of a composition at the default Comp 1 is a firing offense. |
EAN: 2147483647
Pages: 156