Organization
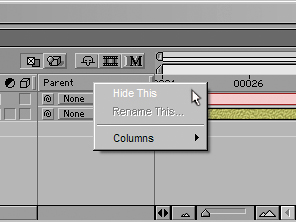
| Customization is what the timeline is all about; as you work with it, you constantly change not only its contents but your view of it. Thus a good number of the tips offered in this chapter are workflow improvements (views and shortcuts) designed to speed you on your way. The Timeline window's top-level customizable views are its columns. Right-clicking on any column heading shows a menu list containing all of the possible views; you would never work with all of them revealed, because it's pointless; there are much better organized ways to keep these displayed to get you quickly to what you need to edit. Column ViewsContext-click on any of the column headings and you can reveal or conceal all the different types of columns available in After Effects. Don't bother revealing them allseveral are only occasionally useful, and After Effects provides you with a better way of finding them in context. Figure 2.1 shows a typical minimal column setup that still gives you instant access to all of the columns, from which you can toggle in one step to each of the columns that don't currently display. From there, you have several options:
Figure 2.1. You don't need to vary your view much from the default to have it about as streamlined as you can get. Here, the Parent column is hidden but all columns other than Parent and Comment are available in a single left-click or via a shortcut.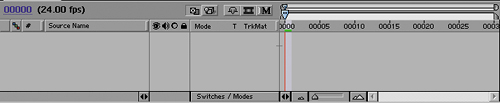 With unused columns hidden, you'll have more space for the columns you need most. Comments and ColorEver try to make sense of someone else's project? Chaos, right? Make it easy on your coworkers: Color code your layers and use plenty of comments. Choosing a distinct color for each layer can provide intuitive visual clues. It can even help you as you work. How you handle colors is really up to you; Figure 2.5 shows an example of a timeline with several layers that are color coded by type. Figure 2.5. A unique color has been assigned to each type of layer (and to the composition itself), making it easy to quickly distinguish between them.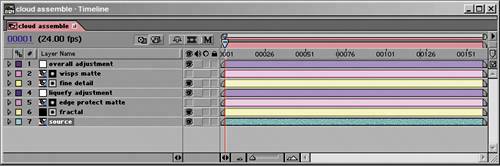 The Comments column is probably the most neglected, yet it enables you to say a few words about the purpose and use of a layer, which is especially useful when creating templates. But even better than enabling the Comments column is to add a layer marker. Press the * key on your numeric keypad, then double-click the layer marker, and enter text in the comment field. Unlike the Comments column, which requires quite a bit of that precious horizontal space and might quickly get turned off, layer marker text is written right over the layer bar itself, so you have as much horizontal space as the layer has.
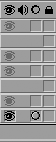
Solo, Lock, and ShyThree toggles on the A/V and Switches columns pertain to how layers are edited and viewed as you work, and because I've seen users who should know better miss or forget them, I'm including a quick refresher. The small circular icon in the A/V Features (Figure 2.6) column is the Solo switch. After Effects decided not to copy Photoshop this time around, so Alt/Option-clicking on the layer eyeball does not solo itthis switch does. The reason for doing it this way is that too many of your layer visibility options in After Effects are permanent in nature to have them inadvertently toggling on and off. Solo a layer and you see only it; send a comp with a layer toggled solo, and the Solo Switches menu in Render Settings determines whether it renders that way. Figure 2.6. You probably already use the Solo switch, engaged here for the bottom layer; remember that leaving a layer solo in a subcomposition will display it that way in the main comp, a common gotcha.
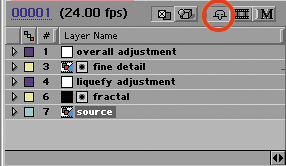
The Lock toggle is really great in situations where you are certain you no longer want to inadvertently edit a layer (or you want to signal to other users of the project not to edit it). You can't even select a layer that is locked. Shy is trickier to new users; toggle a layer to shy and nothing happens until you also activate the Shy toggle for the whole composition (Figure 2.7). Then suddenly, the shy layers disappear from view in the timeline, although they will still be visible in the comp itself, if they were previously. This is a way to temporarily reduce clutter in your timeline, but bewareif you're left scratching your head as to where that layer went, when you can plainly see it's still there, take a close look at the Index numbers: If they are no longer in sequential order, then the missing number belongs to a layer that is now shy. Figure 2.7. Hey, why are those layers numbered 1, 3, 4, 6, 7? The track matte layers have been set to shy and hidden by enabling the Shy toggle at the top of the timeline (highlighted). Very useful for showing only the layers you're still adjusting, but don't forget about those hidden layers.
Navigation and ShortcutsMore than any other window in After Effects, the Timeline window is the place where keyboard shortcutslots of themcome into play. There's a heck of a lot you can do in the timeline via either a single keyboard shortcut or a single click of the mouse, where a beginner would use several clicks of the mouse. Time NavigationMost users learn time navigation shortcuts right away, while others are content simply to drag the time needle around all of the time, a policy I oppose on the grounds that it quickly becomes tedious. Here are a few handy navigation shortcuts:
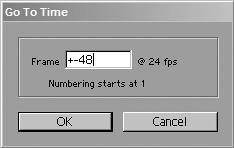
But here's a gotcha: If you need to navigate backward in time 48 frames, you can't simply enter 48 in the Go To Time dialog. If you do, you're transported to negative 48 (frames or seconds, either of which probably moves the time needle right off the timeline). Instead, you must use the format +48; that's right, you're adding a negative number, not subtracting. It's weird, but it works (Figure 2.8). Figure 2.8. Setting this value to 48 would set the current time to that negative frame value, probably not what you want. But entering +48 adds an offset of 48 frames, which might very well be useful.
Making Layers BehaveThe timeline becomes a liability for effects work when layers inadvertently pop on or off because they started at a frame other than zero or are pre-comps that are too short for the master comp. This one burned me on The Day After Tomorrow, where a bit of haze added to a window at 3% opacitytoo low to see clearly when previewing on my monitorabruptly shut off two-thirds of the way through a film-out of the shot. For this reason, some users prefer to make all of their comps longer (in duration) than they ever expect to need, and manage them with the Work Area. To add a layer to a composition, you have many options for dragging and dropping. The one I like best for an existing comp is to drag the source to the layer position where you want it. For a new comp, drag it to the Create a New Composition icon. The keyboard shortcut Ctrl+/ (Cmd+/) drops the footage into the top layer of the active composition. If you skipped Chapter 1, "The Effects Toolset," you missed a major tip for making layers behave for visual effects workediting your Preferences file itself so that all layers that are added to the timeline come in at frame zero on the timeline. Here are some other useful tips and shortcuts:
Often, you may add elements to your composition that are a different size or pixel aspect, yet which are meant to fill the frame (or fill it on the vertical or horizontal axis). No need to break open the Scale controls and guess. We come now to one of my favorite sets of shortcuts in After Effects: the "fit to fill" shortcuts. The standard fit to fill, Ctrl+Alt+F (Cmd+Option+F) is dangerous in that it will not lock the aspect ratio of your layer, stretching the X and Y scale individually so that each is identical to that of the comp itself. More useful, and just plain cooler, are the shortcuts for fit to fill on a single axis, X or Y, because they do lock the aspect ratio of the nondominant axis. For fit to fill on X only, the shortcut is Ctrl+Alt+Shift+H (Cmd+Option+Shift+H), and for the Y axis twist your fingers around Ctrl+Alt+Shift+G (Cmd+Option+Shift+G). These choices of letters might seem a little obtuse until you note that they are adjacent to F on the keyboard; your visual memory picks up that they are close cousins to the regular F fit to fill command. Timeline View OptionsNow that I've barraged you with useful shortcuts, what about interacting with the view of the timeline itself? I'll assume you're familiar with the process of setting keyframes and move right on to some controls for zooming in and out of keyframe data:
Your time needle is actually capable of going where your Timeline window cannot: to time frames that are below the first frame of the composition or beyond the last frame. This needle disappearing act typically happens after you navigate the timeline in the Layer window and then return to the Composition or Timeline window. Have no fear, clicking where you want the time needle to be or using any of the time shortcuts will save you.
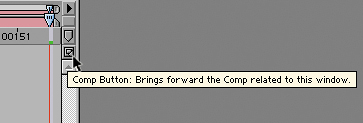
You can, of course, view the timeline without seeing the associated Composition window; it's just tricky to unlink the two because making it easy would be confusing to beginning users. If you Alt/Option-click on the box to close the Composition tab, you close the Composition view while the Timeline tab stays active. This "headless" timeline is useful for making adjustments in one timeline while seeing the results in another comp (Figure 2.10). I'll cover this more in Chapter 4. If you need to bring back the Composition view for your timeline, click the Comp button at the right edge of the timeline (Figure 2.11). Figure 2.10. There's an easier way to preview one comp while continuing to adjust another related one, or several others. Activate the Always Preview This View toggle in the lower left corner of the Composition window. Now, whenever you set RAM Preview, that's the view that will load and play.
Figure 2.11. Clicking the Comp button reveals the Composition window for the current timeline; this is helpful if you have closed the comp view while leaving the timeline open.
Just above the Comp button is the comp marker bin, where you can click and drag out a marker to a point on your timeline. Markers are numbered sequentially, and you can also add whichever number you like at any time (even when a RAM preview is up) by pressing Shift and one of the numbers at the top of your keyboard (not the numeric keypad this time). These aren't quite as cool as layer markers (which you can add at any time with the asterisk key) because you can't label them, but they're sometimes useful anyhow. Holding down the Shift key as you drag the time needle snaps the needle to any comp or layer markers that are present. Replacing LayersSometimes you need to replace the source of a layer with an alternate take or a different element in the Project window. You can easily do this by highlighting the layer to be replaced in the timeline and holding down the Alt (Option) key while dragging the new source to the timeline. An even easier method is to select both the existing layer and the new source and then press Ctrl+Alt+/ (Cmd+Option+/). All of the settings from the previous layer, along with any applied effects, translate to the new layer automatically. Beware if you are replacing with source of a different size or aspect, as the mask and transform values may only be appropriate to the predecessor.
While we're on the subject, what do you do to neutralize a layer that is taking up a disproportionate amount of render time? I recommend that you not replace it in this manner; Chapter 4 covers some much more elegant methods for assigning proxies and pre-rendering embedded compositions. |

EAN: 2147483647
Pages: 156
- Chapter VI Web Site Quality and Usability in E-Commerce
- Chapter VIII Personalization Systems and Their Deployment as Web Site Interface Design Decisions
- Chapter XI User Satisfaction with Web Portals: An Empirical Study
- Chapter XIII Shopping Agent Web Sites: A Comparative Shopping Environment
- Chapter XVIII Web Systems Design, Litigation, and Online Consumer Behavior