Fire
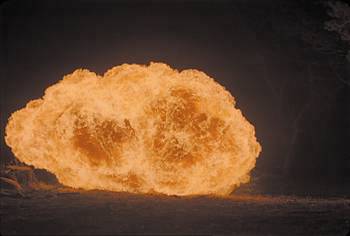
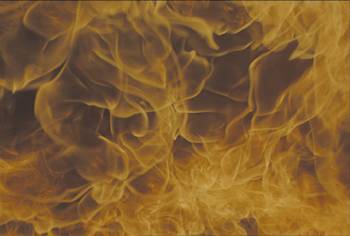
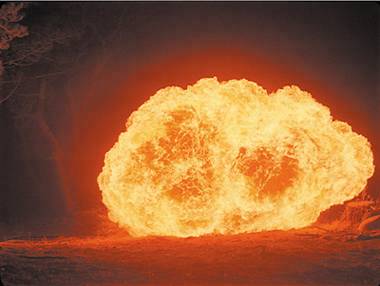
| Synthesizing fire from scratch is still an advanced topic within the upper reaches of visual effects research and development. I was employed at The Orphanage during its work on Hellboy, the film with a leading character whose preternatural gift is that she creates lots and lots of fire when upset. There was no way to use photographed fire for those shots because they required too much interaction with the rest of the scene. I was amazed at what the team responsible for these effects was able pull off. Within After Effects, synthesizing fire is still way too hot to handle. If the fire is at all prominent in your shot, you will need to work with elements that come from somewhere elsemost likely, shot with a camera. Take a look at what's involved. Creating and Using Fire ElementsFigure 14.16 shows fire elements that were filmed for effects usage. The big challenge for compositing fire realistically is that it doesn't scale very well. You might think that any fire that you shoot with a camera will look better than something you create on a computer, but a fireplace fire always looks like it came from your hearth, no matter how you scale or retime it. Figure 14.16. Some fire elements are shot in negative (black) space, others in a natural setting requiring a garbage matte in addition to Add or Screen mode to composite them. By adjusting Input Black in Levels, you can control the amount of glow coming off the fire. In many cases, this gives your scene some needed extra interactive lighting for free. (Images courtesy of Artbeats.)
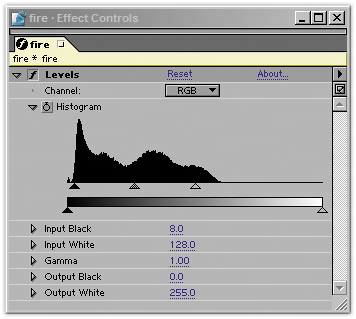
The bigger the fire you need to shoot, however, the more expensive it's likely to be because you really need the fire to be shot in negative spaceagainst a black backgroundso that you can composite it using blending modes. Fire is obviously capable of illuminating the entire environment around it, so if that environment has specific detail, it can be all but impossible to isolate the fire from the environment. This, then, is a case where it's worth investing in proper elements. In many cases, stock footage companies, such as Artbeats (represented on the book's CD-ROM), have anticipated your needs. Whether you require burning half-height miniature trees or a flamethrower, you're sure to find solutions for a wide variety of shots in these stock collections. Plus, the scale and intensity will be more appropriate than what you can likely shoot on your own. Comping FireIf you are starting with a fire element shot against black, the process for integrating it into your scene is highly reminiscent of the techniques for adding fog and mist. These types of elements, however, rely on Screen or Add blending modes rather than mattes to permit the background to be seen behind the fire. As with fog, the secret sauce is to add a Compound Blur effect behind the fire, using its luminance to soften the background behind it (Figures 14.17a, b, and c). Figure 14.17a, b, and c. A simple A over B comp doesn't cut it (14.17a), but add an adjustment layer with Compound Blur referring to the fire luminance as its blur layer and instantly, you begin to have something the viewer could believe (14.17b). A look at just the blurred background shows that a fairly heavy blurring is called for here (14.17c), but the nature of compound blur is that wherever there is a gap in the fire there will be no blur, so at full motion, it's a great effect. (Fire courtesy of Artbeats.)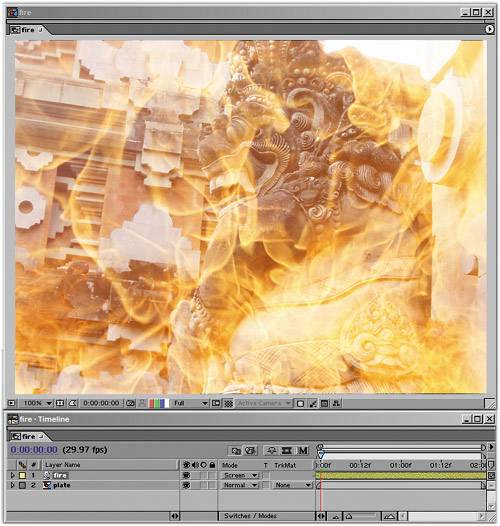 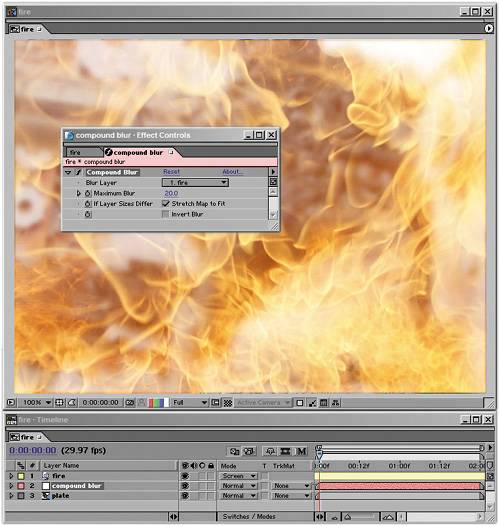  When you first screen your fire layer over the background, the effect may look rather weak. You need to fine-tune it with a Levels effect, pushing in on the histogram with Input White and Black to strengthen the look (Figures 14.18a and b). Figure 14.18a and b. On first application with Screen mode (14.18a), the fire is barely visible over the background plate. To derive the results shown in Figure 14.17b, all you need is a strong Levels adjustment that raises the contrast of the fire element. (14.18b).
Only in the case of a raging inferno do you need to go beyond the blending modes approach and create an actual hi-con matte to make the core of the fire opaque (Figures 14.19a and b). Figure 14.19a and b. The background plate was stock footage of a raging fire (14.19a), but it wasn't raging quite enough. Compositing in more raging inferno footage required hi-con mattes for the opaque look of such intense fires to break through the overlaid extra layers of smoke (14.19b). (Figure 14.19b courtesy of ABC-TV.)
The Need for Interactive LightProvided that your camera is not moving too much, a 2D fire layer should read adequately well as being fully three-dimensional. If it's not looking believable in your scene, the problem is probably a lack of interactive light. As was stated above, fire tends to illuminate everything around it with a warm, flickering glow. There are a few ways to add this. First of all, as you can see in Figure 14.20, your fire element may include a certain amount of glow that you can use. Raising Input Black when adjusting Levels tends to eliminate this glow, so that control is an effective way to dial the glow in and out. Figure 14.20. Depending on the Levels settings you apply to the source fire element that you use, specifically Input White and Black on the RGB and Red channels, you can end up with a lot of extra glow or leave out the glow entirely.
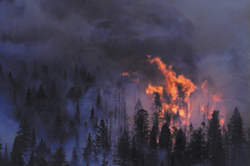
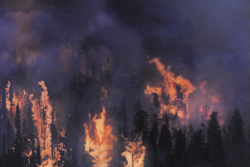
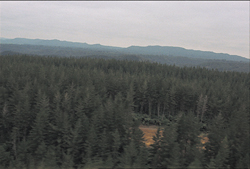
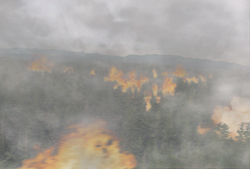
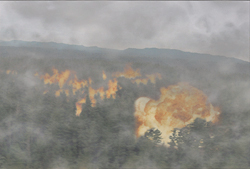
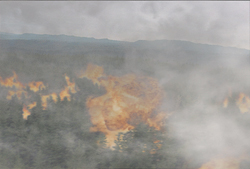
Note, however, that this glow isn't anything particularly unique or special; you can re-create it either via a heavily blurred duplicate of the source fire or using a masked and heavily feathered orange solid, with perhaps a slight amount of wiggle added to the glow opacity to cause a bit of interactive flickering. If your shot has a close-up of a character or an object that should have fire reflecting off of it, don't immediately assume you have to go crazy projecting fire directly onto the subject. In many cases, it will be enough simply to create some flickering in the character's own luminance values, for example by wiggling the Input White value at a low frequency in Levels (Individual Controls). You can also achieve this by overlaying a colored solid or adjustment layer and wiggling its opacity, affecting the whole frame. Into the Third DimensionYou can pull off the illusion of fully three-dimensional fire, especially if the camera is moving around in 3D space, right in After Effects. I was frankly surprised at how well this worked in the shot featured in Figures 14.21a and b. Figure 14.21a and b. Before-and-after sequential stills of a flyover shot. Because of the angle of the aerial camera, the shot required 3D motion tracking, originally done using 2D3's Boujou. (Images courtesy of ABC-TV.)
As shown, the background plate is an aerial flyby of a forest. Because of the change in altitude and perspective, this shot clearly required 3D tracking (touched upon at the end of Chapter 8, "Effective Motion Tracking"). The keys to making this shot look fully dimensional were to break up the source fire elements into discrete chunks and to stagger those in 3D space so that as the plane rose above them, their relationship and parallax changed (Figure 14.22). Figure 14.22. A top view of the 3D motion-tracked camera from Figure 14.21b panning past one set of fires (of which the final composition had half a dozen).The pink layers contain fire elements, the gray layers smoke.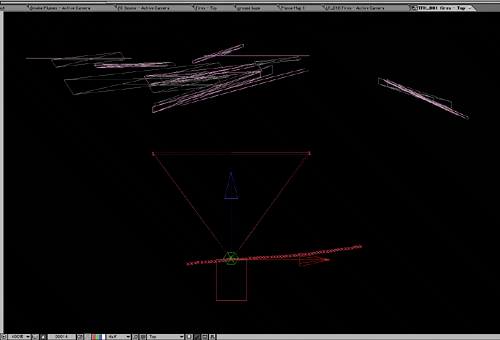 It is easy to get away with any individual fire element being 2D in this case. Because fire changes its shape constantly, there is nothing to give away its two-dimensionality. Borders of individual fire elements can freely overlap without being distracting, so it doesn't look cut out. The eye sees evidence of parallax between a couple dozen fire elements, and does not think to question that any individual one of them looks too flat. The smoke elements were handled in a similar way, organized along overlapping planes. As I mentioned in the previous chapter, smoke's translucency aids the illusion that overlapping smoke layers have dimensional depth. |


EAN: 2147483647
Pages: 156