| A messaging provider and a client that uses a messaging provider are required to run in a container such as the reference J2EE container provided with Apache-Tomcat. In this section, you will create a JAXM client that will demonstrate the features that you can use when a messaging provider is used. The JAXM client will be a servlet, which will process the data sent to it from a Web form. The servlet will use the default messaging provider available through the JAXM reference implementation, and use the messaging provider's support for ebXML to create an ebXML message from the submitted data. The ebXML message will then be sent as a one-way message. The steps involved in implementing the client with a messaging provider are as follows: -
Create the Web form. -
Create the servlet, MyJAXMClientWithProvider, that will process the data posted from the Web form. -
Create the web.xml file for installing the servlet in the Tomcat Web server. -
Create the sampledoc.txt that will be used as an attachment. -
Install the servlet and the Web form in the Tomcat server. Let us begin by creating the most critical piece of them all, the MyJAXMClientWithProvider servlet. Creating the Servlet As mentioned before, the MyJAXMClientWithProvider servlet is the JAXM client that will use the data it receives from a Web form to create an ebXML message, and send it to the default messaging provider as a one-way message. The sequence of steps to create the servlet is as follows: -
Import the packages and classes. -
Get the connection at the time of servlet initialization. -
In the doPost() method, get the ebXML profile and create an empty ebXML SOAP message. -
Populate the ebXML message with the data received from the Web form. -
Create an attachment to the ebXML message. -
Send the message and create a logfile that saves the ebXML message that was sent. Importing the Packages and Classes Open a text editor and create a file called MyJAXMClientWithProvider.java and enter the following lines of code: import java.net.*; import java.io.*; import javax.servlet.http.*; import javax.servlet.*; import javax.xml.messaging.*; import javax.xml.soap.*; import javax.activation.*; import com.sun.xml.messaging.ebxml.*; public class MyJAXMClientWithProvider extends HttpServlet { } The java.net classes are used to create the URL object for the file that will be attached to the SOAP message. The java.io classes will be used for the I/O operations of the servlet. The javax.servlet classes are required for accessing the servlet-related functionality. The javax.xml.messaging classes are required for the provider connection. The javax.xml.soap classes are required to access the message factory class. The javax.activation classes are required for creating the attachment to the SOAP message. You also created the class declaration for the MyJAXMClientWithProvider servlet. Next, you need to create the connection at servlet initialization. Getting the Connection To get the connection, enter the following lines of code: public class MyJAXMClientWithProvider extends HttpServlet { private ProviderConnectionFactory pcf; private ProviderConnection pc; private MessageFactory mf = null; public void init(ServletConfig servletConfig) throws ServletException { super.init( servletConfig ); try { pcf = ProviderConnectionFactory.newInstance(); pc = pcf.createConnection(); } catch(Exception e) { System.out.println(""+e.getMessage()); } } First, you created references to the instances of the ProviderConnectionFactory, ProviderConnection, and MessageFactory classes. These classes will be required to create a connection with the messaging provider and then create a SOAP message. Next, in the init() method of the servlet, the createConnection() method is called to provide the connection to the messaging provider. The init() method is called in the life cycle of the servlet. Next, the ebXML profile will be received from the messaging provider and an empty ebXML message will be created. Creating an ebXML Message A messaging provider can support a number of profiles. To find the profiles supported by a messaging provider, you need to get a ProviderMetadata object of the messaging provider. This object encapsulates various information about the messaging provider. You use the getSupportedProfiles() method of the ProviderMetadata object to find support for a particular profile, such as the ebXML profile, and then use the name of the profile to create a message factory for creating ebXML messages. The messaging provider that comes with JAXM reference implementation supports ebXML and SOAP-RP profiles. To get the ebXML profile and create an empty ebXML message, enter the lines of code shown in bold: public void doPost(HttpServletRequest req, HttpServletResponse resp) throws ServletException { try { // Create a message factory. if (mf == null) { ProviderMetaData metaData = pc.getMetaData(); String[] supportedProfiles = metaData.getSupportedProfiles(); String profile = null; for(int i=0; i < supportedProfiles.length; i++) { if(supportedProfiles[i].equals("ebxml")) { profile = supportedProfiles[i]; break; } } mf = pc.createMessageFactory(profile); } // Create a message from the message factory. EbXMLMessageImpl ebxmlMsg = (EbXMLMessageImpl)mf.createMessage(); First, the getMetaData() method of the ProviderConnection instance is used to get the ProviderMetadata object. Then, the getSupportedProfiles() method for the ProviderMetaData object is used to access the array of profiles supported by the messaging provider. This array is searched for ebxml, and if found, the createMessageFactory() method is called with the ebxml string as its parameter. This creates a MessageFactory object that will produce SOAPMessage objects for the given profile. Finally, the createMessage() method is called to create a SOAPMessage object that conforms to the ebXML profile. Note that the SOAPMessage object is typecasted to the EbXMLMessageImpl class to support ebXML messages. This class is part of the JAXM reference implementation. The ebXML message that is returned by the createMessage() object is empty and needs to be populated to get any real work done. NOTE Note that in our sample code, the messaging provider is expected to provide support for ebXML. However, this might not be the case for all messaging providers. Therefore, it's good programming practice to provide code that can handle the situation in which the messaging provider does not provide support for a specific profile.
The next step is to populate the empty ebXML message. Populating the ebXML Message In an ebXML message, you first need to provide the sender and the receiver information. This is done by using the Party objects. The information is stored in the Header of the message and determines the message delivery sequence. Additionally, in an ebXML message, you need to specify the service, reference to message ID, CPA ID, conversation ID, action, manifest, reference, schema, and description information. For example, you will use the receiver address provided with the default implementation. The service, reference to message ID, CPA ID, conversation ID, action, and description information will be taken from the Web form. To populate the ebXML message, add the lines of code shown in bold: EbXMLMessageImpl ebxmlMsg = (EbXMLMessageImpl)mf.createMessage(); ebxmlMsg.setSender(new Party("http://localhost:8080/chap10")); ebxmlMsg.setReceiver(new Party("http://www.wombats.com/remote/ sender")); String srvc = req.getParameter("Service"); Service service = new Service(srvc); String ref2msgId = req.getParameter("ref2msgid"); ebxmlMsg.setRefToMessageId(ref2msgId); String cpaid = req.getParameter("cpaid"); ebxmlMsg.setCPAId(cpaid); String conversationId = req.getParameter("conversationId"); ebxmlMsg.setConversationId(conversationId); ebxmlMsg.setService(service); String action = req.getParameter("Actn"); ebxmlMsg.setAction(action); Manifest manifest = new Manifest("manifest", "1.0"); Reference ref = new Reference("pay01", "cid:pay01", "http://somecompany.org/purchaseordermodel"); Schema schema = new Schema( "http://somecompany.org/purchaseordermodel.xsd", "1.0"); ref.setSchema(schema); Description desc = new Description("en-us"); String descptn = req.getParameter("Descptn"); desc.setText(descptn); ref.setDescription(desc); manifest.addReference(ref); ebxmlMsg.setManifest(manifest); Note that the constructor to the Party object in the setReceiver() method takes the http://www.wombats.com/remote/sender URI as its parameter. This is the default URI provided with the JWSDP download for sending ebXML messages using a message provider. This URI actually resolves to the following URL: http://127.0.0.1:8081/jaxm-provider/receiver/ebxml. NOTE You can also create your own endpoint mappings for ebXML providers. To do so, you need to use the JAXM Provider Administration Tool provided with the JWSDP download. You can access it by going to the http://localhost:8080/index.html and then clicking on the JAXM Provider Administration Tool link.
Next, using the getParameter() method, you processed the service, references to message ID, CPA ID, conversation ID, action, and description information received from the Web form. You also added the manifest, reference, and schema information to the ebXML message. NOTE The values set in examples are shown for demonstration purposes only and are not necessarily correct or available.
Next, you will add an attachment to the ebXML message. Creating Attachments The SOAP with Attachments specification makes it possible to add attachments to SOAP messages. This is especially useful when you want to add non-XML documents, such as images and so on, to a SOAP message. By default, the SOAPPart object in the SOAPMessage object can store only XML content. To store attachments, you need to create AttachmentPart objects from the SOAPMessage object, add content to the AttachmentPart objects, and then add them to the SOAPMessage object. The SOAPMessage object provides a createAttachment() method with which the AttachmentPart object can be created. After the AttachmentPart object is created, you need to populate it with header information and other content. An AttachmentPart object has multiple headers, so setting the Content-Type header is mandatory. The other headers, such as Content-Id, Content-Location, and so on, are optional. The content in an AttachmentPart object can be set by one of the two styles, either using the setContentMethod() of the attachment object or using the JavaBeans Activation Framework (JAF) DataHandler object. In the MyJAXMClientWithProvider servlet, the DataHandler object is used to create an attachment. You will add http://localhost:8080/chap10/sampledoc.txt as the attachment object to the ebXML message. To add the attachment to the ebXML message, enter the lines of code shown in bold: ebxmlMsg.setManifest(manifest); URL url = new URL("http://localhost:8080/chap10/sampledoc.txt"); AttachmentPart ap = ebxmlMsg.createAttachmentPart(new DataHandler(url)); ap.setContentType("text/plain"); // Add the attachment part to the message. ebxmlMsg.addAttachmentPart(ap); In this code, you created a URL object of the http://localhost:8080/chap10/sampledoc.txt resource that is to be added as an attachment. Next, you used the createAttachment() method with the DataHandler object representing the URL as its parameter. This created the attachment part and set the content to the URL in one shot. Next, you set the content type to text/plain because the sampledoc.txt contains a string. Finally, you added the attachment part object to the ebXML message. The next and final step is to send the message and create the logfile to save the ebXML message that was sent. You also need to ensure that the user is notified that the message has been sent. Sending the Message To send the message, you need to use the send() method of the ProviderConnection object. This method sends the message and returns immediately. The send() method needs only the ebXML message as its parameter because the destination address is already stored in the header of the message. To send the message, create the logfile to save the ebXML message that was sent, and notify the user that the message has been sent, enter the lines of code shown in bold in the following: ebxmlMsg.addAttachmentPart(ap); //Send the message pc.send(ebxmlMsg); //Log the message FileOutputStream sentFile = new FileOutputStream(  "outputofMyJAXMClientWithProvider.log"); ebxmlMsg.writeTo(sentFile); sentFile.close(); //Inform the user String startHTML = "<html> <H4> Message delivered to provider. You can see the message that has been sent at <jwsdp_home>/outputofMyJAXMClientWithProvider.log file</H4></html>"; OutputStream os = resp.getOutputStream(); os.write(startHTML.getBytes()); os.flush(); os.close(); } catch(Throwable e) { e.printStackTrace(); } } } "outputofMyJAXMClientWithProvider.log"); ebxmlMsg.writeTo(sentFile); sentFile.close(); //Inform the user String startHTML = "<html> <H4> Message delivered to provider. You can see the message that has been sent at <jwsdp_home>/outputofMyJAXMClientWithProvider.log file</H4></html>"; OutputStream os = resp.getOutputStream(); os.write(startHTML.getBytes()); os.flush(); os.close(); } catch(Throwable e) { e.printStackTrace(); } } } You successfully wrote the servlet to process data from a Web form, created an ebXML message from it, and used a messaging provider to send a one-way message. Compile the servlet and keep it ready for deployment. Next, you will create the Web form that will post the necessary information to the servlet. Creating the Web Form For the sake of simplicity, create a simple Web form and name it index.html. The form should appear as shown in Figure 8.1. 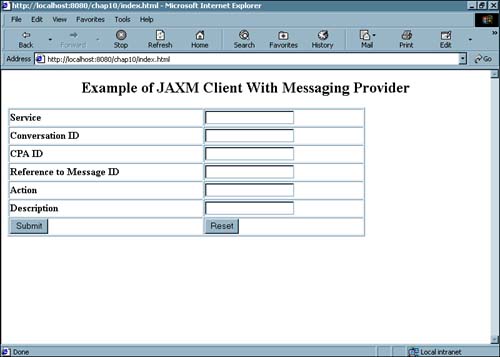
The source for the index.html file is shown in Listing 8.2. Listing 8.2 Source for index.html<HTML> <HEAD> <META NAME="GENERATOR" Content="Microsoft Visual Studio 6.0"> <TITLE></TITLE> </HEAD> <BODY> <P align=center><FONT size=5><STRONG>Example of JAXM Client With Messaging Provider</STRONG></FONT></P> <P align=left> <FORM action="senderwithprovider" id=FORM1 method=post name=FORM1> <DIV align=left> <P align=left> <TABLE border=1 cellPadding=1 cellSpacing=1 width="75%"> <TR> <TD><STRONG>Service</STRONG></TD> <TD><INPUT id=text2 name=Service></TD></TR> <TR> <TD><STRONG>Conversation ID</STRONG></TD> <TD><INPUT id=text3 name=conversationId></TD></TR> <TR> <TD><STRONG>CPA ID</STRONG></TD> <TD><INPUT id=text4 name=cpaid></TD></TR> <TR> <TD><STRONG>Reference to Message ID</STRONG></TD> <TD><INPUT id=text5 name=ref2msgid></TD></TR> <TR> <TD><STRONG>Action</STRONG></TD> <TD><INPUT id=text6 name=Actn></TD></TR> <TR> <TD><STRONG>Description</STRONG></TD> <TD><INPUT id=text7 name=Descptn></TD></TR> <TR> <TD><INPUT id=submit1 name=submit1 type=submit value=Submit></TD> <TD><INPUT id=reset1 name=reset1 type=reset value=Reset></TD></TR></TABLE> </P></DIV> </FORM></P> </BODY> </HTML> Note that the value of the action field is senderwithprovider. This is the name by which the MyJAXMClientWithProvider servlet is mapped. This mapping is done through the web.xml file, which you will be creating next. Creating the web.xml File The web.xml file is the configuration file for a Web application. It defines things such as the servlet name and its mapping to the actual class, session configuration, supported MIME types, and so on. For the sake of simplicity, the web.xml file for our example will only contain the servlet mappings. The web.xml file is displayed in Listing 8.3. Listing 8.3 The web.xml File<?xml version="1.0" encoding="ISO-8859-1"?> <!-- Copyright 2002 Sun Microsystems, Inc. All rights reserved. SUN PROPRIETARY/CONFIDENTIAL. Use is subject to license terms. --> <!DOCTYPE web-app PUBLIC "-//Sun Microsystems, Inc.//DTD Web Application 2.2//EN" "http://java.sun.com/j2ee/dtds/web-app_2_2.dtd"> <web-app> <servlet> <servlet-name> MyJAXMClientWithProvider </servlet-name> <servlet-class> MyJAXMClientWithProvider </servlet-class> <load-on-startup> 2 </load-on-startup> </servlet> <servlet-mapping> <servlet-name> MyJAXMClientWithProvider </servlet-name> <url-pattern> /senderwithprovider </url-pattern> </servlet-mapping> </web-app> Creating the sampledoc.txt File The sampledoc.txt file contains the content that the ebXML message will add as an attachment. It is a simple text file that is displayed as follows: This is a sample text to show that any type of file can be attached to a soap message. Now you are ready to deploy the servlet in the Tomcat container and see the JAXM client in operation. Deploying the JAXM Client Let's take a look at the components we have created so far to see the JAXM client in action: -
The index.html Web form that posts data to the MyJAXMClientWithProvider servlet. -
The MyJAXMClientWithProvider servlet that processes the data posted from index.html. -
The web.xml configuration file. -
The sampledoc.txt file that is to be used as an attachment. NOTE The code discussed so far is available in the example1002 folder.
You will now deploy these files to get the application up and running. The following steps are what you need to do: -
Shut down Tomcat if it is running. -
Create a folder called chap10 under the webapps folder. -
Copy the index.html and sampledoc.txt files under the chap10 folder. -
Create a folder called WEB-INF under the chap10 folder. -
Copy the web.xml file under the WEB-INF folder. -
Create a folder called classes under the WEB-INF folder. -
Copy the MyJAXMClientWithProvider.class file to the WEB-INF folder. -
Copy the client.xml file from the example1002 location to the WEB-INF folder. This XML file is required to resolve the endpoints to specific URLs. -
Start up Tomcat. You are now all set to launch the JAXM client. To do so, launch a Web browser and go to http://localhost:8080/chap10. This will display the index.html on the browser window. Enter the data in the fields and submit the form. The servlet will create the ebXML message from the submitted data and send the message. An example of the ebXML message that was sent is shown in Listing 8.4. Listing 8.4 Output of MyJAXMClientWithProvider------=_Part_2_5670484.1022764118409 Content-Type: text/xml <soap-env:Envelope xmlns:soap-env="http://schemas.xmlsoap.org/soap/envelope/"> <soap-env:Header> <jaxm:Message xmlns:jaxm="http://java.sun.com/xml/jaxm" soap-env:actor="http://java.sun. com/xml/jaxm/provider" soap-env:mustUnderstand="1"> <Method>SendMessage</Method> <Profile>ebxml</Profile> </jaxm:Message> <eb:MessageHeader xmlns:eb="http://www.ebxml.org/namespaces/messageHeader" eb:version="1. 0" soap-env:mustUnderstand="1"> <eb:From> <eb:PartyId eb:type="URI">http://localhost:8080/chap10</eb:PartyId> </eb:From> <eb:To> <eb:PartyId eb:type="URI">http://www.wombats.com/remote/sender</eb:PartyId> </eb:To> <eb:CPAId>http://somecompany.com/ProcurementOrderPact.xml</eb:CPAId> <eb:ConversationId>20020530-001</eb:ConversationId> <eb:Service eb:type="">ProcurementOrder</eb:Service> <eb:Action>New Procurement</eb:Action> <eb:MessageData> <eb:MessageId>fdd4965a-5d67-4f52-9cce-9998d6efc237</eb:MessageId> <eb:RefToMessageId>20020530-001@somecompany.com</eb:RefToMessageId> <eb:Timestamp>1022764117738</eb:Timestamp> </eb:MessageData> </eb:MessageHeader> </soap-env:Header> <soap-env:Body> <eb:Manifest xmlns:eb="http://www.ebxml.org/namespaces/messageHeader" eb: eb: version="1.0"> <eb:Reference eb: xmlns:xlink="http://www.w3.org/1999/xlink" xlink:href="cid: pay01" xlink: role="http://somecompany.org /purchaseordermodel"> <eb:Schema eb:version="1.0" eb:location="http://somecompany.org/purchaseordermodel.xsd"/> <eb:Description xml:lang="en-us">Procurement for Car Parts</eb:Description> </eb:Reference> </eb:Manifest> </soap-env:Body> </soap-env:Envelope> ------=_Part_2_5670484.1022764118409 Content-Type: text/plain This is a sample text to show that any type of file can be attached to a soap message. ------=_Part_2_5670484.1022764118409-- | 