Making Use of Events
You draw state diagrams to understand the life cycle of an object. Each event received by one of your objects causes the object to change state—to change its behavior in a major way. So you work with events to accomplish the following:
-
Develop operations for your classes: Events in your state diagram tell you when an object represented by that state diagram must perform some state-based behavior. When an object’s behavior (specified as an operation on the object’s class shown in a class diagram) is called, then the object performs the operation-based behavior. Because events cause an object to perform some behavior (state-based behavior) they make good names for operations for the object’s class. For more on this see the section on “Operating your events” later in this chapter.
-
Understand parameters for operations on a class: We make use of complex groupings of events in a technique that parameterizes and simplifies the number of events and operations you must contend with. Sometimes you can reduce the number of different operations in your classes by adding parameters to an operation on a class. We use events on state diagrams to help. For more on this see the section on “Objectifying your events” and “Parameterizing event hierarchies” later in this chapter.
-
Consider the sequence of behavior within an operation: You can use events of different types to better control the behavior of your objects. For more on this see the section on “Holding special events” later in this chapter.
Operating your events
The only way anything happens in an object-oriented system is to have groups of objects work together. To get your system to perform a task, one object calls another object—which calls yet another and returns a result. Then still another object sends a message to an object, and so on. Each of your objects does a small piece of the overall task.
Figure 17-1 shows the state machine diagram for the objects of a simple CreditCard class. The life cycle of a credit card starts at the large dot (initial state) and immediately moves to the Wait state. If the event charge(amount) arrives, then the instance goes into the Debiting state. However, if the event valid arrives, then the instance moves on to the Validating state. If the event expire makes its way to the object (instead of charge or valid), then the object moves on to the Expired state. (See Chapter 16 for more details on state machine diagrams and using events to transition from state to state within an object.)
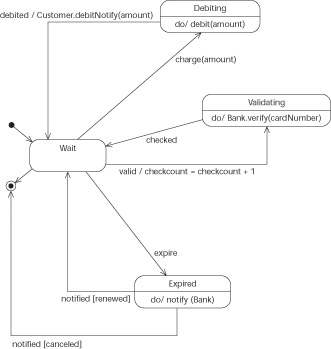
Figure 17-1: A state diagram for a credit card.
The event transitions (interruptions) that you place on a state diagram become operations performed on a class when you represent them in a class diagram. For example, when you send the charge(amount) event to an instance of the CreditCard class, that’s the same thing as sending a message asking that some amount be charged to a credit card.
Remember An event transition is the line that connects two states as a result of an event.
After you’re satisfied with the state diagram for the objects of a class, then you can create operations in the class corresponding to each event transition on the state diagram that defines those objects. We took several of the event transitions in Figure 17-1 and placed them as operations in the CreditCard class shown in Figure 17-2. The following describes what we did:
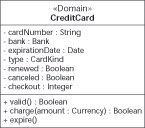
Figure 17-2: Class diagram showing events as operations of the CreditCard class.
-
Event valid: The valid event becomes valid(): Boolean. From the state diagram in Figure 17-1 you see that along with the valid event is an action to add one to the checkout value and then to invoke the verify operation on an instance of the Bank class. If the bank verifies that the credit card number is okay, the operation is done. The method code for the valid operation looks like this:
public Boolean valid () { checkout = checkout + 1; if (bank.verify(cardNumber)) then return (true); else return(false); }
-
Event charge: The charge(amount) event becomes charge(amount : Currency): Boolean. However, after the charge event happens, the credit card must debit some amount from the bank and once debited, the owner of the card or customer must be notified. The method code for the charge operation looks like the following:
public Boolean charge(Currency amount) { if not canceled then if(bank.debit(amount)) then { Customer.debitNotify(amount); return(true); } else return(false); }
-
Event expire: The expire event becomes simply expire(). When the credit card is told to expire, the Bank is notified. The Bank, in turn, notifies the card whether it’s renewed or canceled as a result of the expiration event. If the card is renewed, then the credit card goes back to its Wait state to wait for more valid and charge events. If the card is canceled, then it goes to its final state and is removed from the system. The method code for the expire operation looks like the following:
public Boolean expire() { String cardStatus; cardStatus = bank.notify(expired, cardNumber); If cardStatus == "renewed" then { renewed = true; canceled = false;} else if cardStatus == "canceled" then this.finalize // clean up for the java garbage //collector. }
Warning The code examples for the valid, charge, and expire operations represent just one way of designing the CreditCard class. If we’re dealing with asynchronous calls in a multithreaded environment, we could choose to implement the code in any of several different ways.
Objectifying your events
Modelers often run into the situation of having an object that receives so many events, that it becomes hard for you to get a handle on what is going on. For instance, consider the events that some relatively high-tech air-filter machines must deal with. The machine is set to on, off, or standby. Meanwhile the fan has a service limit. The air filter is notified when the fan has reached that time limit and needs replacement. A sensor tells the air filter whether the airflow from the fan is normal or too slow. The owner of the air filter can select one of several room sizes and fan speeds. The machine also has an ultraviolet light to kill germs—and that has a service life too. The really fancy air filters have motion sensors that send events to indicate whether dust is in motion in the room. Finally, the air filter has an air-quality sensor that sends events to the machine to help it control how long it should be running. (Confused by all this sending? We are.)
UML provides you with a way to make sense of this confusion of events: You can treat your events like classes and build a generalization (inheritance) hierarchy to organize your events. You see, events are really a lot like classes. Events have attributes called parameters. Events also have associations, which relate the event to the class that sends it—and to the class that receives it. When you treat an event like a class, you use the «signal» stereotype.
Figures 17-3 and 17-4 show what is called an event hierarchy. To create an event hierarchy, treat each event like a class—and give them the «signal» stereotype. (Be sure to consider all the different kinds of events being sent to the AirFilter class.) To complete the process, follow these steps:
-
Group your related events and form a generalized event.
-
In the air-filter example, the on, off, and standby events become PowerOn, PowerOff and PowerStandby classes, each of which is a specialization of the PowerEvent class. We looked for other groupings and modeled them as FanSpeed, Airflow, MotionSensorEvent, RoomSizeSettingEvent, AirQualitySensorEvent, and ServiceEvent classes.
-
Continue grouping the groups if necessary.
The MotionSensorEvent and the AirQualitySensorEvent are both kinds of SensorEvent class. The FanSpeed and Airflow are both kinds of the more generic FanEvent class.
-
Group the most generic events under one class.
Finally, we grouped the most generic events under one class called AirfilterEvent.
Now you can use the diagrams in Figures 17-3 and 17-4 to see the structure of all those events. Seeing the structure of all these events allows you to check whether any events are missing or out of place.
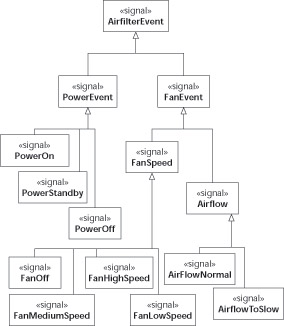
Figure 17-3: The first half of the air-filter-event generalization.
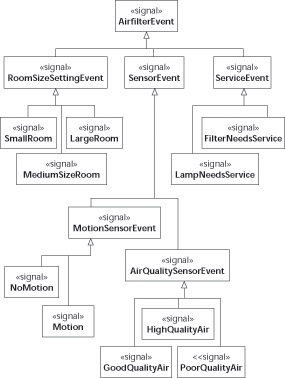
Figure 17-4: The second half of the air-filter-event generalization.
Technical Stuff Converting events into classes is a form of reification, which is the technique of taking something that isn’t an object of some class (in this case, an event) and making it into one. Now that we’ve reified some events, we can give them attributes, invoke their behavior, and even store them away in a database for later use.
Parameterizing event hierarchies
Parameterization is another payoff you can get from generalizing events. You can reduce the number of events by changing the lowest event classes in your generalization hierarchy into parameters that exist in the more generic superclass. Use this technique when you want fewer events to deal with. Transforming events into parameters in a superclass reduces their complexity, making them simpler and easier to program.
Figure 17-5 illustrates the results of using the following steps to parameterize your event hierarchies:
-
Identify the classes you want to turn into parameters.
First locate the leaf classes in your hierarchical tree of events. Leaf classes are the classes at the very bottom of the hierarchy that have no subclasses below them. Select all the leaf classes that can make up one superclass in your event hierarchy.
For example, PowerOnEvent, PowerStandby, and PowerOffEvent are leaves in the event hierarchy shown in Figure 17-3. Each of these classes is a subclass to the PowerEvent superclass.
-
Identify the superclass.
Select the generalized superclass of the leaf classes selected in Step 1. (See Chapter 6 for more on superclasses.)
The superclass chosen is the PowerEvent class.
-
Create an enumeration class.
This is a class with the «enumeration» stereotype. Its attributes hold values of a particular datatype used in some other class. In this case, your enumeration class holds each leaf event as an attribute.
In the air-filter example, you would create a new class called PowerKind, give it the «enumeration» stereotype, and give the class three attributes—on, standby, off—corresponding to the three leaf classes chosen in Step 1 (which they now replace).
-
Add an attribute to the superclass.
Add an attribute to the superclass you chose in Step 2. This attribute’s datatype is that of the enumeration class you created in Step 3.
In the air-filter example, you would add the power attribute to the PowerEvent class. The attribute has an initial value of off, and the UML notation for the attribute looks like this:
- power : PowerKind = off
-
Add a set operation to the superclass.
Add an operation to set the value of the attribute you added in Step 4, placing it in the same superclass.
In our example, add the setPower operation. The UML notation looks like this:
+ setPower(p : PowerKind)
-
Add multiple parameters.
You can have a superclass whose attributes include more than one parameter. Just follow Steps 1 through 5, but place the attributes and operations in the superclass of the superclass.
The FanEvent class has two subclasses FanSpeed and Airflow. These classes, in turn, have subclasses that can be parameterized. The FanEvent class ends up with two attributes fanSpeed and airFlow.
The event-generalization structures shown in Figures 17-3 and 17-4 can help convey an understanding of all the events that effect one complex class such as an AirFilterUnit class. This generalization process helps you categorize your events. Finally, to simplify the diagram, you change those event classes into parameters in a superclass. Figure 17-5 shows the result of this process: an AirfilterEvent superclass with only four subclasses.
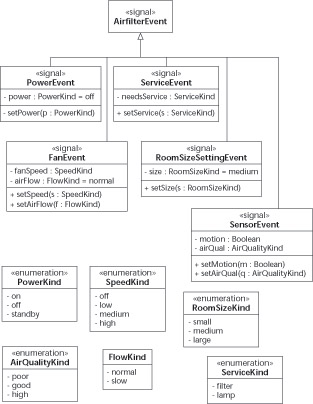
Figure 17-5: Parameterizing some air-filter events.
Tip If your classes must handle a lot of events, another common technique for implementing them is to specify an operation such as handle(event). Instead of having one operation for each event (as in Figure 17-2), you can have one operation that handles all the different events. For the Airfilter class, for example, you can provide the operation handle(event:AirfilterEvent).
Holding special events
Remember An event is a moment in time when something of importance happens. Events stimulate an object to make a transition from one state (of performing some behavior) to another state (with different behavior). When the new state is attained, the transition caused by the event is complete; event transitions are what happens between states.
Sometimes you want your events to occur during an object’s state. These special events are shown inside the rounded rectangle that represents a state:
-
Entry events: Every time your object changes state and starts a state, an entry event is generated. This is the moment in time when your object “enters” the state before it starts performing the behavior of that state.
-
Entry actions: The action associated with each entry event—the entry action—is performed as soon as your object enters the state that includes this action. Entry actions are small chunks of behavior (like normal actions); what’s different is when they occur. (See Chapter 16 for more information on actions.)
-
Notation: Inside the rounded rectangle that represents a state, place the word entry followed by a slash (/) followed by the entry action.
-
-
Exit events: Every time your object receives an external event and must change state, an exit event is generated. This is the moment when your object exits its current state, before it performs any actions associated with the external event that made it exit.
-
Exit actions: The action associated with each exit event—the exit action—is performed just before your object exits the state that generated the action in response to the external event.
-
Notation: Inside the rounded rectangle that represents a state, place the word exit, followed by a slash (/), followed by the exit action.
-
-
Internal events: If you have an event-and-action pair that occurs inside a state, you may have an internal event.
-
No entry or exit actions: This type of event does not cause the object to exit the existing state. Nor does it cause a reentry into the existing state (which would trigger an entry action).
-
Notation: Inside the rounded rectangle that represents a state, place the name of the internal event, followed by a slash (/) followed by the action that your object should perform if the internal event occurs.
Tip You can model queries as operations (requests for information from your object) that generate internal events.
-
-
Deferred events: Sometimes you want to defer event actions—keep them from occurring until later. Such deferred events are recognizable as events that can occur while an object is in a particular state, but the execution of any associated action is specifically blocked for now. The notation for this type of event is to place the name of the deferred event followed by a slash (/) followed by the word defer inside the rounded rectangle that represents a state.
Figure 17-6 is a partial state diagram from the customer-account example that we used at the beginning of this chapter. The figure illustrates entry, exit, internal, and deferred events. On entry to the Validating state, an instance of CustomerAccount performs the entry action by sending the valid event to a linked instance (theCreditCard) of the CreditCard class. Upon exit from the Validating state, an instance of CustomerAccount performs the exit action by setting its own internal attribute, dateOpened, to today’s date. If the deferred event statement should be received while an instance of the CustomerAccount class is performing the do activity (in this case, wait for validation), then the statement event is deferred to another state (OnTrial) that does not defer the statement event. The OnTrial state handles three internal events: statement, withdraw and deposit.
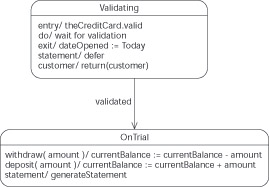
Figure 17-6: Events inside states.
Other events you can use in special situations to model events between states include these:
-
Completion transition: A completion event is generated when all entry, internal, and do behaviors within the state are complete. If the state is connected to another state by a transition that has no label, then the object automatically makes a transition to the state that comes after executing any exit action. Completion transitions used to be known as automatic transitions in earlier versions of UML.
-
The when event: Use this kind of time event when your object must be notified of a precise moment in time. The notation for a when event is the word when, followed by the required absolute time condition (placed in parentheses).
-
The after event: Use this kind of time event when your object must be notified of a relative moment in time. The after event begins after your object enters a specified state. The notation for an after event is the word after, followed by the required relative time condition (placed in parentheses).
Figure 17-7 shows you examples of a when event, a completion transition, and an after event. Here’s how they play out:
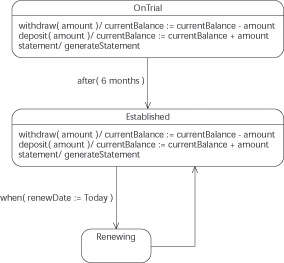
Figure 17-7: Other special events outside states.
-
The after event: Six months after an instance of the CustomerAccount class enters the OnTrial state, the instance stops any do activities and makes a transition to the Established state.
-
The when event: When the renewDate attribute of an instance of the CustomerAccount class is equal to today’s date, and the instance is in the Established state, then the instance stops any do activities and makes a transition to the Renewing state.
-
The completion transition: After the renewing behavior (not shown) is finished, an instance of CustomerAccount follows the completion transition and automatically goes back to the Established state.
EAN: 2147483647
Pages: 193