Perimeter Traffic Filtering
| The original function of a security appliance was to filter traffic originating from a less-secure network, such as the Internet, and destined to the private inside network of a device. The ASA/PIX implements this default behavior in the following way, presenting a strong security posture:
This default behavior ensures that when an ASA/PIX is first installed, the private secure network is fully protected from attacks that might originate from the Internet (outside network). One of the only possible attacks that could be launched from the Internet against an inside host is a TCP hijack attack. However, this is unlikely because it would mean that an attacker randomly found a TCP stream and decided to pose as the target device. The most damage that a hacker could probably do in this scenario is to send a Trojan back to a host as a web response (which is essentially the same thing that websites do to inject spyware and adware). The defense for this isn't actually in the security appliance; the defense is in host intrusion prevention (CSA) and antivirus software. Because of the work already completed in Chapter 5, "Deploying Secure Internet Connectivity," Chapter 6, "Deploying Web and Mail Services," and Chapter 7, "Deploying Authentication," there is very little if anything you need to do as far as setting up additional filters on your security appliance. To gain an understanding of how to set up access rules, in this chapter, you will go into the appropriate panels but not make any additional changes to access rules. You will now step through an exercise on how to create a new access rule on your ASA/PIX Security Appliance using ASDM. Just to be clear, access rules are known by several different names, depending on the vendors with whom you are working or the books and articles that you read. Don't be confused, because all of these terms are used interchangeably:
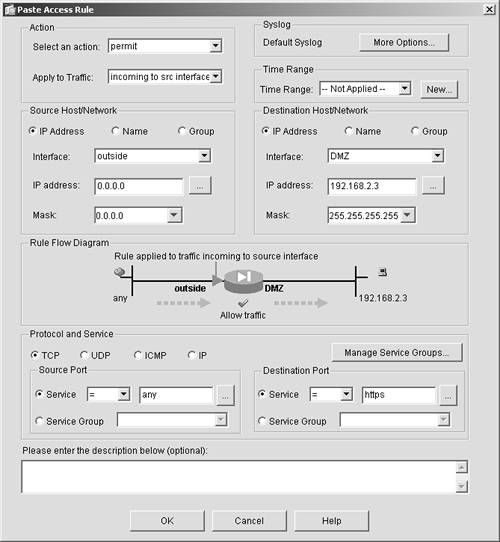
All these terms mean essentially the same thing. The term most commonly used in the past has been access lists, but the terminology used in ASA/PIX version 7 with ASDM is access rules. This step-by-step procedure instructs you on how to open a port to allow Secure Sockets Layer (SSL) traffic from the Internet to the web server on your security appliance's demilitarized zone (DMZ) interface. CAUTION As a matter of security best practice, if you are not using HTTPS on your web server, delete this rule when you have completed the exercise or take care that you don't click Apply when you have finished the steps.
The procedures that you have just stepped through are the same for adding or deleting any access rules on your ASA/PIX Security Appliance. Be very careful to make sure that you have chosen the proper interfaces and IP addresses for the source and destination of the access rules. The best-case scenario is if a rule is misconfigured, no traffic will pass through the security appliance. The worst case, however, is that you will have opened a security hole that can be exploited and your inside hosts or services might be compromised. |
EAN: 2147483647
Pages: 120
- An Emerging Strategy for E-Business IT Governance
- Assessing Business-IT Alignment Maturity
- A View on Knowledge Management: Utilizing a Balanced Scorecard Methodology for Analyzing Knowledge Metrics
- Technical Issues Related to IT Governance Tactics: Product Metrics, Measurements and Process Control
- Governance in IT Outsourcing Partnerships